The Vectric community is made up of many people from all around the globe but thanks to the internet we are able to be inspired by your work no matter what corner of the world you are from. This is definitely the case for this month’s customer case study, Peter Passuello, who lives on the West Coast of New Zealand’s South Island. Peter is a hobbyist craftsman that shares his skills and projects through his YouTube channel CNCNutz which is where we discovered his amazing work. We asked Peter if he could show us how he uses Aspire and his CNC machine within his workflow; but before we get to that we wanted to ask him about his background and how he was introduced to the CNC world…
CNC is a hobby for me and I like to share my CNC adventures via YouTube. By day I'm a telecommunications technician which gives me a good grounding in electronics which is helpful in this hobby.
I discovered CNC about 15 years ago, I saw a picture on the internet of a DIY CNC machine and was amazed that something made from MDF and run by a computer could be made by the home enthusiast. It never occurred to me that I could ever make or own one of these machines but I never forgot. In 2006 I saw another picture of one and decided to give it a go and so built my first machine from steel and skateboard bearings. It only had an 8" (200mm) square cutting area but it worked. I bought PhotoVCarve and spent a lot of time making lithophanes and 3D carvings. I was hooked and built myself a bigger machine - having learned the lesson that building from plans is better than designing on the fly from a photo. The new machine was bigger, faster and only served to fuel my desire for an even better machine.
So, two years on at the beginning of 2008 Joe from JoesCNC.com released his plans for the Hybrid 4x4 and I immediately bought the plans and built my machine. Because I live in New Zealand, I couldn't get many of the parts I needed so I modified the plans to suit what was available here. The final result was a machine that looked like a standard hybrid though a little smaller due to the size restrictions in my workshop. It has worked a treat for me over the years and I'm now in the process of upgrading the machine to an all metal construction.
With regards to customising my machine I recently changed the Y Carriages on it to a steel and aluminium construction not because I am dissatisfied with what I have but because I want to design something of my own. A machine that can be built with minimal tools but be solid and run well. I did a small video series on the upgrade as well as making a rotary axis for the machine and adding a Laser as well. My favourite addition is the Autozero touch off plate. The modified script allows the reference point to change from the top of the stock to the table surface at will for accurate cutting; without having to worry about actual material thickness variations.
For software I have used PhotoVCarve, Cut3D, VCarve Pro and more recently Aspire. Over the years I tried many different software packages but once I got VCarve Pro 9 years ago, I never looked back. When I first started “CNCing” Vectric software was the first one I came across that didn't look like I needed an engineering degree to use and being new I wanted something that would “WOW” friends and family and be easy to use. I bought PhotoVCarve and had a ball creating projects. I liked the fact I could create a picture without the need to learn 3D modelling or any artistic skill at all.
There are aspects in and out the software that I think are great about Vectric. Firstly, the ability to design a project using the built in easy to use CAD tools make it great software. Then moving onto the CAM for the machining with the 3D render of the finished project, it’s a pleasure to use. Secondly, the ability to upgrade from one package up to the next for the price difference between the two instead of buying the new package at the full price is amazing. It allowed me to start as a small hobbyist and as my experience grew and need for more tools came along, I could upgrade instead of having to buy the top product from the start – it’s really fair how I only pay the difference in price to upgrade.
It’s really evident to see that Peter’s electronics background has enabled him to create bespoke CNC machinery for his workshop so he can start his journey into his new-found hobby. Like we said at the start of this article, Peter’s work caught our eye as we were on YouTube and as you can see it looks amazing. We asked him if he could tell us how he made this 3D based project…
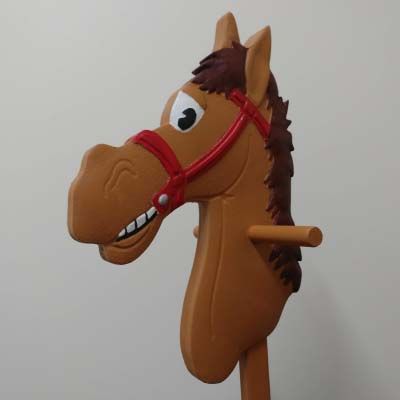
Several years ago, I made some Hobby Horses using a 3D model of a horse’s head I had and used it in a similar fashion but didn't video the process. I wanted to make another but this time with my own 3D model. With the 3D tools in Aspire I was able to create a horse’s head that I liked and away I went.
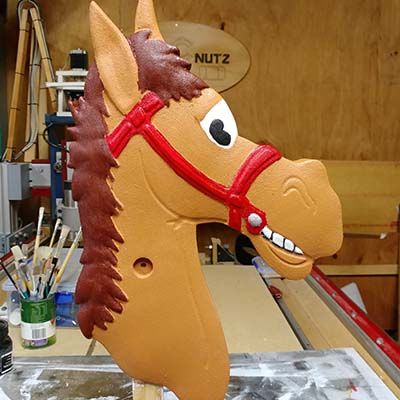
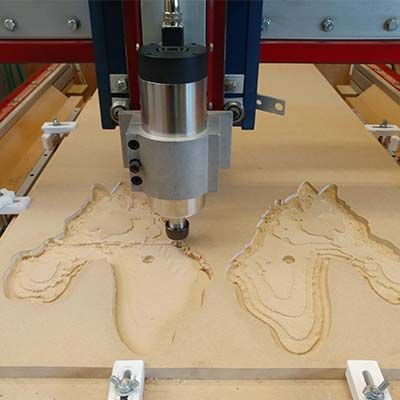
Creating the model was surprisingly quick and over a couple of evenings I was able to create the model and refine it until I was happy. The 3D modelling feature of Aspire for this project was invaluable. I have always dreaded 3D modelling but having done one now I can better see the process. I thought the most interesting part of the 3D modelling process was not the 3D process itself but the making the 2D files to base the 3D parts on. If you spend the time to get the 2D elements right then the 3D is much easier. My favourite feature of VCarve and Aspire is Moulding toolpaths. It has allowed me to create a 3D cut with minimum effort. It is a very useful tool. I know with more experience I could do it much quicker and better but for a beginner I was happy with slow and steady. Overall it took about 4 hours to cut out all the parts and assemble. Finishing, priming and painting took another 2 hours over 2 nights waiting between coats for them to dry.
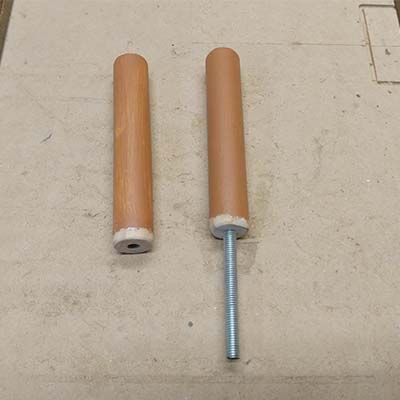
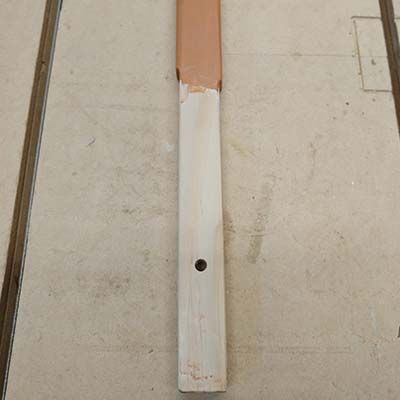
For the materials I used 18mm MDF for the body. Pine for the stick and 18 x 25mm pine from my local hardware store cut to a length that suits the user. In my case 1200mm, but I had to round over the edges and thin the stick to ensure a nice fit with the body. This is easier to do before the head is glued up. Also, most importantly a piece of 6mm threaded rod 100mm long.
This project surprisingly didn’t require too many tools. I used a 1/4" down cut for the rough cut 100ipm at 10000rpm. A 3mm ballnose for the final cut 300ipm at 100000rpm 10% cutover and a
1/8" for the profile cut 100ipm 10000ipm.
Even though I love creating this on my CNC for this project the painting of the horse was the best part. You can cut the same model over and over but once it is painted it will take on a life of its own. No two will be the same. With different colours and horse can look completely different. You can prime the finished model and give it to someone to create their own personal horse. This reminds me, a top tip for folks using MDF. Prime MDF before painting. It soaks in to the cut MDF and hardens the surface. Shellac works well and dries very quickly but still paint with a white primer before applying the colour. I find that paints look so much better over a white primer than direct onto MDF. The primer I used is water based but still works well.
For a first time 3D modelling project we can quite easily see that this was a success for Peter. We would like to take this opportunity to thank Peter for finding time to create and share this project and story for the Vectric community. Before we let him go we asked him what he had planned for the future…
I'm currently working on an electric bike build and will be machining a battery box to fit the bike frame. This is a long-term project I will be doing as time permits. I plan to continue making videos for my YouTube channel and creating more projects though I have nothing specific in mind.
Click here to explore Peter’s YouTube channel
Peter has been kind enough to give away his project files so that you can have go at creating your own hobby horse, to download the project files click here.

Vectric Ltd
Precision House
2 Arden Road
Alcester
B49 6HN
GB115123072
Privacy Policy |
Terms and Conditions


