For Tim, woodworking has been a lifelong hobby and passion and the decision to incorporate CNC technology within his well-equipped shop was seen by Tim as a natural progression.
Tim invested in his Shopbot CNC machine 8 years ago and soon required more sophisticated design software to tackle the projects he wanted to undertake. However, he became disillusioned with the lack of choice in the market, especially when it came to price as he explains;
“I could not justify spending more money for software than the entire machine cost to begin with”
Fortunately Tim did not have to wait too long as Vectric was soon to release its first product ‘VCarve Wizard’ (now VCarve Pro);
“Then Vectric appeared with their initial V-Carve Wizard software and everything turned around for me. Since then I have moved up through their products and currently use Aspire for everything.”
Since upgrading to Aspire Tim has been able to take more and more interesting projects, for work and for fun! This case study focuses on the latter and looks at how Tim used Aspire to machine 3D Shark models for his Grandkids.
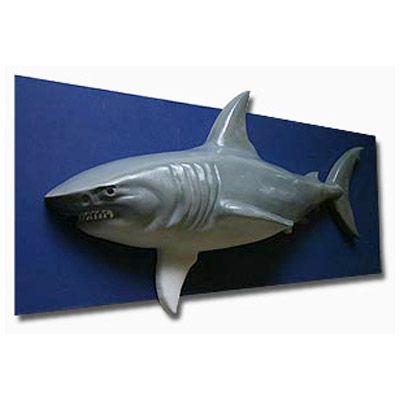
Inspired by another Vectric user who posted a 3D Christmas Camel project on the Vectric forum, Tim wanted to try something similar but new to him, as up until now all his work had been finished naturally. Although he could have designed and modeled the shark from scratch, he decided to check to see whether he had an interesting model to use in his 3D Clipart collection from VectorArt3D and found their 3D Great White Shark, knowing immediately that both grandkids would love to have one!
Tim’s aim was to create a big, impressive model that would pose problems if created out of wood, especially hanging from a wall, so he decided to try machining them in high density foam. I wanted it big and impressive, which in wood would have created something too heavy to hang on the wall as he explains:
“I needed to make two but decided to do one first and see how it went. Hoping to get both out of one sheet of 4' X 8' X 2" foam insulation sold at the local home improvement store”
Part layout and toolpath creation in Aspire:
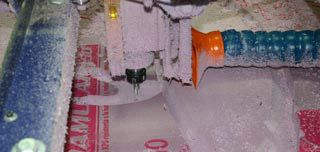
For this project Tim looked to use Aspire’s 3D Model Slicing feature to section the 4’ long shark into four 2” thick Z slices. The image on the right shows the initial layout and toolpath preview for the first shark.
To ensure the parts were held in place whilst machining Tim decided to include ‘hold down holes’ as part of the design to help fix the material to the CNC bed. These holes would be machined first so a drilling toolpath was created to take a washer head screw.
The next step was to create the roughing toolpath which removed large quantities of excess material quickly. After the roughing pass, the finish pass went fast and smooth. Tim decided to use a longer ball nose bit then he normally uses to give him a greater z clearance.
Finishing & painting
With the machining completed, as well as a lot of vacuuming, it was time to assemble. Wanting to use supplies that he already had, Tim glued the layers together using Titebond 3 glue, however Tim has started using a different method after the first shark as he explains;
“The glue worked fine and the shark is still in one piece, but has since read that the glue may not set up on the interior surfaces. Therefore, for the subsequent sharks, I have used a 3M spray adhesive and that is working great”
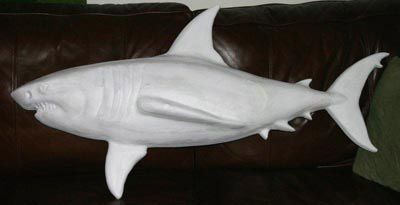
Here is a picture of the assembled shark after gluing the 4 layers together. Tim now needed to fill in and finish the rough edges and holes. Tim explains the method produced a great finish with cnc cut foam
“I found sanding easiest with sponge sanding pads. The 60 and 80 grits worked the best, and with the soft sponge base, they were not as aggressive as the grit number would indicate. I used the 60 for some final shaping and smoothing followed by a heavy coat of Zinsser's water based primer. After letting the primer dry, I sanded all surfaces using the 80 grit sanding sponge.”
To fill in the small holes Tim mixed some light joint compound with a little water to achieve a pancake batter consistency and used a foam paintbrush to cover the entire surface (after the initial coat of primer).
After using an 80 grit sanding sponge to produce a smooth surface and satisfactory surface, Tim applied a final coat of the water-based primer. After drying, the entire surface received a final sanding with a 120 grit sanding sponge and was finally painted in Gloss Smoke Gray to finish the top and bottom. After a couple of coats of the gray and white Tim used a small paintbrush to finish the eye and teeth with inexpensive acrylic paint available most everywhere.
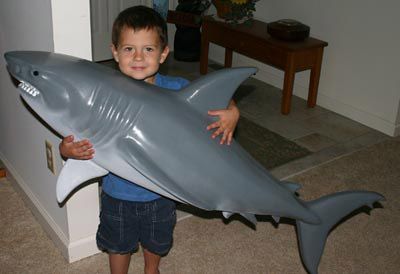
Tim told us that the sharks were well received by his grandkids;
“The first shark went to my two granddaughters. They were excited, but nowhere near as excited as my 2 1/2 year old grandson was. It took a while to get him to hold it for the picture, and he was not very excited about getting his picture taken, but this is what makes it worth the time and effort.”
For more information about the project, read the full thread on the Vectric Forum >

Vectric Ltd
Precision House
2 Arden Road
Alcester
B49 6HN
Registered in England Number 05382596
VAT Registration GB115123072
Privacy Policy |
Cookie Policy |
Terms and Conditions


