
David Glasco has been interested in woodworking ever since he was a young boy and even though he is a construction-engineer during the day, he continues his passion for woodworking as a hobby in the evenings and on the weekends. Until about two years ago, David carried out most of his projects using traditional wood carving techniques, but after experiencing limited success from trying a number of traditional methods for creating wood inlays, he stumbled across an article on CNC machines for woodworking hobbyist;
"One thing lead to another and after about 2 to 3 months of research I was ready to build my own CNC machine. I spent another 3 months building and tuning my machine. I had tried a couple of different type of computer aided manufacturing (CAM) programs before I tried the Vectric software. I first purchased the Photo V-Carve program and fell in love with the ability to carve an image into wood or Corian. Shortly after that I purchased V-carve Pro and begun exploring all its functionality with things such as incorporating photo v-carve into my project, making plaques & signs, It feels like I am only limited by my imagination. The ease at which I have been able to learn Photo V-carve and V-carve pro, to me speaks volumes about how well the software is designed"
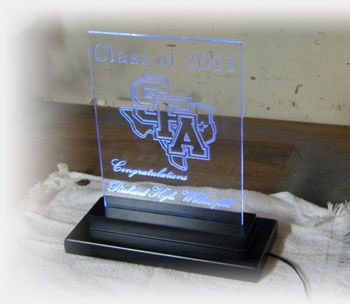
David’s latest interest has been carving of decorative designs into acrylic and using edge lighting to create a very visually appealing piece of art. David has been kind enough to step us through his method for creating these pieces. using one of his latest projects for a local school. Over to David…
Project Description:
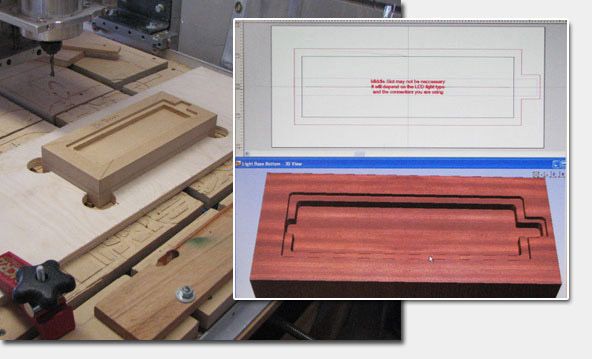
Light Panel Design and Tool path Setup
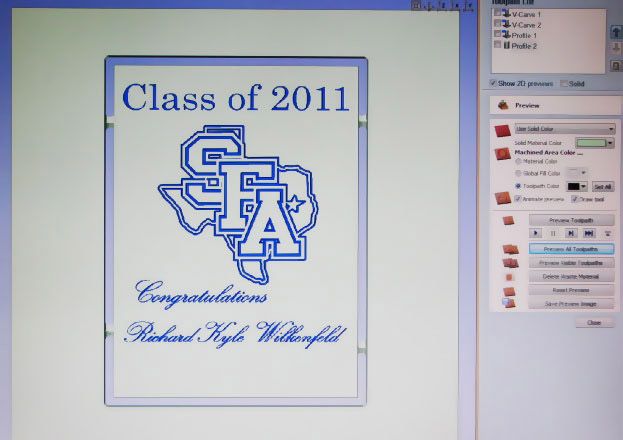
After deciding on the panel size in VCarve Pro I centred the shape within the 12" by 12" work space set up. I was then able to easily import a copy of the school logo as Jpeg file and use the trace bitmap tool to create the vectors suitable for engraving in the acrylic. The image was then placed into the panel and resized to fit. Next I added the text using the great text editing features, experimenting with several different fonts until I found the ones I liked. The beauty of V-Carve pro is that as long as you have the text highlighted you can run through the various fonts until you find one you like. In this panel I used two different font types to have some contrast but this is totally up to each person’s tastes.
After the panel was populated with the various text and vectors it was time to setup my tool paths. When setting up the toolpaths I extensively used the useful ‘preview toolpath’ feature to evaluated the toolpath on screen to determine which setting would give the best finish, For example I experimented with a 30 and 60 degree engraving bits for the logo and text. I ended up selecting the 60 degree engraving bit for both the text and logo; however, for the logo I selected a profile tool path set to a cut depth of 0.05". For the text I chose the V-Carve/Engraving tool path with a start depth of 0.02" and a cut depth of 0.05" The total calculated machine time to engrave and cut out the panel was slightly under 23 minutes.
Light base Manufacture
Step 1 - Light Panel Base Preparation
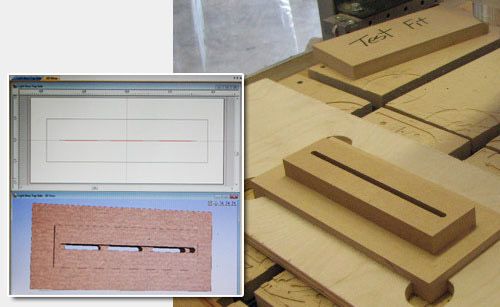
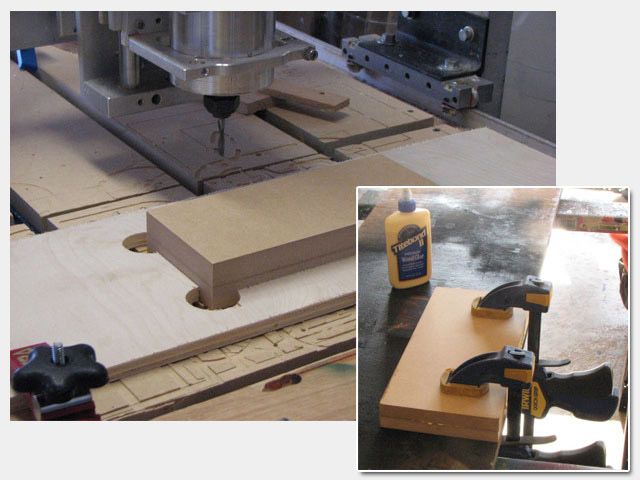
For this project I glued two pieces of ¾-inch MDF together and then cut the base to the required dimension(in this example 9” x 4”)using my table saw. Once the glue has dried and my base is cut to the correct dimensions, I then use VCarve Pro to mill the bottom and top of my light base. Helpful hint: make yourself a jig with a scrap of wood or MDF. This will allow you to mill the bottom, and then easily turn your base over and mill the top and all your machine setting should be the same for the X, Y & Z coordinates.
Step 2 – Milling the Light Base Bottom
I placed MDF block into my prefabricated jig and then after setting X, Y & Z coordinates I used a 0.25 inch spiral up-cut end mill in my CNC machine to carve out the pocket for the LED lights and associated wiring and for the bottom cover panel. You need to ensure that the pocket depth is sufficient to house your LED lights and wiring as well as the 1/8 inch bottom plate cover. You will notice that the light base I made has a groove that extends past the original pocket, this was necessary to house the particular type of LED light I chose as well as the wiring harness.
Spindle Speed: Approx. 18000 - 23000 rpm
Machine speed: 45 inches/min. (max. for my home built cnc)
Plunge Rates: 15 inches/min.
Step 3 - Light Base Top
After milling the bottom of the base I then removed the base from the jig and turned it over and re-secured the piece in the jig, ready to mill the top portion of the base. It is really easy to customize this type of design but the most important thing to remember is to secure the LED lights in their slots. The acrylic material used on this design is approximately 0.23 inches thick and the slot is 0.25 inches wide which makes for a snug fit for the acrylic panel. I used two different router bits for the top, a 0.25 inch end mill to cut the slots and to cut out the pocket and 0.375 round over bit to round one edge of the top of the base. The bottom cover plate was cut from a piece of 0.125 inch plywood with a 0.25 inch end mill.
Spindle Speed: Approx. 18000 - 23000 rpm
Machine speed: 45 inches/min. (max. for my home built cnc)
Plunge Rates: 15 inches/min.
The Acrylic Light Panel
Step 1 - Acrylic Light Panel Preparation & Setup
There is a lot of differences in the acrylic panels one purchases at, say, a home improvement store versus some of the acrylics you can order from a plastic supplier. No matter where you get your acrylic sheets, there are steps one can take to minimize scratches in the materials during handling and machining. After obtaining the acrylic material I wrap it up in a towel to minimize any scratches in the materials before I actually use the acrylic. When I am ready to use the material, I first lay out a towel or something soft on the work bench to lay the acrylic on. The acrylic panels usually come with a very thin plastic cover and I have found that this factory cover is inadequate protection against scratches. I remove the thin plastic and replace it with a heavier duty stencil film (I use Oramask stencil film 813). I repeat the same procedure for the both sides of the panel.
I ensure that before placing the acrylic on the CNC cutting table the bed is clean and free of particles left over from previous projects. I have an old microfiber cloth that I lay on top of the cutting table and then I place my acrylic sheet on top of the cloth. I then securely clamp the acrylic sheet into place (note: if the area you are clamping will be part of the visible light panel, cut a small piece of fabric or felt to place between the clamp the surface of the acrylic material to minimize scratches). Now you are ready to cut your acrylic.
Step 2 - Milling Acrylic Light Panels
What I found was cutting acrylic is a lot different than cutting wood or Corian. The problem with cutting acrylic is that if your machine doesn’t move very fast (like mine) you will need to slow your spindle speed way down or you will end up melting the acrylic material. The speeds and feeds I use varies depending on the type of materials I am using. The ballpark starting point would be spindle speed of about 6000 to 8000 rpms with my CNC machine cranked up to 45 to 50 inches per minute.
My recommendation is practice with a couple of pieces until you find your own sweet spot with your machine. While you are practicing cutting the acrylic, keep an eye on your engraving bit for any acrylic material that is melting and sticking to the tip of the bit. You may have to stop and start several times to clean the bit and adjust your feeds and speeds accordingly.
I use engraving knives I purchased from Toolstoday.com. You only want to use single or double fluted engraving bits when engraving acrylic. For cutting shapes in the acrylic materials, I use Solid Carbide Spiral 'O' Flute, Plastic Cutting Up-Cut & Down-Cut Router Bits. Just remember the more flutes your bits has the less likely it will work on the acrylic materials.
It may be necessary to make more than one pass when you are engraving the acrylic. Again this may depend on your project complexity, depth of cut etc. In this example I probably made three passes for everything engraved on the front of the panel.
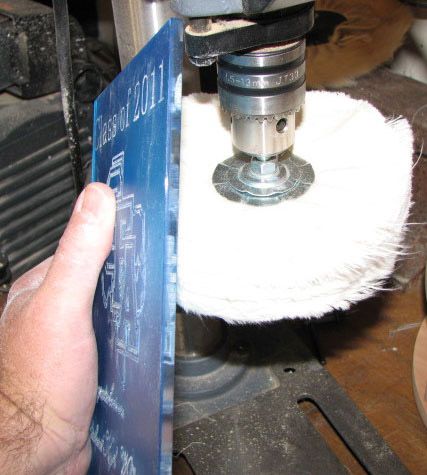
Step 3 Finishing and polishing Acrylic Light Panel
If you are very careful with your acrylic piece most of your efforts during the buffing and polishing will be concentrated on the edges. There are two basic methods: 1) Sanding, buffing & polishing or 2) Sanding and flame polishing. For this project I chose method 1, and sanded the edges with 100, 150, 220, and 320 grit sand paper (Note: I do not remove the stencil film until I have the edges ready for polishing).
After sanding the outside edges, I then buff these edges using a buffing compound that is made for plastics before I remove the stencil film from the front and back of the panel. I then proceed to buff the entire panel front and back. Once the buffing is completed, I use a polishing pad with some plastic polish.
Step 4 Installing Components
First I drilled a hole into the side of the base to feed my wire to the LED lights. I centered each of the individual LED modules over the slots that were cut through the top of the base and used hot glue gun to hold them in place. Next I installed bottom panel with four small craft screws and fixed four adhesive corner pads to the bottom of the base. Now you are ready to install the acrylic panel and turn on the lights.
The acrylic panel is in truth fairly simple for just about anyone to make and a nice gift for any occasion. Overall, the Vectric software made design and fabrication of this project very simple.
List of Materials used:
¾” MDF
12” x 12” acrylic panel
Wood glue
LED lights
Led Light power source
Spray Primer
Spray Paint
Sand paper
Buffing & Polishing Pads
Buffing compound (made for plastic)
Polishing compound (made for plastic)
Glue gun & glue stick
Craft screws
Router Bits used
Vectric Ltd
Precision House
2 Arden Road
Alcester
B49 6HN
Registered in England Number 05382596
VAT Registration GB115123072
Privacy Policy |
Cookie Policy |
Terms and Conditions


