For this month's case study we talk to James Booth from CeorfanWorks (Ceorfan is the old English word for cutting or carving). A number of you may remember James from his time at Vectric or previous to that from him co-founding Vector Art 3D. Even if you didn't meet James at one of the User Group Meetings you'd have probably heard his voice on the training videos... James left Vectric at the end of 2016 to pursue his desire to make things himself with a CNC rather than teaching others how to. We caught up with James recently to discuss a project he was involved with last year to replicate a very ornate carved mantelpiece.
We started by asking James for some background on his workshop and CNC choice...
"I have the good fortune to share a space with a local company 'Thomas Philpott Cabinet Makers' - Tom and I met a while back when he made a built-in desk for my house. At the time we had chatted a lot about CNC and his interest in it and so when I left Vectric I thought I would ask him if he'd rent me some space in the barn where he has his workshop, thankfully he thought that was a good idea. We spent a number of cold weekends clearing out the mezzanine floor then we built an office to do computer work and set up an area for the CNC, my material storage, and benches for assembly and finishing. Sharing the space has been great as I get access to a whole workshop of professional woodworking tools (table saw, jointer/planer, thicknesser, spindle moulders etc.) and Tom gets access to the CNC to have me make parts for his projects."
"In choosing a CNC machine I had the same challenges that most will be familiar with, balancing budget with size, rigidity, spindle or router etc. As the CNC is the focus of what I'm doing I decided to get a small but robust model and also wanted to support local manufacturing by buying from a British company. After some research this led me to Exel CNC and after a visit to their factory for a demonstration and realising how well engineered the machine was I choose the SL6090. I deliberately picked a fairly compact machine (600 x 900 mm - approx. 2 feet x 3 feet) as I knew I did not want to get side-tracked cutting sheet goods and instead stay focused on carving. For the configurable options I chose a 3hp Elte Spindle, 150mm Z-travel, vacuum hold-down, Z-zero touch-plate and M8 bolt locations for clamps when the vacuum is not suitable. I've been extremely happy with it so far having used it to create a large variety of work."
Having established some information about James' setup we asked him to tell us about how the Mantel project came about...
"Tom has done a lot of work for a client in a 400+ year old property, creating some fantastic interior spaces including a small two-story library. In one bedroom where a significant amount of work had already been done, there was a very plain fireplace and they had been trying to decide what to do with it that would fit in with all the other more ornate work in the room. The client had mentioned how much he liked a mantel he had in another room of the house and so Tom asked me to take a look at it and see if we could replicate it in the space in the bedroom."
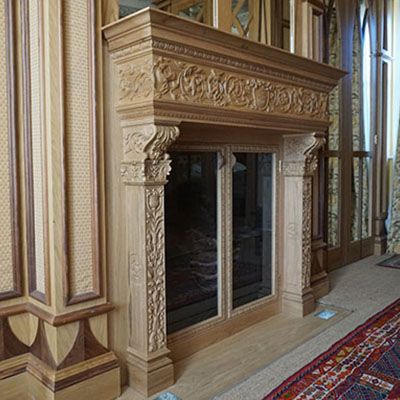
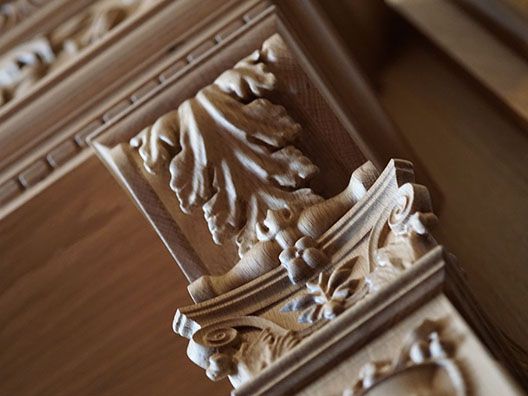
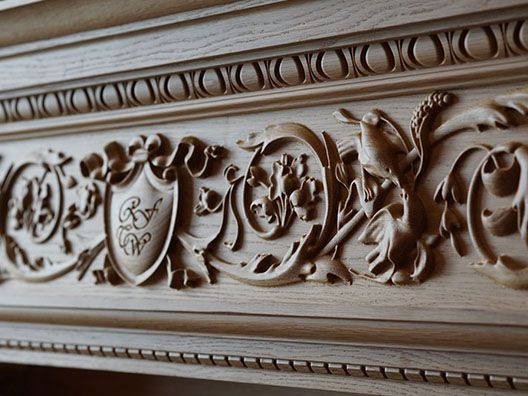
"The original mantel was carved in the 1700's and as you can see in the image it has a lot of features with a long wrap-around frieze, strips of egg and dart, a dentil type section, vertical carved columns, capitals, corbels not to mention a lot of shaped straight mouldings. Looking at it though I realised I could break it down into its component pieces, work on the models in Aspire for each section then put them together as needed to create all the finished pieces. Having persuaded myself it was doable I agreed to work on it although I did not promise when it might be completed... especially as I was not working full time in the workshop last year."
We followed up with James by asking where you make a start on such a complex project.
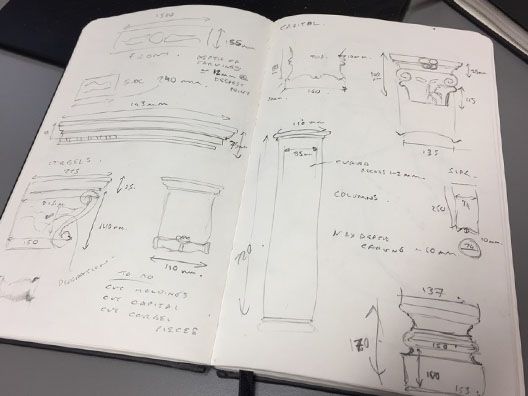
"With something like this you really need to just plunge in and start working on it. The first thing I did though was to measure all the components of the original mantel and take a lot of photographs that I could load into Aspire to use for reference to draw vectors over. As well as taking straight-on images to sketch over I also took a lot from other angles as this helps when trying to decipher shapes when replicating an existing object."
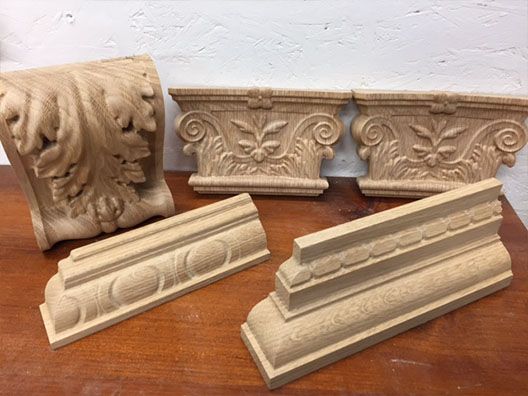
"Once I knew as a whole what I was aiming towards I broke it down into parts I could work on individually and made some notes on the order I would work on them. Typically for a project like this I'd look to make some progress on modeling a few of the parts so I can make some maquette style carvings. These are incredibly useful to determine whether the model needs adjusting and also how you might put together more complex items like the corbels and capitals. They also make good samples for the workshop or as a gift for the client to show the work in progress - almost like carved sketches."
"I wanted to get to grips quickly with the main carving on the mantel as it is the most involved item, both in terms of modeling time and carving work, so I figured that was a good place to start. To reduce the chance of the shapes being distorted by the camera I took close ups of small areas and worked on the models for these individually before combining the resulting 3D components into a full size model of the whole frieze. This also included the pieces that wrap around the sides of the mantel as they needed to continue from the front. For the main decorative panel the focal point is the shield in the middle so I started with that and worked outwards, slowly building up the design. After I'd created part of this I cut a sample (maquette) to get a sense of how the depths of the model were working at real size in the right material (oak). I realised I wanted to create more definition after looking at my test cuts so started to increase the depths of the models I was building and also add some base height to the shapes to further define their silhouette."
"After the main carving I also modeled the vertical columns, the capital, corbel, egg and dart and some of the other decorative moulding profiles. All of these were cut as small samples again to check fit, assembly method and aesthetics."
Clearly on a job as complex as this there must be a lot of 3D modeling so we asked James to summarise his use of the software in this area.
"The modeling process was slow but steady; I did not use any particular tools but just took my time to draw all the appropriate vectors over the imported photographs of the original and then used these to build up basic forms with the shape editor or two-rail sweep. From there it was a lot of sculpting in the software to provide a more natural look and to blend parts together. There was also a lot of cross referencing images to ensure I was closely following the shape of the original carving. In total I had around 80 hours of computer time on the project although this included both the modeling and later creating the toolpaths."
"Once I'd got the majority of the mantel modelled in the software and had a good idea how I was going to carve everything I loaded all the separate pieces into a single model - just for visualisation. This was helpful when I sat down with Tom to discuss how he would like to construct it and when we made a material list so he could order the oak and start prepping all the boards. At this stage we also decided that instead of using a spindle moulder to cut the standard extruded style mouldings that I would aim to cut every single component using the CNC. Some shapes would have probably been more easily made using traditional shaped knives but we figured this would be a good exercise to see just how the CNC might be able to create all the parts and ensure a perfect match to the original."
"While waiting for the material to come into the shop and be prepped I went through and tidied up all the models and got them to a finished state and created toolpaths in a way that I could easily edit for final cutting when I knew all my finished sized pieces of material."
We asked James to continue by describing how the toolpath creation and execution went and also to describe the finishing and assembly process.
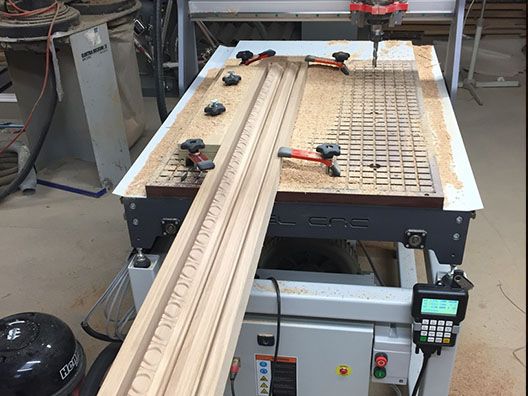
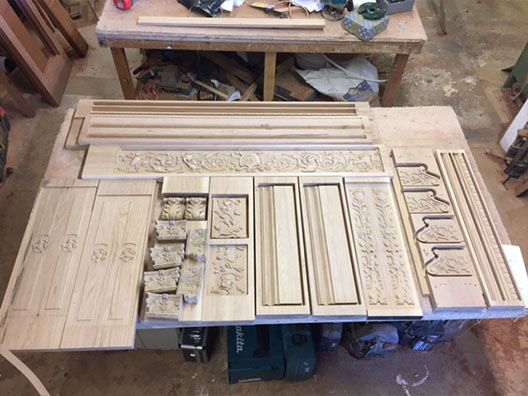
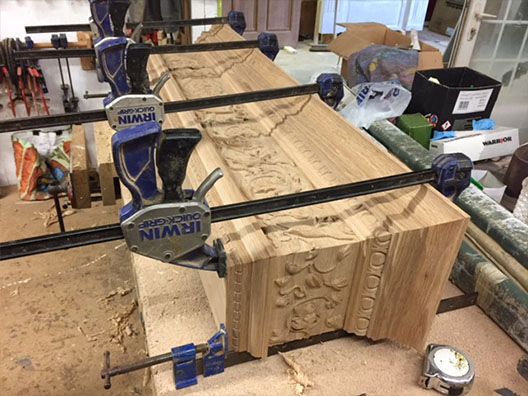
"The parts were all carved over a three week period; pretty much just working through one board at a time then as the previous one carved I finalised the toolpaths for the next piece of material. As I'd done a lot of prep-work in the design stage most of the carving was pretty straight forward and used a combination of 1/4 or 1/2 inch end mills for roughing and 1/4 inch or 1/8 inch tapered ball noses for finishing - depending on shape and detail. I work in what my friend Bill Young calls "minches" - sizing everything in metric but using inch tooling and toolpath parameters - it's not ideal but works for me. Thankfully Vectric software is really not bothered mixing the two like this. I also used the moulding toolpath for the straight shaped sections - it's a much more efficient way to cut these shapes and gives a great finish."
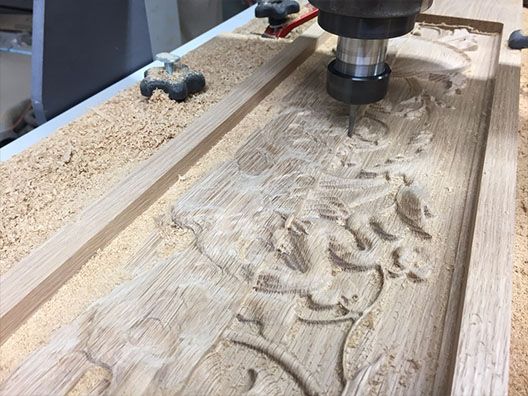
"There was one quite challenging aspect in toolpathing this mantel as the longer pieces are almost 1.4 metres (4-5 feet) and my machine is only 900mm (3 foot) long. These pieces had to be carved out of a single piece of material though so had to be partially cut, then the material pulled through and the rest cut accurately enough so the join between the toolpaths was invisible. To do this I used Aspire's ability to "Tile" a toolpath. This meant I created the full size carving, and then told it I wanted to divide it into 750mm tiles. Once you do this it saves two separate files for each toolpath, you run the first set and then accurately position the material along the machine bed by moving it through 750mm and then cut the second set of toolpaths. If you measure it very carefully and also ensure you keep it straight this works seamlessly (pun intended). To help me keep the parts inline as they were pulled through I made a jig out of some MDF that I bolted into the M8 threads I have built into my CNC's work table. I did test this one some of the smaller, simpler long pieces before trusting it to the 10+ hour carving of the main decoration. It worked really well, occasionally I got a very small discrepancy but this was small enough it was easily blended out with some light sanding."
"In all there was around 60 hours of machining to complete all the separate pieces for final assembly. As other parts were cutting I would go over the parts I'd previously cut with a small diamond ball tool in a Dremel to clean up the fuzzies which you tend to see on oak and also to add undercuts on things like the acanthus leaf on the corbel. I also did some sanding at this stage too although most things came of the machine with a pretty good finish."
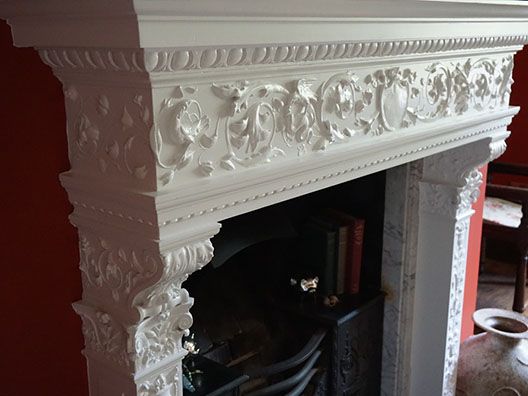
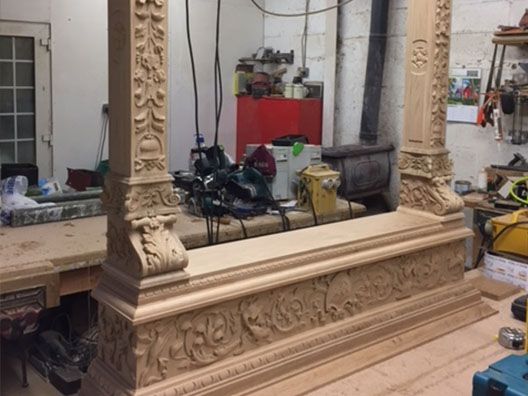
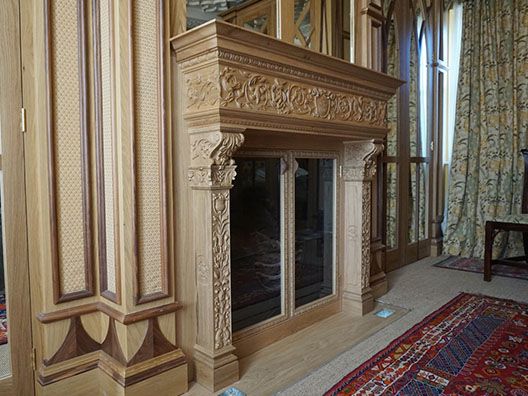
"I finished carving all the parts around the end of September 2017 (at this stage it had been around 4-5 months since I first took the photos and agreed to work on it)... Then there was a couple of weeks before it could be scheduled into the workshop for assembly. From the middle of October we slowly started putting the mantel together. We basically created three sub-assemblies, the top horizontal part being one and then the two columns the other two. The columns included the corbel and capitals too. This meant we could work on gluing up one part, and then leave that to dry while we worked on the others. By no means were we full-time on putting it together and there was probably a few days actual work spread out over a month or more. Some of the assembly was quite challenging as you can see from the photos but eventually we had it all put together. An unforeseen addition to the project was the fact the customer wanted doors putting into the mantel as it is a disused fireplace and they would moderate the breeze coming down the chimney - we decided to echo the egg and dart on the mantel itself for their frames which meant another bit of carving was needed to make these."
"Eventually once the assembly was complete the parts were lacquered and around the end of November taken over to the customers and installed. Thankfully it was exactly the right width but there was some fun dealing with the old fireplace it needed to cover which was not straight (is anything in a 400 year old house) and getting the doors to hang exactly right. After some skilful work by Tom and Adam who works with him this was all taken care of and I was mightily relieved to see it finished and looking immaculate."
"The customer was extremely happy with the completed mantel and it worked brilliantly to finish the room and act as a focal point when you walk into it. All in all it was a massive challenge and certainly, to date, the most complex thing I've made. All the way through though the software and CNC performed perfectly and it was very exciting to see it all come together after having lived with it on screen and machine for so long."
That really is quite an epic project and we'd like to thank James for taking the time to go over it with us and share the images. You can see more of the other weird and wonderful things (his words) James has been making at his website where he writes a weekly blog and also follow him on Twitter @ceorfanworks for regular updates on what he's currently making.

Vectric Ltd
Precision House
2 Arden Road
Alcester
B49 6HN
Registered in England Number 05382596
VAT Registration GB115123072
Privacy Policy |
Cookie Policy |
Terms and Conditions


