We love that our makers have such diverse skill sets bringing a unique signature to each of their hobbies and businesses, and it’s fabulous to see a mini revolution out there with more of you guys popping up all over the world! Every day you surprise us by lighting up our forum and socials sharing exciting new projects as you add careful thought and personal creativity to your work. It’s what makes our amazing community so special and is especially important amongst a world surrounded by generic mass production. The trick is hitting the right balance between automation and hand made, and the maker magic is using the right tools to help you automate just enough of those processes to let to focus on what makes your work personal. The great thing is the price of CNC has drastically reduced in recent years enabling us to add quite advanced bits of tech to our workshops for relatively low cost. Our partners are always trying new ways to improve the way they work and give everyone inspiration, and Linn from Darbin Orvar has done just that. Linn is often experimenting with her projects and started looking at rotary machining to help her upscale the making of simple tools for her shop. Let’s find out how she swapped milling cylindrical items one at a time on her lathe to create these fantastic screwdriver sets using Aspire with rotary machining on her CNC!
Linn, it’s great to catch up with you. Thanks for tagging us on your latest YouTube video “how to make a ton of money selling screwdrivers!”Can you tell us a bit about yourself and when you started getting into woodworking?
I have always loved making things, whether that’s doing art projects or other stuff. As a kid growing up in Sweden, we had a crafting shop class from 2nd grade which alternated between woodworking and sewing, and I loved it! However, it wasn't until I was living in the US years later and had just bought my first house that I really wanted to get into building things for real. One project led to another! At first it was mostly plywood and framing lumber and simple construction, but then it progressed. I got introduced to CNC work a little while later using a small desktop unit, and I had such a good time learning all about it.
Wow, you certainly got the woodworking bug at a young age, and it’s clearly left its mark if if you managed to reignite your skills for your new life in the US. Tell us a bit about your YouTube journey and how long you have been setup.
I started my YouTube channel back in 2014 and the company was set up around the same time. I decided to call it Darbin Orvar as a bit of a joke; it was my dog's nickname! I wanted to find something unique but also keep my private life private so it was the perfect solution. I love the whole process of sharing what I learn with viewers on YouTube: creating something, filming and editing, then getting to share it with other like-minded people. Selling things in the shop is fun too but the interaction is a different skill set.
That’s a fun way to choose a business name! The projects you create are a really interesting mix of home décor projects, wood shop improvements, tools and accessories. How do you decide what you want to make and share?
Essentially, it's all based on what I'm up to at the moment. If I'm working on something for the shop, then the videos tend to go in that direction. It's really a reflection of whatever I'm interested in currently. My favorite project at the moment is the one I just published. It’s a custom coffee station where we carved the legs on the CNC and it has a beautiful counter. I love projects that you really use and this piece of furniture gets used multiple times a day which has made the coffee-making experience a lot more fun!
What a great way to keep things natural by reflecting your daily lifestyle. Did you always have a CNC when you started Darbin Orvar or were you mostly making projects by hand?
Initially I did not have a CNC so I was making everything by hand then a couple of years in, I got an X-Carve and eventually upgraded to an Avid in 2020 where I found Vectric! I started by just played around with Aspire making a bunch of small things just to get used to the functions, but I suppose my first "real project" was the one plywood desk. I still use that desk every day and it's been a fantastic piece of equipment.
It’s interesting to see you started testing rotary projects pretty quick after getting your CNC. What made you decide to add that tool to your router?
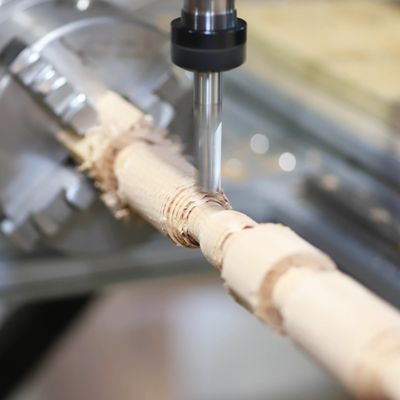
I got the rotary attachment in 2021, just a year after I got the CNC and ever since I learned about it, I thought it would be a great addition to my setup as I wanted the opportunity to build up from cutting small run cylinders and customizing rotated objects on my lathe. The rotary attachment on my CNC lets me machine 2D and 2.5D cylinders accurately over and again.. things like these screwdriver heads but also table legs, lamp stands, banisters, bed posts, walking sticks etc.
That sounds like a game-changer when you want to produce multiple runs. What made you choose this specific project?
I've got the beeswax polish in the shop at the moment and lately I've been wanting to expand the product line. I absolutely love basic tools that you use all the time and screwdrivers are great examples of that. It's something you constantly reach for so I thought it was a perfect project to do on the rotary. It was so easy to create and is full of potential like adding more tool heads to the set, more wood options, and you can really run with all the handle customization ideas.
That’s the beauty of making workshop tools that are so personal. Can you talk through the process of how you created the kits?
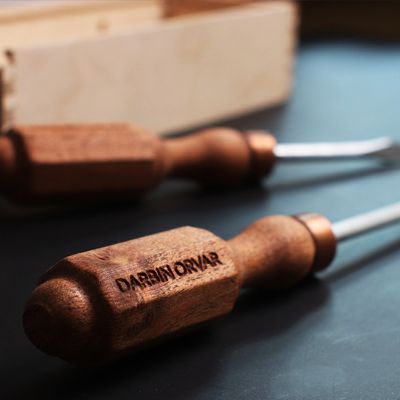
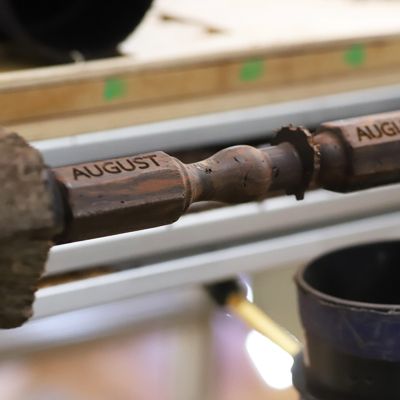
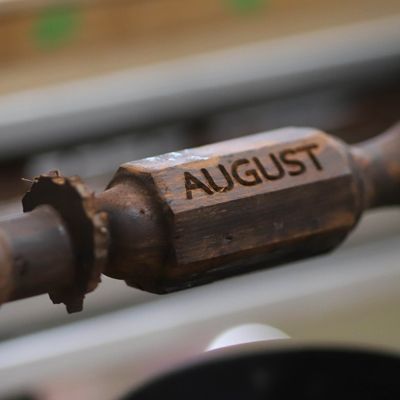
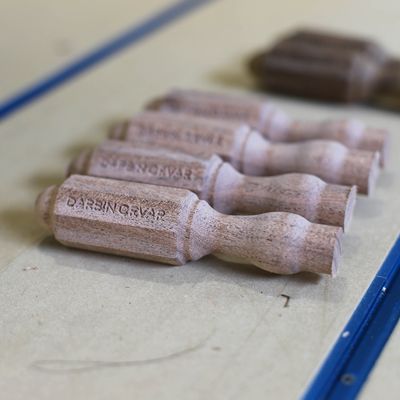
I simply imported a photo of a London style handle design then used Aspire to trace over the photo bitmap, making some scaling adjustments to get the size and grip just right. This was a repeat process as we went through various tests with different handle thicknesses to gauge what felt right in the hand until I came up with the final design. I also used the rotary function to v-carve my business name into each handle.
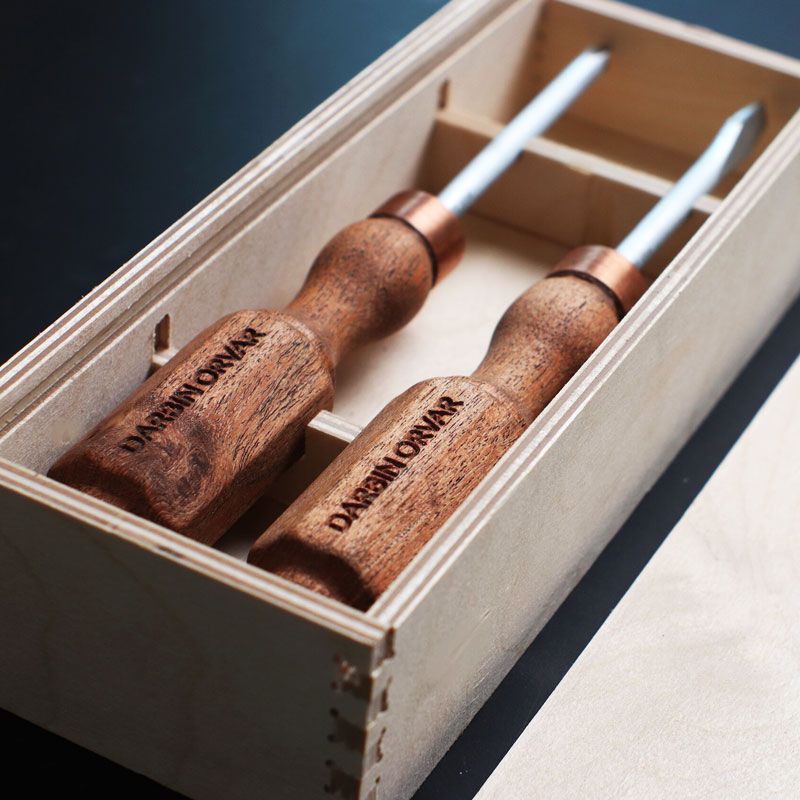
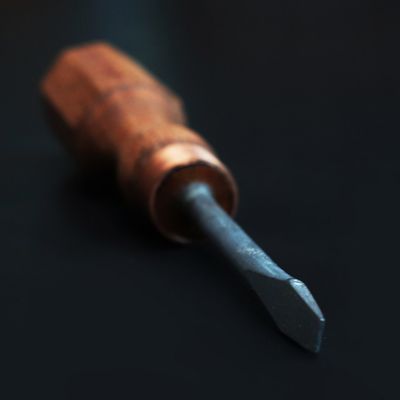
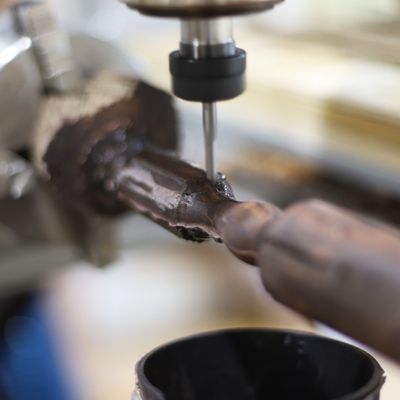
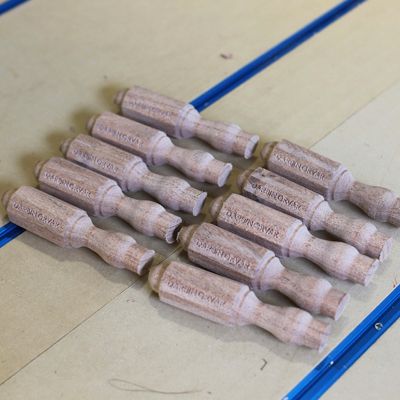
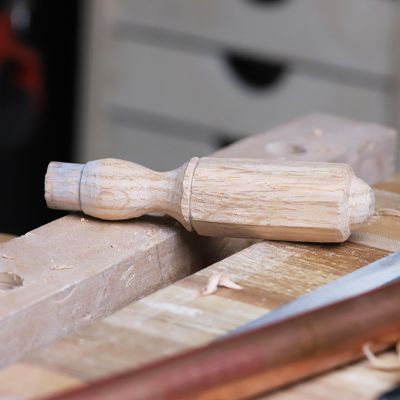
I had lots of beautiful handles made from a range of hardwoods and was trying to find a solution for the screwdriver head. My first tool designs had screwdriver heads from old tools around the workshop… and who doesn't have a bunch of tools lying around! These were okay for the prototyping but not a good business model for production and sale, so I wanted a supply of nice quality blanks to start building up the shop stock. I eventually found a supplier where I could buy larger quantities and found some great 1/4-inch slotted and #2 2-inch Philips blade blanks. They’re a great starting point to fulfill a variety of tasks as I didn't want anything too small or too finicky that could only be used for very specialized tasks - more a generic type that can be more useful. The real challenge was inserting them into the handle, making sure they stayed perfectly straight and rigid, and avoiding cracks! We used the jig to drill the holes in the handle then used the Rikon band saw to remove the 2 fixing points in the blanks that might create wood cracks in the handle. I filled the hole with epoxy, inserted the screw, let it dry then lots of sanding and planing. The finishing touch was the copper ferrule to add a bit of strength to the joint followed by my linseed oil and beeswax polish. I absolutely love copper and it works really well with these wood handles. I bought the copper pipe from a reclamation yard but you can get them from a plumbing shop and it’s a great way to repurpose them.
The next step was packaging and I really want these screwdrivers to be sold as a set where each detail feels really thought through. Plus having a box makes it easier to ship them without damage. I spent a lot of time designing options with separators or dividers to hold the screwdrivers safely and securely in place, and ended up with the pencil box style with a sliding lid and little finger joints. This process has really made me appreciate things that come in nice boxes! For pricing, we decided to sell 100 sets badged as 'London Tool Handle Custom Made Hardwood Screwdrivers'. We ended up with $100 each or $200 for a gift box set of 2 screwdrivers, based on each set being the same hardwood species.
We love that you’ve shared your project as a real step-by-step insight including material and time comparisons, and the extra tests you did to fine-tune the machining time and tool changes. How did Aspire help you conduct these tests, what toolpath strategies did you use and can you elaborate on the tools/sizes you used and/or feeds and speeds?
Obviously you want the fastest speeds and the largest tool you can use to get the job done as fast and as accurately as possible, and most importantly with as few tool changes as you can get away with. I usually go with 250 IPM as it’s the speed I’m most comfortable working with so I used this speed throughout. For the fastest wood removal, I began with a ½” spiral upcut and ended up with a ¼” bull nose on the finishing path. For my business, it felt much better to leave the wood on and just change the bits because of the added risk to accuracy by removing and restarting the job. It just increases the chance of slight changes to the Y and Z axes, and if you don’t get that set up just right, being even just a touch-off can make a huge difference to the job.
It was lovely to see you brand your handles using v-carving. What feature did you find most useful when setting up this rotary project and how do you choose your materials?
The 3D modeling is pretty intuitive and while I am no expert, I can definitely say that with just a little practice I was able to quickly pick up just enough to design this project and many others afterwards. Since this was my first rotary project, I am now much better at understanding making non-linear modeling designs.
I use whatever wood I happen to have on hand and I have a lot of wood. It's often just a mix of offcuts from previous projects and I try to utilize everything that I work with to avoid wastage, even for test cuts.
To get a real insight into the project, watch my video with a step-by-step guide of the process, including best handle design, wood species, optimal design for machine use, wood blank sizes, number of handles to cut, bit change versus wood change, personalization, blank inserts, metal ferrule, packaging... and of course the cost-effectiveness of your product against the physical cost to make them: https://www.youtube.com/watch?v=jIfbP6P7c78 Enjoy!
Wow that’s amazing seeing so much skill being shared. It’s great to see people of all ages taking up the same love of making. What does your son enjoy making with you the most?
Well, he's currently 5 years old and very into wires, switches and electronics in general, so at the moment that's what he likes to "work" on in the shop.
Wow that’s brilliant that he’s bringing a different style of making to your shop. What’s the most unusual project you’ve created?
Unusual! Well, I made a tiny swimming pool for my golden retriever out of plywood and tarps one summer when it was really hot, and it lasted a surprisingly long time! I also made a mallet made out of concrete once and covered it in epoxy... that one didn't last as long :).
I’m sure that will get our makers chuckling! Do you have any top tips for the Vectric community starting their own hobby or online business?
I would give just one sound bite: take it one step at a time and play around to properly absorb and really learn the software. If you don't, that will not enable you to move on and get more comfortable. Try different things and don't create huge batches of something before you know whether or not you have a product you can actually sell. Most of all, be flexible!
A huge thank you to Linn from Darbin Orvar for being so generous sharing your experience of learning how to rotary machine. We hope this will inspire more of you to start pushing the boundaries and try out some rotary milling on your own CNC.
Check out the project gallery then head over to Linn’s Darvin Orvar YouTube channel: http://www.youtube.com/darbinorvar/
Linn
Darbin Orvar
PO BOX 1101
Goochland, VA 23063 USA
Instagram: http://instagram.com/darbinorvar/
Twitter: http://twitter.com/darbinorvar

Vectric Ltd
Precision House
2 Arden Road
Alcester
B49 6HN
Registered in England Number 05382596
VAT Registration GB115123072
Privacy Policy |
Cookie Policy |
Terms and Conditions


