For this month’s customer case study we bring you the story of Erik de Ruiter. Only having discovered CNC machining in 2017 Erik is fairly new to the routing world – but this has not stopped him creating some amazing projects. Before we find out about the particular project that caught our eye we wanted to find out more about Erik’s background…
I have always been very interested in computers hence my career as a computer hardware/software service engineer before I got disabled. Nowadays a lot has changed: electronics, the internet and microcontrollers like the Arduino were not even a dream when I started my career… The possibilities we now have are truly amazing. As I am not able to work; to keep me busy at the days I can do something, I am always looking for opportunities to make something. Being able to use my own CNC machine is so amazing! It’s a fantastic addition to my electronics hobby. Never a dull moment ever again because the possibilities are endless.
It was early 2017 when I stumbled across a CNC forum… “Wow, I was so intrigued!”. I kept on reading and gradually I read comments of experienced people telling others who build their machine it was not accurate enough, the parts used not good enough. The ‘perfect’ CNC machine got more and more expensive, out of my reach. Because all of that I got discouraged and skipped the idea to build a CNC machine. A year later, April 2018, I suddenly discovered a DIY project to build a wooden CNC machine which fired up my looming interest again! The design looked very good and I felt more comfortable to work with wood instead of building one from aluminium. 50 euro’s for the drawings was affordable so I got started! It was so rewarding to build my own machine… It was an exciting journey and seeing the machine come to life for the first time was a special moment.
Previously I did not own a CNC machine or anything like that. I used the common woodworking equipment but noting computer controlled. Now I own a CNC machine made from wood, called the Solidis. It’s a German design and building it was a lot of fun!! It took me a month to build. The learning curve in the sense of the terminology used, what mills to use etc. Was steep but so worthwhile… I am sure many people are scared off by the things you have to learn when operating a CNC machine but I would say to them: “TAKE THE PLUNGE, you will have so much fun!”
The main alteration to the Solidis machine I made while building was a larger cutting area. So glad I did that. I now can cut 32 x 45 cm (12.5 x 17.5 inches). Also, to keep the neighbors and my ears happy, I made an enclosure for the machine so I can mill away without stressing out anybody…
My main worry when starting with CNC was the software part. It didn’t stop me but how on earth could I make even a simple item? I first wasted 50 euro’s and used a good but simple CAM package but very soon, after 2 days using it, I bought the Vectric Cut2D software… What a difference! I did not realize, before buying the Vectric software, that it also has very good design capabilities! What a pleasant surprise that was. Recently I upgraded to the Vcarve Desktop software because I would love to start with 3D milling…
I’m so glad the designer of the Solidis CNC machine recommended the Vectric Cut2D software… The best advice he could give although I made the mistake to start with a cheaper package because of the cost – but this proved to be Penny Wise, Pound Foolish.
There are many benefits when using the Vectric software and key features not found in other software I researched. I realized, after using the software for a short while, that the Vectric software learning curve is not steep at all! This is because of the provided support video’s, very good documentation and user centered software design. Many software designers make good software but lousy manuals. Hats off Vectric team! I developed a disability which prevents me using my eyes for a long time. But thanks to the Vectric software I can enjoy using my CNC machine because it’s so easy to use! I am really grateful for this. This made me not just a Vectric software user but also a Vectric fan. Then there is the benefit of the Design and Make store. This is great because I don’t know how to make 3D designs. Having the store available, I can buy and use the designs when needed.
With his handmade CNC machine, Vectric software and Design&Make at his disposal Erik has been busy creating some interesting projects during his spare time. Twitter is where we saw this interesting Wooden Pendant and had to find out how it was made – but before we dive into that we had to ask about why he chose to make this…
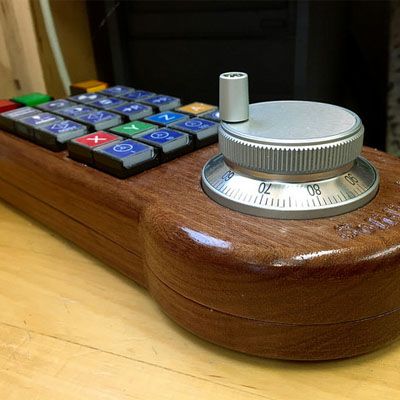
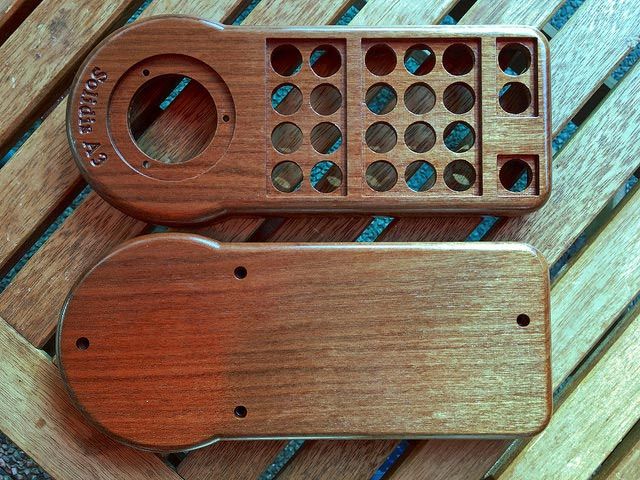
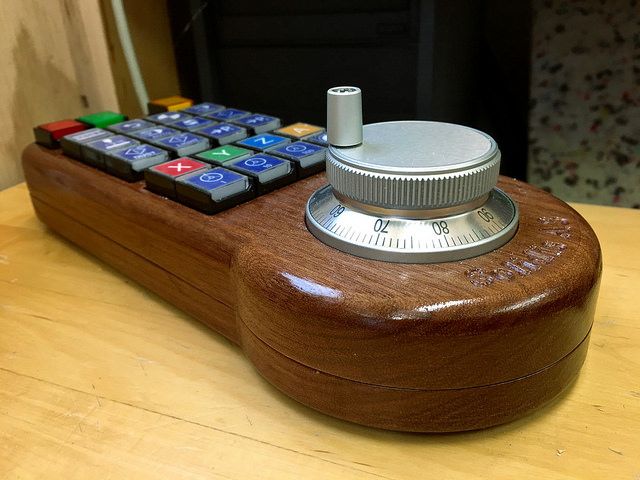
I made the pendant because I did not want to spent 100 euro’s for a commercial pendant with only 2 start/stop buttons and a handwheel. A multi button pendant would cost me 450 euro’s. Besides this, I loved the challenge to make my own pendant and this way I could make a truly custom case which is not always possible with a ready-made ABS type case you can buy for 20-50 euros. The cost of making this pendant was 75 euro’s, excluding the wood and cabling.
When asked to share my latest project as a Case Study, I was a bit amazed. I’m a CNC newbie, green as grass, just enjoying a new hobby. But at the same time I felt it is a great opportunity to encourage others to join the Vectric CNC club! In the past I made a few electronics projects and I enjoy sharing my work so we can learn from each other that way. Why keep knowledge and ideas for yourself?
I plan to share even simple projects I make with the vcarve software in the forum so that beginners can become inspired just as others inspire me to take the next step.
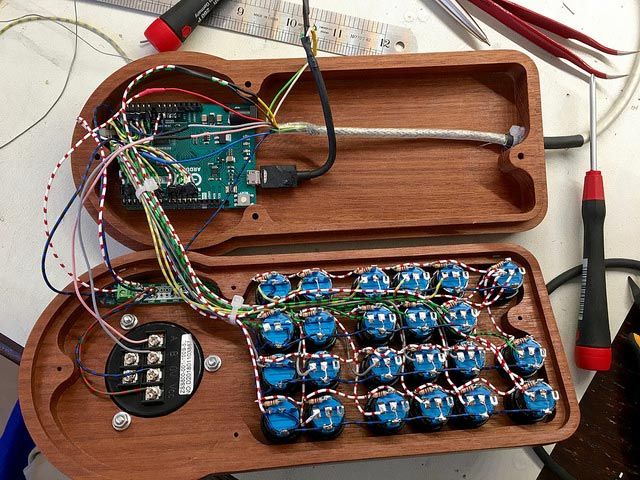
The hardest part was sourcing the switches… After a long and frustrating search I finally found the switches with my requirements: the ability to fit custom labels and LED illuminations. The electronic part was simple because I am familiar with the Arduino microcontroller environment. It took a few hours divided over a week to figure it out. The Arduino is a microcontroller which acts as a keyboard when connected to the PC. So pressing a pendant button will result in one (or more) key press commands sent to the PC. It’s not rocket science. Speaking of rockets, you could use the pendant to launch one!
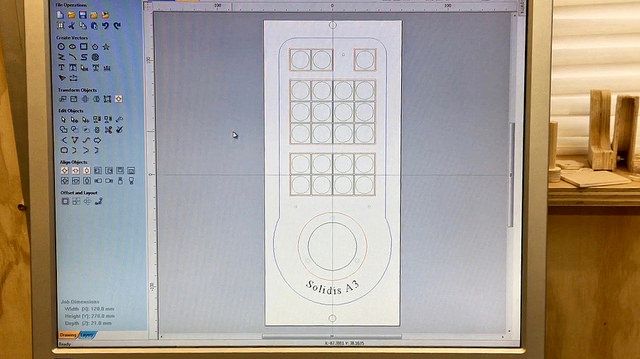
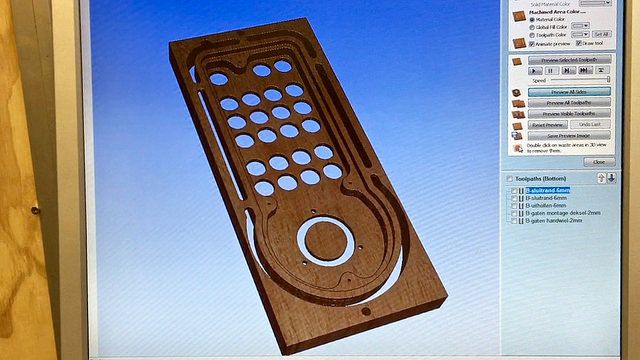
That’s because all that the Arduino does is sending a keyboard command to the computer via the USB port. Whatever CNC controller software package you use (MACH, USBCNC, EDINGCNC etc.), if you define in the Arduino software the right command for your software, it will function. Even multiple commands are possible of course. After finishing the microcontroller C++ code, I was ready to design the pendant in the Vectric software. I am definitely not a designer but I had so much fun just starting with a rough sketch and perfecting it along the way, making lots of mistakes which are the most useful when learning! It had to be a double sided project, my first so this was a good exercise. Defining the tool paths took longer than the design stage because of the fine-tuning, checking, altering depths etc. But this is the most important stage.
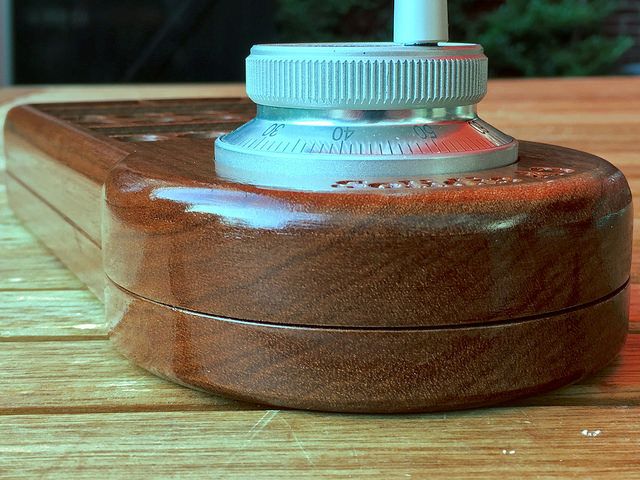
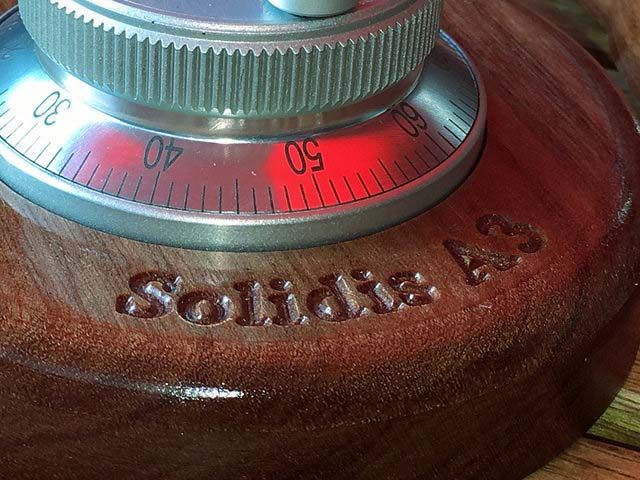
The pendant is made of Mahogany wood. I love to work with wood and the look and feel is wonderful. The extra weight when compared to a plastic case proved to be a benefit because the pendant stays put when turning the handwheel!
The Mahogany wood I used is a piece of carefully stored 45-year-old wood from an old office desk. After milling, it needed only a light sanding before applying 10 coats of clear spray varnish. Depending on the type of switches used, you need a certain thickness of wood so I was lucky to have a plank with a thickness of 21mm (8.27”) so I had enough space for the switches.
The switches came from Aliexpress and were just 1,20 euro’s (£ 0.95) each so I ordered some extra to be able to quickly replace a switch when needed. For labelling the switches I used a high quality Poly-Vinyl sticker for my color laserprinter. (Also available for inkjet printers). Printing on regular paper was no option because you do see the structure of the paper very good when lit.
The icons are the same as used in the edingcnc software which is included with the CNC control card when you buy it. I just copied the JPEG icons from the software directory and I changed some in a graphics program to customize them for my need.
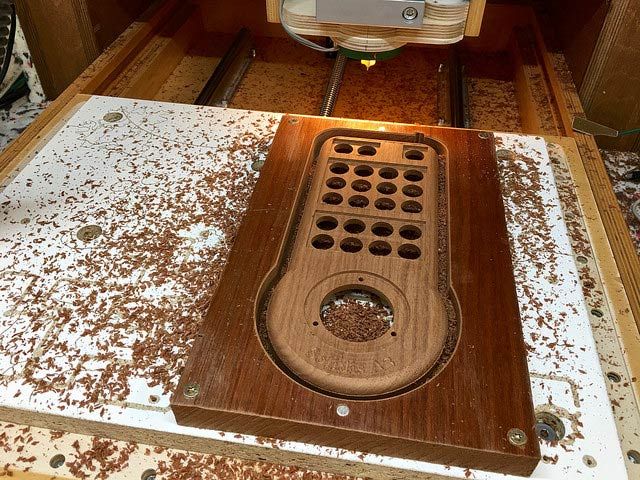
To make the pendant, I used End Mills with sizes of 1,2,3 and 6mm (3/64”, 5/64”, 1/8” and 1/4”) and a form tool with a radius of 6.4mm (1/4”) to round off the circumference of the pendant top and bottom. I decided to lower the handwheel and switches a little bit into the enclosure (3mm (1/8”)) which looks much better. Because the switches are square, I had to use the 1mm (3/64”) end mill to mill the corners of the pocket. I used a 6mm (1/4”) end mill for the roughing of the larger section of the pocket. The 6mm (1/4”) end mill was also used to get rid of the lacquer layer of the wooden plank. Then it was used for most of the pocketing and profiling. I’m a bit fuzzy about details but it pays off in the end. The pendant looks beautiful and it’s a joy to use…
I wonder if other software packages have the same timesaving features? I don’t think so because I there are not many user friendly CAD+CAM programs on the market. Anyway, glad I did invest in the Cut2D software and now the vcarve Desktop version. I did choose Vectric because upgrading to a higher level version does not cost you extra! This was for me very important. Fantastic…
About the features: The smart snapping option is amazingly helpful but my favorite is the scissors tool! It’s fun to use this handy tool… The base pendant design was just made of a circle and a rectangle and then a few cuts with the scissors, rounding the corners with the fillet tool and the main part was ready! Then the 3D preview… this is so useful. I saw a few design errors before actually running into them when milling. Very important to check and double check the 3D model to see if you made a mistake.
This was my first project using hard wood. I was pleasantly surprised how well the milling went and how fast (2400mm/min or 100”/min) I could mill when pocketing for example the main body. Milling a double sided project was made very easy using the Vectric software. Vectric made it easy to organise the different vectors in layers. I want to make use of that feature the next time so when editing a vector for example, it’s automatically included in the toolpath. But there are more advantages of course. Giving the layers a color is very handy. I now use red for pocketing and blue for profiling. Many more handy tricks need to be discovered by browsing the forum. I’m still a CNC newbie so I need to do a lot of learning.
It’s evident to see that Erik has found a hobby that allows him to combine his vast experience with electronics and his new-found passion for CNC machining. The level of detail and care shown for his projects is inspirational. We would like to take this opportunity to thank Erik for taking time out to share his story with our community. But before we let Erik go, we had to ask him what he had planned for his next project…
I just finished a small and quick project: a tape dispenser for some 76mm (3”) adhesive tape rolls I had laying around. I posted this mini project in the vcarve showcase forum. The next big project will be a wooden clock with marbles used for striking the bell every hour. I will buy the design and have a lot of work converting it to metric but that’s part of the fun.
Vectric Ltd
Precision House
2 Arden Road
Alcester
B49 6HN
Registered in England Number 05382596
VAT Registration GB115123072
Privacy Policy |
Cookie Policy |
Terms and Conditions


