
Veteran Salesman now turned CNC craftsman, David Mathieu is the focus of this month’s customer case study. After recently posting a great debut project on the Vectric Forum we were keen to find out exactly how David had gone about creating it. But before he takes us through his method of work we asked David how he found himself immersed with CNC technology and what he plans to do with his new-found tool…
I have always enjoyed wood working, but I felt limited in my abilities. I always wanted to be able to do some things that were in my head, but I couldn't get done or it would take me too long with conventional wood working equipment. I first found out about CNC machining about 3-4 years ago while searching the internet for woodworking ideas and machines. When I saw videos of what a CNC could do, it just opened up all kinds of possibilities in my mind. I bought a small kit to put together to learn how a CNC works. It was hook, line, and sinker after that. I sold most of my conventional wood working equipment and transformed my small shop to CNC, Laser & 3D Printer. I don’t really have a business yet, although I am trying to sell some products on ETSY as one way to get started. I'm looking at attending some local shows as a way to get my name out there as well.
With David firmly bitten by the CNC bug we asked him to tell us about his progression through different technology to get to where he is now with tools and software...
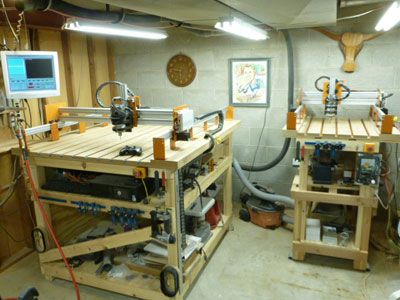
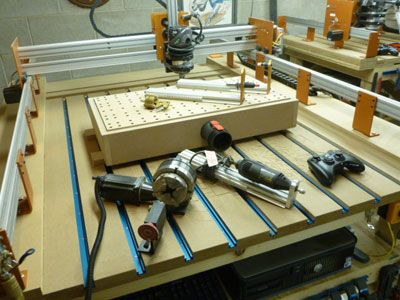
I started with a machine from Probotix called a V-90. This enabled me to get some hands on education as to how a CNC works. I sold the V-90 and purchased a CRP4848 from CNC Router parts. Both machines were great to work with for different reasons. I wanted a 2nd CNC so I designed and built (3) CNC machines. Two of them I took apart as I wasn't happy with the results. The one I was happy with I sold. I then sold the CRP4848 to a guy in my area for his business. I helped him getting it up and running and he purchased Vectric's VCarve Pro for the designing of his parts. I'm now running (2) CNC Mogul's. A guy (Mike) in my area designed them. By purchasing the CNC Mogul's I was able to afford to add a laser and 3D printer to my shop. I have made a few custom changes to my machines. I have added a 4th rotational axis, a laser diode, larger and smaller size drag knifes, diamond engraving bits, plotter markers and a Dremel for a smaller spindle. With the CNC Mogul, I'm able to easily change out all of these to either size machine I have.
The software I use to design and manufacture my projects is Aspire 4.5 and Mach 3. Before using Vectric software I was going through the process of trial and error. I was searching the internet looking for what software to use and ran into Vectric's products. I tried some of the free stuff out there and some cheaper alternatives, but I found all of them difficult to use. The more I look at Vectric's products, worked through the tutorials, and read about it on the forums, the more I was convinced it was the way to go. I started with VCarve Pro and up graded to Aspire about 6 months later. Vectric is all I use for everything I do. Like is said before I have tried free stuff, cheaper alternatives, other programs, etc. etc. but nothing compares to the Vectric product line. There just isn't anything else that I need other than Vectric's software to accomplish everything that I do
Equipped with 2 CNC Mogul’s, a copy of Vectric’s Aspire 4.5, Mach3 and his other equipment, David has been busy creating pieces for clients and customers online via his ETSY profile (the link is at the bottom of the page). So having found out more about David's CNC journey we return to the project that intrigued us in the first place, the Cannon, the first questions really being how did you end up choosing this as a project?
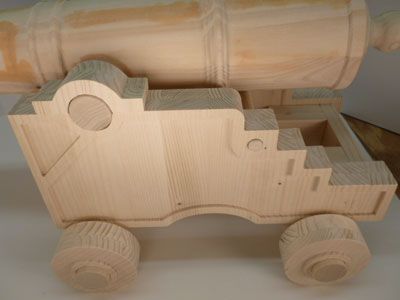
I was asked by someone at work if I could make a cannon for his Tiki Bar that he is building this spring/summer. He emailed me a photo that he got off the internet and that was all I had to work with. He said he wanted the cannon barrel to be about 24" in length. I told him I would give it a go at it and we would see how it would turn out. The design process was the longest part. Maybe took a couple of hours. Each piece of the cannon barrel took about an hour each to cut and the base parts all total less than a hour. A little clean up sanding, gluing, and putting the parts together, maybe another hour or so. All totalled around 6 hours start to finish.
I just used 2X6 planed down to 1.25 inch stock for each part of the cannon. The base is just 0.72" edge glued pine board. I just purchased the materials for a local home improvement store. The guy at work is going to paint it, so nothing fancy on the material side. As for tooling I used a 0.125" tapered tool bit for the carving of the pieces for the cannon. A 0.15625" bit to cut out the parts for the cannon and the parts for the base. I use a 0.125" end mill to pocket out the design on the base as I wanted the corners to be as sharp as I could get them.
There were quite a few features that I find to be really helpful, but for this particular project the importing of a 3D model and the slicing of the model were perfect, once I had the proportion of the cannon figured out.
To be honest everything went pretty well with this project, I was pleased with the importing of a 3D model and the slicing of the model once I had the proportion of the cannon figured out and also; the inverting of the parts for the cannon. Another feature that helped was the importing of a photo of the cannon and using the photo to create the vectors for the base. I brought in the photo into a work space size that represented the proportioning of the base for the cannon.
Looking back on the project I would have kept at it with modelling the cannon myself. I would also do 2 sided machining for the barrel. The boring of the barrel for where the cannon ball goes was a pain, I should have had the CNC do the work then it would have turned out better.
The points noted above are typical of the learning process we all go through on any process, with this in mind we asked David if there are any tips he would share that he found useful when creating this project...
When I was slicing the model, I was working with 1.25" stock. I needed to adjust the model a little in order to get four solid pieces to make up the cannon. Otherwise I would have had to cut some pieces that would have been rather thin. Also when slicing the model and setting up the CNC, make sure to get as close as possible to the very bottom of the stock. I had one piece where I zeroed the bit a little high and the piece ended up a little thicker than I wanted… had to break out the belt sander to make it fit properly.
Often in our case studies we showcase long-time users of the software, we were interested to talk to David as relatively speaking he is still at the beginning of his CNC journey. We thought the cannon project was really well worked out and also showed how the CNC/software combination can be used to create something unique from scratch in a short amount of time. We look forward to seeing what David posts on the forum in future and thought we would finish by asking him to give us a preview...
Right now, I’m working on a rum dispenser for the same guy that wanted the cannon. It's also for his Tiki Bar. It's looking pretty good so far!! It's going to be called Jane's Hula Hut. I'm also working on adding some products to my ETSY shop. And of course, there are family members asking me to make things for them. But for the future I'm working on coming up with some unique items to sell. It's a work in progress. I'd like to make this a full time thing, but for now, I'm just going to keep plugging away at it and see where it goes.
We would like to take this opportunity to thank David for his time in answering questions for this article. If you would like to view or purchase some of David’s work please click the links listed below:

Vectric Ltd
Precision House
2 Arden Road
Alcester
B49 6HN
Registered in England Number 05382596
VAT Registration GB115123072
Privacy Policy |
Cookie Policy |
Terms and Conditions


