Here at Vectric HQ, we are always impressed by the projects made by our users. Gert Burkhardt’s Plant Stand project was one that stood out to us on the Vectric Forum due to the impressive use of the thread milling toolpath and the finish of the plant stand. For this month’s case study, we caught up with Gert and asked him about his background and how he got into CNC…
As an EE and ME by trade, I worked in electronics hardware development, engineering management, and operations management, finally retired in 2017 (yay!).
I have been a woodworker since childhood because my dad was a woodshop and arts teacher (a long time ago in Germany). However, for most of my life I did not have a shop and only minimal equipment, limiting my woodworking activities.
Only for the last 15 years I found the space and became interested in CNC woodworking. I purchased a small NextWave Shark (including VCarve Pro) in 2011 and learned the basics but sold it after a few months. However, this machine allowed me to cut the parts for my own home-made mid-size CNC router. The latter is made mostly of bamboo plywood, quite rigid and massive at 750 pounds, and has served me well for the last 9 years.
For some projects, I wrote my own dedicated CAM software that allowed e.g. flat machined finger joints and dovetails, to calculate maze patterns and tool paths and guilloche patterns. I sold such apps as a side business for several years but discontinued the sale last year since real-time customer service as a one-man company can be kind of challenging.
We wanted to hear more about why he decided to create the plant stand…
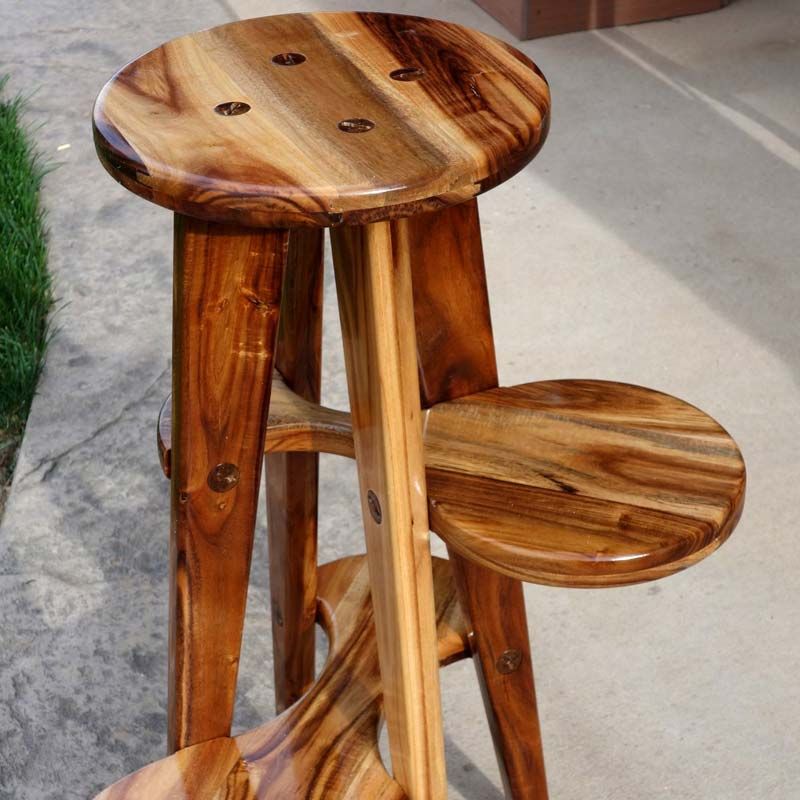
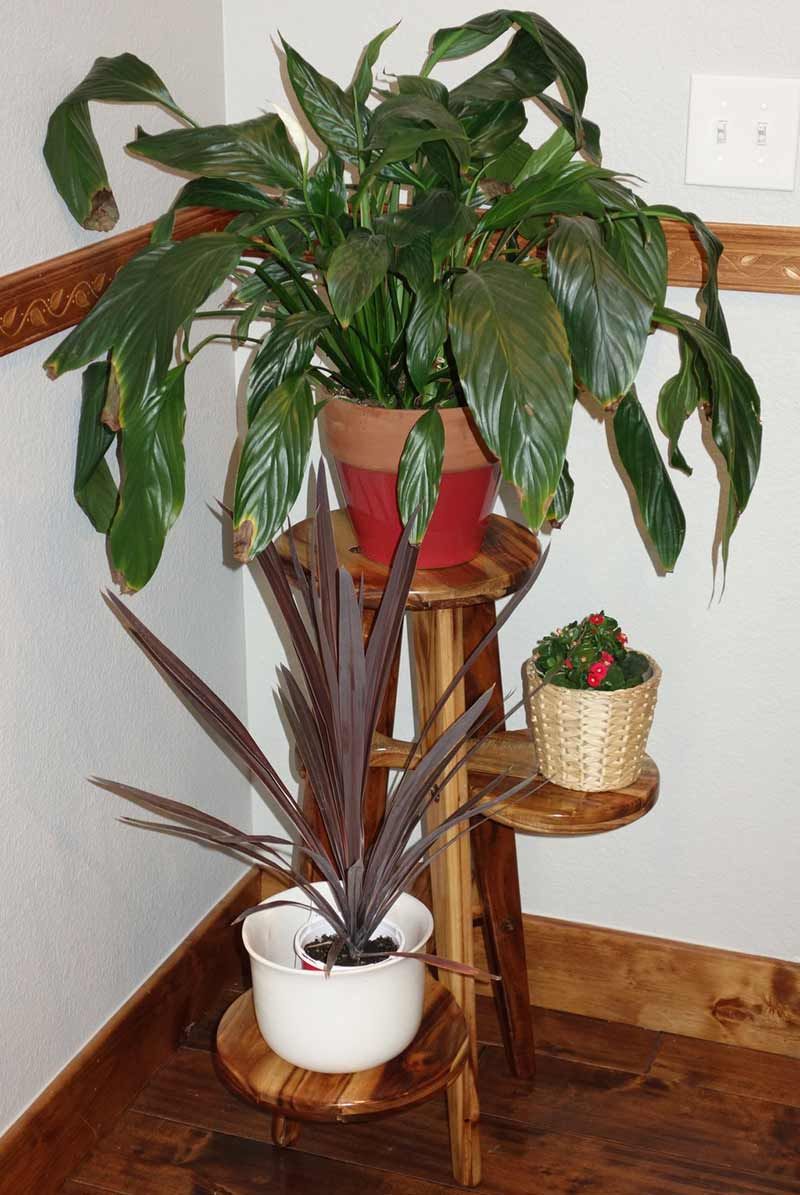
We moved to Colorado earlier this year (I made sure the house had a 1300 sqft shop space in the basement) and for the new dining room, we bought solid acacia furniture. However, there was an empty corner that we wanted to decorate with some plants. Looking over the usual sources we did not find something we liked or that fit with the rustic appearance of the other furniture. So, I decided to design and build my own plant stand.
After coming up with the idea and getting the materials together, Gert went to work planning and designing the project…
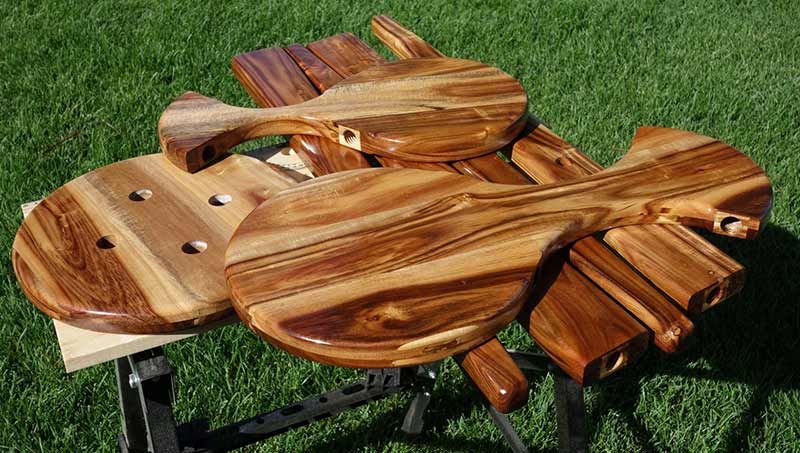
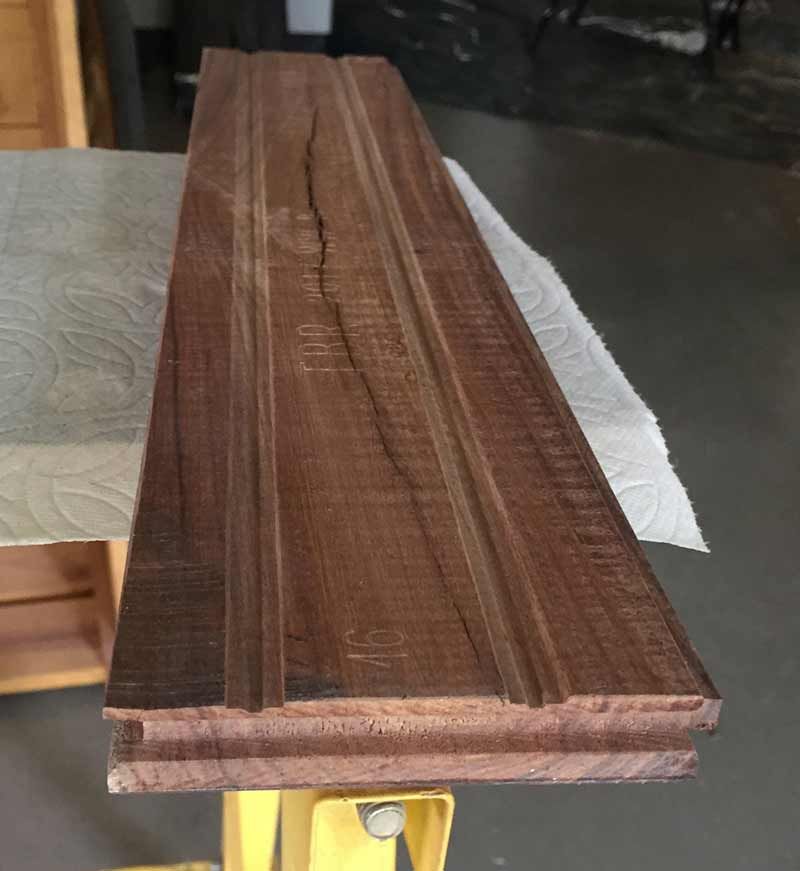
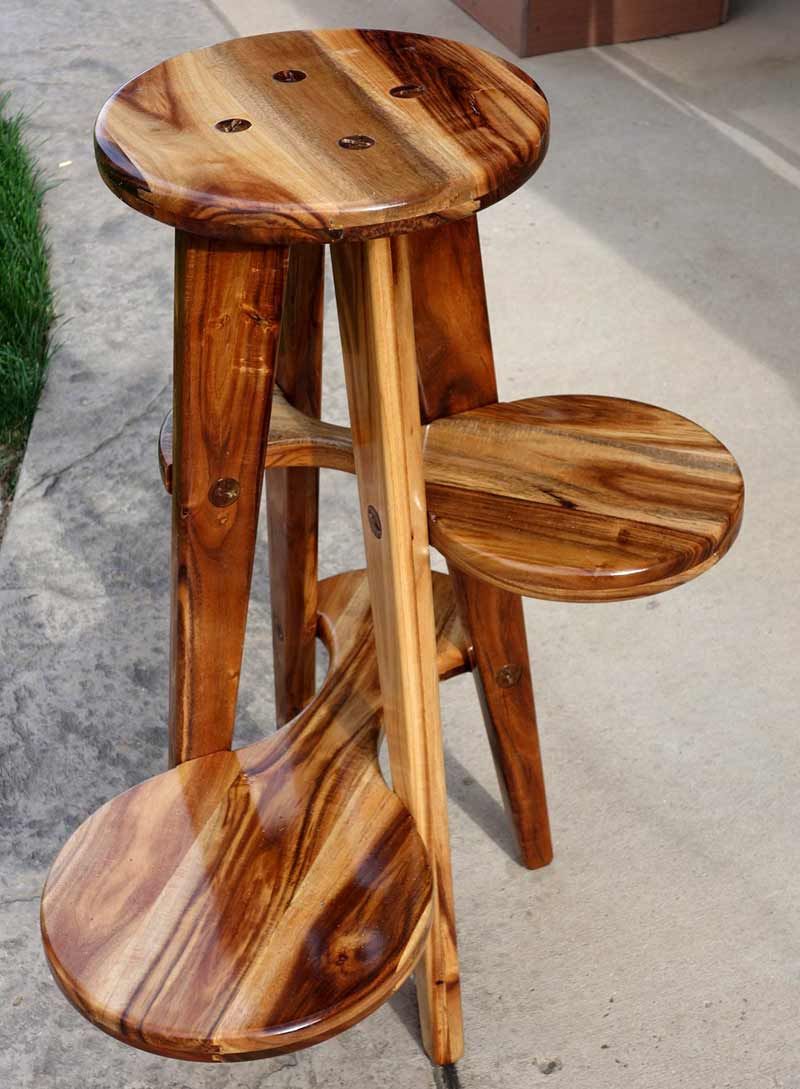
It is made from solid acacia hardwood. I really love this material with its wild grain patterns. It is very hard and dense, machines nicely without much fuzz, and can be sanded really smooth. Acacia is not oily like many other exotics and does not clog abrasives. It glues very well.
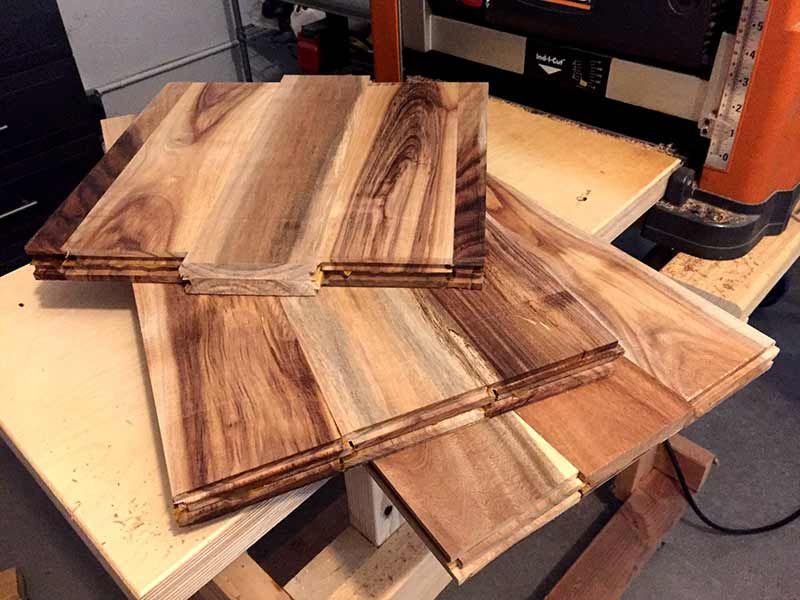
However….it is almost impossible to buy board lumber here (that I know of). Therefore, I ended up buying a box with 26 sqft of acacia hardwood floorboards at a local flooring supplier. They were 19mm thick but after planing off the back-side ridges and drum sanding off the top finish only 14mm thickness were left. It was helpful to have a helical carbide cutter head for the planer because this wood is very hard (2200 Janka).
With the planed boards (half of the box) I glued up the blanks double-thick (to 28mm) for machining the components on the CNC.
I hand sketched a few ideas of how to allow for 3 potted plants in a room corner and ruminated over that for a week. At some point, I focused on the barstool like design and how to attach the lower shelves to the legs.
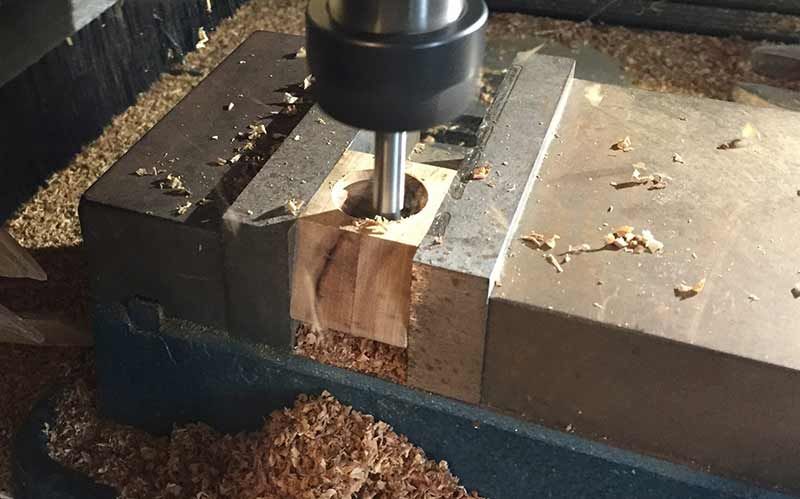
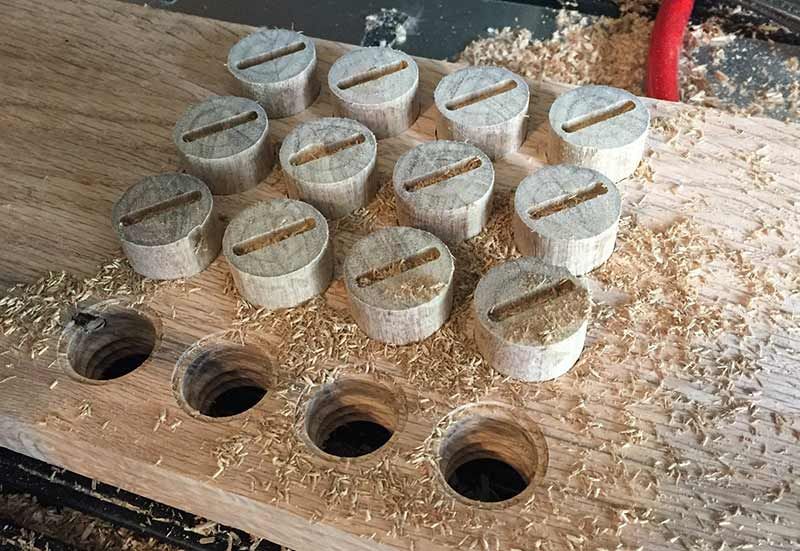
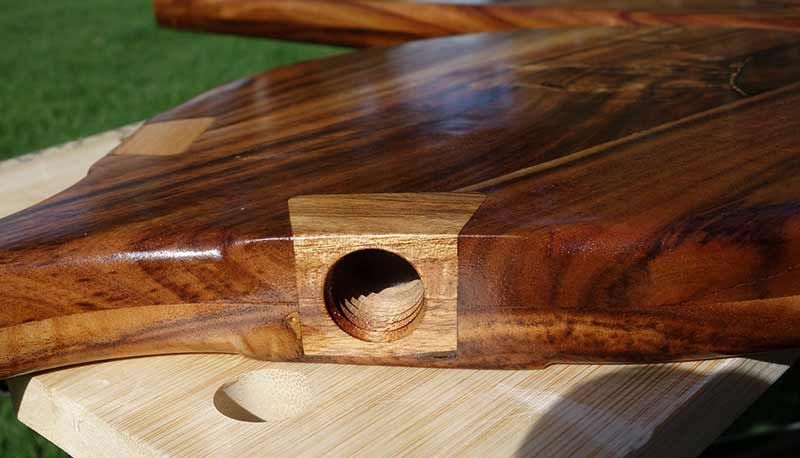
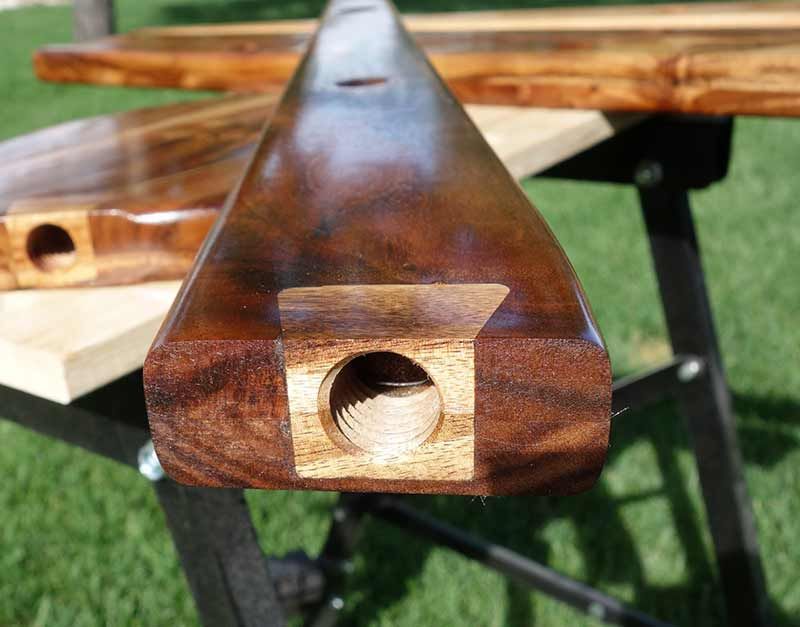
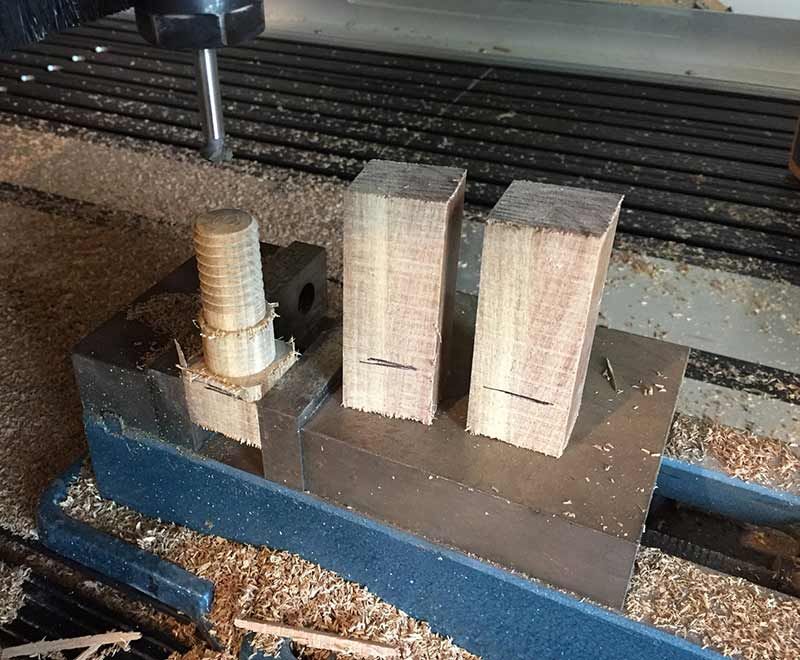
At first, I had planned on using a glued mortise/tenon attachment. But the new Aspire version with threading tool path came out just in time to change my mind and consider a bolted construction with wooden screws.
The detailed design was made using IRONCAD, a mechanical design package that I have been using for 20+ years. Not as well-known as e.g. Solidworks, it has similar capabilities (and price…). I did not need 3D models for this project and transferred only the 2d-drawings as .dwg to Aspire. There I completed the 2D work for the hole circles, threads, nut recesses, and rounded bevel guide vectors.
I did not need special features of the CAD software. Once I had the idea, it was a very basic mechanical design. It could have been done as well in many different CAD software like Sketchup that allow for assemblies.
Gert then went onto talking about the toolpaths and cutting the project…
Obviously, the threaded tool paths were the key feature I wanted to try out. But otherwise, I used pocket and profile toolpaths as well as moulding and drilling toolpaths. The moulding toolpaths were strictly for radius bevelling of the shelf and leg edges. This could have been done faster by hand with a roundover bit but, well, I do not have a working handheld router anymore….
I did all the profile, pocket, and drill cuts with a ¼” upcut endmill (the simple Freud brand carbide bits from Home Depot) at a modest 0.15” depth, ~12k rpm, and varying feed rate 40ipm for drilling up to 150ipm for straight cuts. Being a one-off project in unknown material I was rather conservative.
The threading was done with a Magnate 90-degree threading bit similar to #796 (not sure anymore which number exactly) and the bevel profile with a ¼” ballnose of unknown provenance. The only cut with an 1/8” bit was for the screwdriver slots in the screw heads.
Gert explained about the finishing and building of the project with some reflection…
After machining, all parts were sanded with ROS at 80 grit until all machining marks vanished, then 120, 240, and finally 400 grit. The total sanding time for all parts was maybe 2-3 hours. But after the 400 grit, the wood started to become shiny.
A first finishing coat of Danish Oil was applied and left overnight to dry. After that, the grain came out great and I normally would have left it at that, maybe with another oil coat.
However, given the intended purpose with the risk of water damage I gave all parts a generous layer of semi-gloss polyurethane varnish (Varathane Triple-Thick). It still looks nice but I do not appreciate the somewhat plasticky feel of the polyurethane.
I would like to do more projects with the acacia lumber but this is limited to smaller parts that can be made e.g. from cheap Acacia cutting boards. The glue-up method used for this project is possible but it took almost as long to plane, sand, and glue the blanks as it took for the rest of the project. I am probably not going to do that again.
The wooden screws and threaded inserts were cut individually while held in a machine vice. I did this mainly to avoid making a special jig for multiple parts. The downside was a LOT of bit changes (end mill for the bolt and head shape and threading bit) and part swapping. That kind of ticked me off and I would come up with a method of gang machining all required bolts and nuts (12 each) at one time.
As mentioned above, if not for the water damage risk, I would not use the polyurethane varnish on fine furniture. The Danish Oil (or tung oil) gives a much more natural appearance.
We then asked Gert if he has any tips or advice to fellow makers…
Maybe some pro’s and con’s for using the threaded connectors (compared with mortise/tenon joints) for furniture:
Pro’s:
Con’s:
Gert’s hard work has clearly paid off and shows in this project and hopefully many more to come. Before we let him go, we asked Gert what plans he had for the future…
Well…this project was a pleasant distraction from the sad reality that my shop is not yet fully set up. I still have some 40 moving boxes with tools, parts and materials that need to be unpacked and organized. I guess now I will go back and just get that done. After that, maybe new bathroom furniture but my interest changes daily. I am suffering from a serious case of project ADHD.
We wanted to say a huge thank you to Gert for taking the time to talk to us about his project so that we could inspire our community to try something new. If you have a story you would like us to feature, please get in touch, simply email online@vectric.com. We would love to hear from you.
Vectric Ltd
Precision House
2 Arden Road
Alcester
B49 6HN
Registered in England Number 05382596
VAT Registration GB115123072
Privacy Policy |
Cookie Policy |
Terms and Conditions


