Every day is a new day at Vectric with our talented makers surprising us and it’s the sheer variety of work plus the fascinating stories behind how they’re made that always astounds us. Streamline Automation are always pumping out sensational foam prototypes and custom carvings for their Canadian customers, and it’s no surprise they’ve gathered an eclectic mix of projects created over the years to help bring cool ideas to life at super-scale. Now, why would you make a Pronghorn buck? Let’s get the low down from Brian Novak!
Streamline Automation is a Canadian company who have been selling FROG3D milling machines, wire cutters, printing machines and tooling for over 20 years. Key to their success has been helping clients with their production processes so they get the highest quality cutting in the shortest possible time using automated solutions. We caught up with the Brian Novak to find out about the incredible artistic projects he has been creating in Aspire, and why he created this Pronghorn antelope head.
Welcome back Brian. Tell us a bit more about your amazing foam production business and how you use Aspire to support your customers?
For those who don’t already know Streamline, we manufacture systems that process various materials including EPS and HDU foam, MDF, plastics and acrylics, as well as woods. Our clients work in a variety of industries ranging from artistic to industrial, with many processing wood and MDF using our FROG3D manufacturing solutions. Our aim is to help our customers see how easy it is to cut parts on a CNC so we use Vectric software as an integral part of our service because it allows us to provide high quality end-to-end solutions for design and build processes. Using Aspire can help our customers efficiently generate or manage their designs and we help them see how they can quickly create precise toolpaths to drive their CNCs to route, mill and engraving their end results. We’ve also taken a lot of time to develop supporting CAD/CAM training on a single platform, as well as bureau services for those customers who need our expertise to get them up and running quickly or produce projects on their behalf.
That’s a fairly extensive service you’ve developed to support your clients. What have you been doing to help educate your makers on the world of CNC?
Lately, we have been putting together some content for social media, trying our hardest to show how simple things can be. We built a few themed props for our office and took the opportunity to record the process from idea to milling then finishing touches with paint effects. Using Aspire, I was able to completely create the 3D models of the props. At the end of it all, we thought what really great projects they are as they reflect very well on the capabilities of Vectric software for both design and tooling, and FROG3D for the manufacturing. As it was all brought to finish, the images look really cool!
How did you guys get into using so much foam!
Most of our customers have sculptural applications, work in architectural and construction industries or are using prototyping and reverse engineering processes. We also have customers producing one-offs for special events, exhibits and scenic design, including a variety of highly intricate 3D props and themed environments. Our customers mostly use EPS foam for their displays.
You can see some of the work we have produced in house for customers using Aspire. Once the finished products are installed, the surface coating and paint makes it impossible to tell that it’s made of foam. Check out our channel: https://www.instagram.com/p/CHGTZhyhAg7/
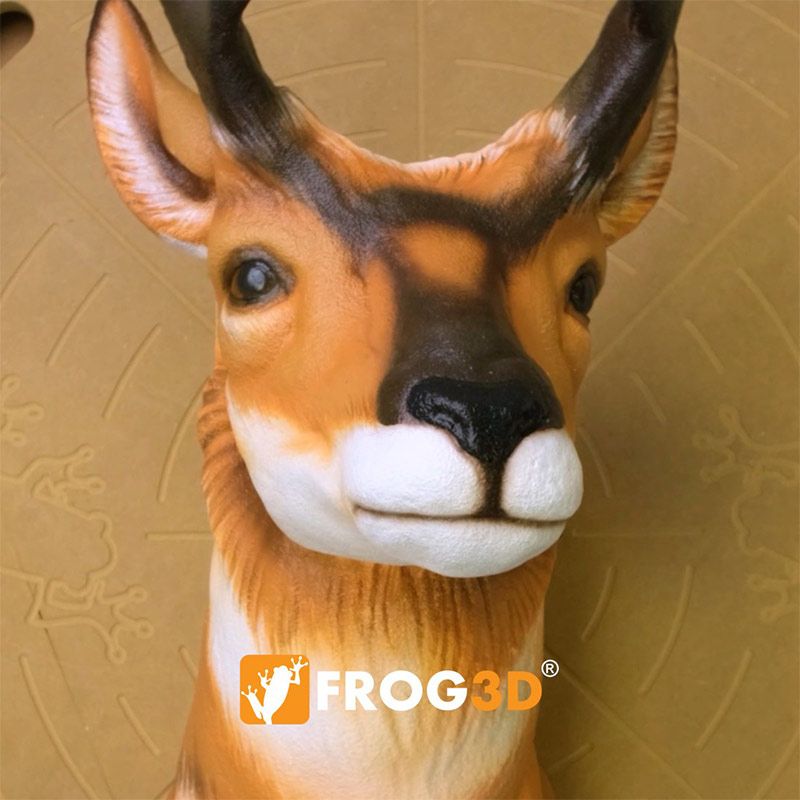
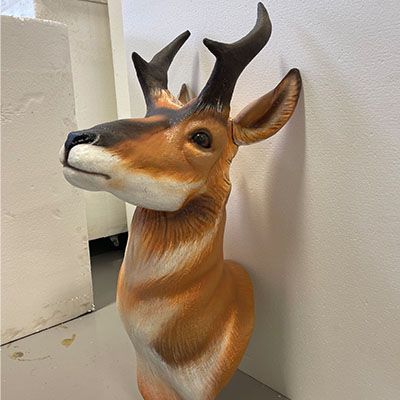
The Pronghorn prop is intriguing and we love the quality of the furry finishing paint effects. Tell us how this project came about?
As well as the design and manufacturing solutions we sell, we also make our own projects because we put just as much focus on providing training as we do on producing reliable systems. The Pronghorn was originally designated as a training program model because it’s a great way to demonstrate several tooling and finishing strategies. We commissioned a local artist to make the original model then developed the process of how we would take it from physical art into a digital model for CNC production.
Wow, so that’s why he’s pint-sized so you can hand him around to customers. He’s really lifelike and animals are notoriously tricky to sketch out, so how did you create him?
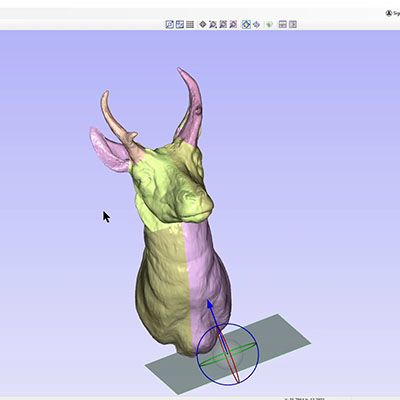
The original model was created with sculpting clay to get that beautiful hand-sculpted feel then we used a reverse engineering technique to scan the physical model using the FROGScan Flash. It’s a handheld device giving us more flexibility to capture the data than a traditional coordinate measuring machine (CMM), so we collected the model’s geometry, converted it to point cloud data which is what Aspire needs. We quickly imported it into the software, made some modelling adjustments and then started creating the tooling.
Clay is an amazing material to sculpt with because it’s so malleable and great for reworking like sketching by hand. We love how the scanner was able to capture all that rich detail and turn it into a digital model too. How did you work with the models once in Aspire to create the tooling?
We used the slicing features in Aspire’s import window to segment and split the model up into parts so they could be machined from a single direction, and using the nesting functionality, we arranged the parts on one sheet to reduce material wastage and setup time. The segments were then cut out of one piece of foam using the FROGMIll CNC system with a 1/2” diameter FROGTool bit. A couple of things to point out on the detail here is that we just used the single-sided setup because we had already split the model up into parts appropriate for relief milling. During production we also decided to remove the Pronghorn ears and cut them separately so that our small pieces didn’t break off during machining, and the Aspire 2D and 3D tab tools came in really handy for that... an earless Pronghorn is not a good look!
Well that sounds like a lot of fun being able to experiment and adapt typical production methods to fit the specific shape of a project. How did you put Pronghorn back together and prepare him for that extra special finishing touch?
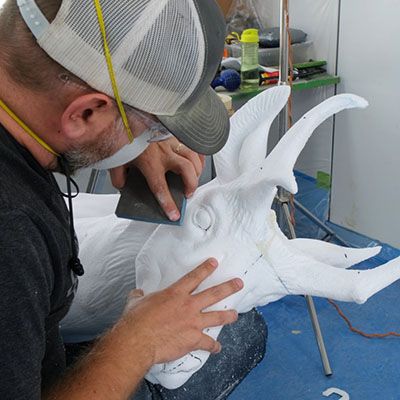
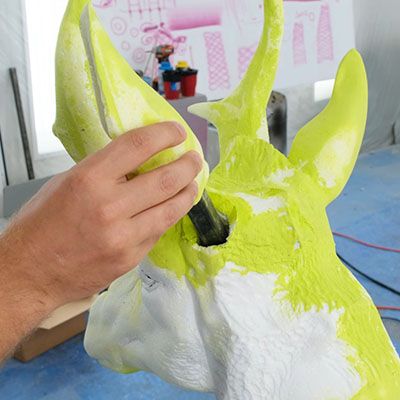
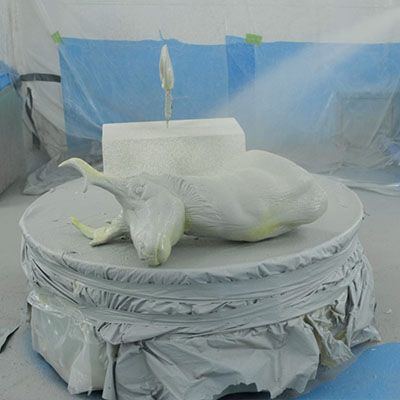
We included a small amount of armature within the model, mostly for demonstration purposes, and having the 3D model split into halves worked really well for this project as we were able to more easily assemble it around the steel structure. You know we like to go a bit crazy in the paint spray lab so the FROGSkin technique was then used to apply a Polyurethane coating, protecting the surfaces with a hard, impact resistant shell. Some of the fine details were cut back in with a Dremel tool as the coating washed it out a little bit then he was ready for painting by hand. We used a few paint techniques so that the base coat, dry brush, and airbrushing brought out all the details for this one. The finale was a French cleat being installed to make it easy to hang up in our machine shop and voila, Mr Pronghorn!
Wow, you make it all look so quick and easy to make! What are your top tips on this project for all our makers out there considering this for their shops?
My top two tips for this project are:-
1) Play to your strengths! We don’t mind using hand tools to manually cut out troughs for armature, carve out some extra details, or even dig out some undercut. Not everybody has the time or patience to do that so let the software and machines do it for you! For instance, we could have used the 2-sided machining strategy, and had the troughs for the armature machined in automatically. It’s not a difficult process, and Aspire is able to meet you at any of your goals - be it high levels of details, or fast and simple approaches. Just take the time to explore the tools available, and know that you have them in your toolbox when the opportunity to use them comes up.
2) Getting this project right in Aspire include using the “quick orientation” buttons in the 3D model import screen to ensure that jobs like this keep aligned. Then using a combination of the 2D and 3D design spaces, you can generate multiple processes off the same file, keeping things organized and ensuring that the orientations and scaling of the individual elements are all maintained. We were really happy with this project and ease of programming, and confident in the outcome of the final part 😊
Huge thanks to Brian Novak at FROG3D for sharing this great story. Take two and watch his incredible video here showing the Pronghorn morph from clay concept into the fabulously finished foam sculpture:
https://www.instagram.com/p/CHGTZhyhAg7/
More decorations, props and scenic fabrications created using FROG3D foam cutting, coating systems and specialized spray effects, all with Aspire… coming soon!

Vectric Ltd
Precision House
2 Arden Road
Alcester
B49 6HN
Registered in England Number 05382596
VAT Registration GB115123072
Privacy Policy |
Cookie Policy |
Terms and Conditions


