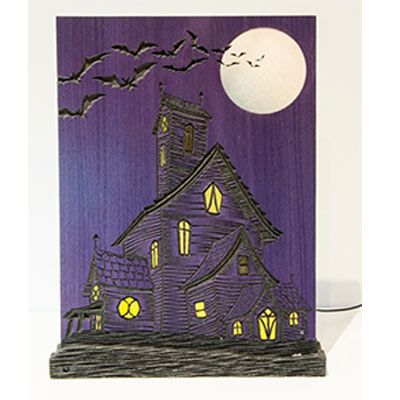
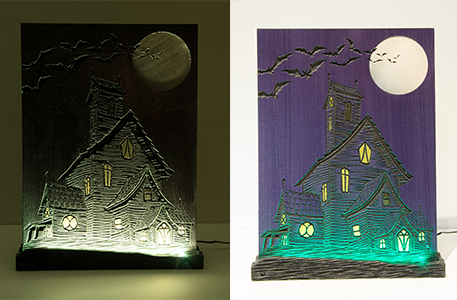
This project arose because of a commission I received from an art gallery for a picture in this silhouette style but in a marine setting. The oceans and marine life are not something I have a great deal of experience of or affinity with so I was struggling. Then one day I realised that lots of v-carve contoured lines will reflect light in interesting ways so I was looking for an idea to expand on and try a few things out. With halloween almost upon us, and some inspiration from a poster I saw, I decided to try out a haunted house picture and use LED lighting to provide more contrast and a depth - just to see if it worked.
Before I go any further there are a few things I would like to point out. First, I am entirely self taught so I may not do things the ‘best’ way or a particularly efficient way but it is just what I have come up with. I am sure you can do better and probably faster. Second, my CNC machine does not have a tool changer (other than me…) so I work hard to minimise the tool changes. Third, I am really lazy so I do my best to get the machine to do everything while I enjoy a cup of tea (I am English after all) - that is one of the reasons why I got the CNC in the first place. Finally, this project is really a prototype to test an idea so it is does require further development but hopefully will be of some interest.
Ok, enough said, lets get on with it. One of the issues we face when V-carving is getting the image to stand out. We carve into wood and all sorts of different wood-coloured materials like MDF and then comes the finishing part - colouring the v-carved areas to get them to stand out. Like I said, I am lazy so I don’t like that bit! After much looking around, I discovered a material called Valchromat, made in Portugal from recycled wood pallets (so eco-friendly). It is essentially MDF BUT, it is dyed all the way through in different colours. So if we put a veneer over the top or paint it and V-carve through the top layer- hey presto we have our coloured V-carved piece without further finishing - whoopeee!
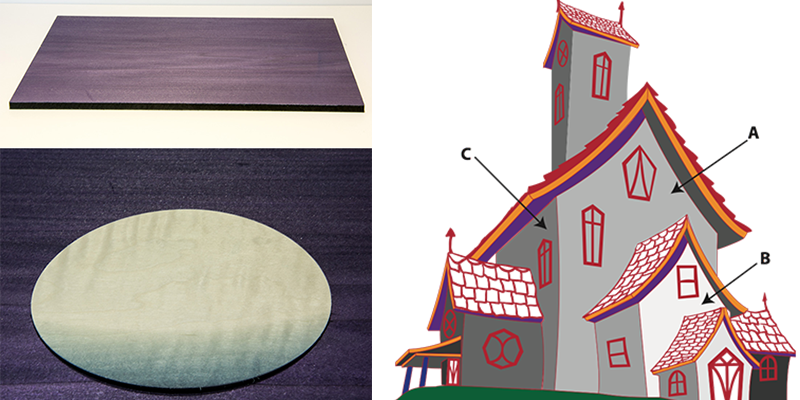
So, this project starts with a piece of black Valchromat 8mm thick. One side is veneered with a purple dyed poplar and the other side is balanced with plain poplar veneer so it does not warp or bend. Thus we have a simple board, in this case 400mm x 300mm (~15.75” x ~11.8”). Once the board is veneered it is sanded to 180 or 240 grit and then a coat of finish is applied - in my case I use a 2-pack spray lacquer and only put one coat on. Once cured it is denibbed with 400 grit paper. The finish is applied at this stage for two reasons, one is it helps bind the veneer fibres together so they cut better on the CNC and when the ‘moon’ is glued in, any excess glue is easily wiped off without leaving an unsightly glue patch.
The next job is to insert the moon. The moon is cut from bleached figured sycamore, I buy this in already bleached although it is possible to do yourself. Another approach is to cut a MDF template the size of the board with a hole where the moon is and simply spray white paint (or another colour) onto the board directly. I use the figured sycamore for contrast and the fabulous figure it lends the project. I also shade the bottom of the moon with black just lightly using an airbrush. This again adds more depth to the picture.
This is quite a complicated looking picture but in essence it is reasonably straightforward. I tend to use Adobe Illustrator to create images like this because there are a lot of tools I can use to support my laziness. It is quite possible to do this in V-carve but I also use Astute plug-ins with illustrator because I find it makes it easier! Each of the roof, door and window sections (coloured red, orange and purple in the picture) are all V-carved with a 60 degree v-bit.
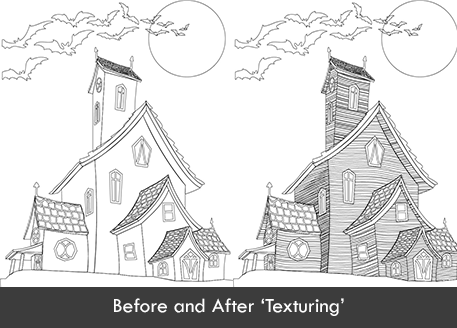
Take care to do some housekeeping if you import files like this into VCarve or Aspire and place the various objects like the roofs, windows, eaves, etc. on separate layers to make selection and machining easier later on. Each of the wall sections and eaves - A, B, C - etc. which are all coloured different shades of grey (above) have been textured using the create vector texture tool new in Version 8 of V-carve (Fabulous tool Vectric - well done!). Each wall has different settings at different angles to create the 3D effect - I just played around until it looked OK to me. The bat vectors were then imported from some clip art I modified and then the circle for the moon drawn. The pictures below show the image as imported into VCarve and then with the textures added.
At this point the picture looks really complex but each of the textured walls is on a separate layer and can be easily selected. Ok so far so good. Now for the machining. All of the roof, door and window sections (red, orange, purple) are V-carved with a 60 degree V-bit with a flat depth of 7mm (~0.27") - although the cutter does not penetrate that deep. The board, with the veneer added is about 9.5mm (~0.37") thick.
All of the ‘textured’ layers for the walls are fluted with the same 60 degree bit ramped over the entire length with a 2mm (~0.08")depth.
That leaves the ‘garden’ section at the bottom - the green bit on the diagram above. This is cut using the Texturing tool path with - yep I bet you guessed it - the same 60 degree V-bit! I have found that I also need to run the V-bit around the edges of all the walls to provide a little more edge definition on the picture and a simple profile tool path is used for this - it just makes it ‘pop’ a little more. That means the whole picture is cut with the same bit - yippee, told you I was lazy! You often get little ‘furry’ bits of veneer hanging on to the edges of the tool path and these can be removed either by using a nylon bristle brush (toothbrush or a household nailbrush) or by running a sharp blade along them. The picture is then finished using two coats of 2-pack high gloss lacquer with denibbing in between. OK so far, so good. If there is any veneer left on the bottom ‘garden’ section (green above) it can be easily remove with a v-fluted chisel - or even a scalpel.
The windows in this example were hand painted with a yellow paint - I used a quick squirt of car spray paint in a clean yoghurt pot and then brushed it on. As I got higher up the building I added some black paint just to darken it and change the effect. Please note that I use a vacuum hold-down bed on my machine so I do not need to cut the picture out. I do oversize the sections of the vectors which go right to the edge - some of the bats and the bottom textured section so that the V-bit goes right off the edge and minimises clean-up. I also use masking tape around the edges of the picture to provide further support and minimise any air leaks between the picture and the vacuum bed. My vacuum table is a home made affair and only uses a Fein dust extractor for vacuum so it sometimes needs a little help.
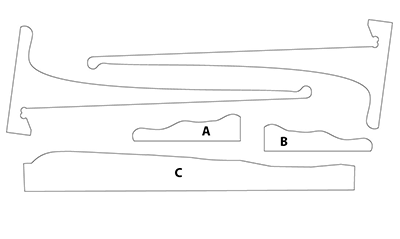
The stand is intended to hold the picture up and provide a platform for the LED lighting. The components for the stand are all cut from the same black Valchromat as used for the main picture.
The sections labelled A B and C will form the outside of the base of the stand and are textured using the texturing tool path in V-carve pro and the same 60 degree V-bit. Section C is textured to match the same texturing on the picture as closely as possible. The pieces are all cut out using a 5mm (~0.2") End Mill. I don’t tend to use tabs for this. Instead I like to leave about 0.2mm (~0.01") or so on the bottom. This saves my spoil board (I use 3mm or 1/8” MDF) and does not require a lot of cleanup. To release the components I turn the board over on the workbench and use an orbital sander with a 180 grit sanding pad and simply sand it out. This gives me a nice clean edge and it works quite well even for small components.
You will also need a piece for the base of the stand the width of the picture less two widths of the board (in my case 300mm - 2 x 9.5 = 281mm or ~11") and the depth of the stand upright - about 100mm (~4") in this case. The uprights are simply glued to the base and the textured side and front are similarly glued to the uprights and the base. the whole lot is held together by masking tape and lightly clamped to cure. Once the piece is glued up, you will notice that the edges of the sides do not match the texturing on the front. I rectify this using a v-groove gouge and just match the grooves across. Valchromat is a really good medium and carves quite cleanly.
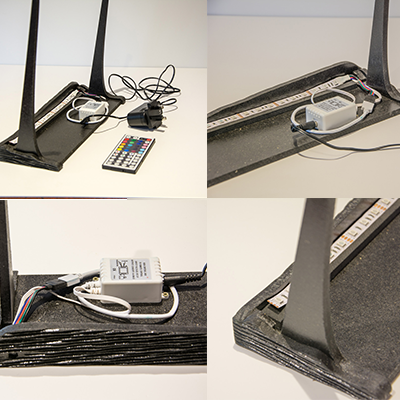
The lighting is not as difficult as you might think. I use 12V LED lighting which is readily available on ebay. Search for ‘12v RGB led strip lighting’ and a whole host of suppliers will pop up. You will also need a 12V power supply which the same vendor will no doubt be happy to supply. Try to pick a strip which does not require soldering. I do tend to solder mine (although I didn’t in this case) but I can tell you from experience that you need a really good soldering iron, lots of patience and quite a bit of practice so don’t bother - be lazy! The strip can be cut to length quite easily and it comes with a sticky back so it is easy to install. I put in an extra piece of Valchromat under the strip with an angled cut in it so that the light strip was at 90 degrees to the picture. I am sure better angles can be found but this seems ok.
The remotes work by infra-red so there is a sensor which must be pointing to the remote for it to work but you just need to cut a small hole for that off to one side and push it through. I secure the controller to the base of the stand behind where the picture sits (out of sight) with two small screws just to stop it rattling around. The light strip does have a habit of peeling up sometimes so you just need to push it down a little harder - the adhesive is pressure sensitive - at least it is supposed to be!
Warren has very kindly supplied the VCarve (.crv) files which are available to download via the button below. We would like to take this opportunity to thank Warren for his time and efforts creating such a great article and sharing his work with us. Hopefully this will provide some inspiration and ideas for next years Halloween!
Please note: These files are available to Aspire 8.0 & VCarve 8.0 Users.
If you would like to view more of Warrens work please visit: www.maplestiltskin.co.uk
Vectric Ltd
Precision House
2 Arden Road
Alcester
B49 6HN
GB115123072
Privacy Policy |
Terms and Conditions


