Our talented makers are always keeping ahead of the trend creating an inspiring mix of eye-catching seasonally themed projects and theatrical displays with a touch of playfulness and fun. As the bewitching season approaches we just love seeing how far the crafters amongst you go to create your one-of-a-kind spooktacular projects. Halloween is about the horror, haunted houses, scary movies and creepy costumes but have you ever wondered how to get even more adventurous and create the wow factor using cheaper, lightweight and more weatherproof materials for your store? The tricksters at Streamline Automation had a ball when they completely transformed their shop into a floor-to-ceiling display of devilish proportion so let's catch up with Brian Novak and find out how he used Aspire with Design & Make clipart to sculpt this devilish dungeon, spine-chilling skull and ghoulish gravestones in EPS foam... and find out if any spirits got locked up in the process!
Welcome back Brian. Thank you for sharing your latest project. Can you recap on what your business offers and how you started using Aspire to support your customers?
Most of you will be familiar with Streamline Automation now. We manufacture systems that process various materials including EPS and HDU foam, MDF, plastics and acrylics, as well as woods. Our clients work in a variety of industries ranging from artistic to industrial, with many processing wood and MDF using our FROG3D manufacturing solutions. Our aim is to help our customers see how easy it is to cut parts on a CNC so we use Vectric software as an integral part of our service because it allows us to provide high quality end-to-end solutions for design and build processes. Using Aspire can help our customers efficiently generate or manage their designs and we help them see how they can quickly create precise toolpaths to drive their CNCs to route, mill and engraving their end results. We’ve also taken a lot of time to develop supporting CAD/CAM training on a single platform, as well as bureau services for those customers who need our expertise to get them up and running quickly or produce projects on their behalf.
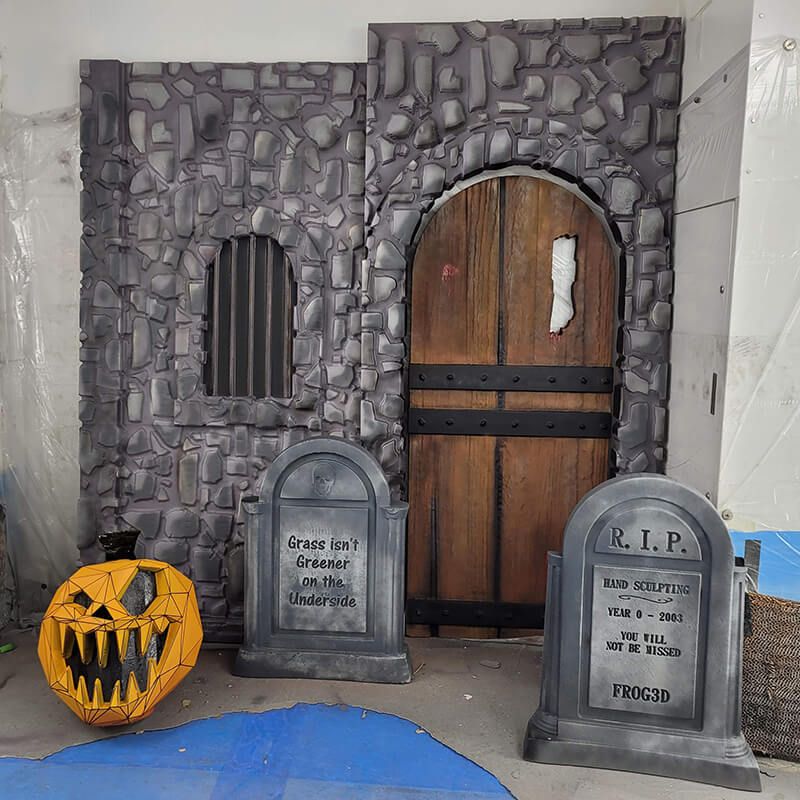
We couldn’t help but notice there have been some creepy goings on at your office. I guess it’s not so bad getting locked up when you’re having this much fun and have the equipment to play with it! How did your dungeon scene and tombstones come together?
This Halloween we built a few themed props for our office and took the opportunity to record the process from idea to milling then finishing touches with paint effects. Using Aspire, I was able to completely create the 3D models of the props. At the end of it all, we thought what really great projects they are as they reflect very well on the capabilities of Vectric software for both design and tooling, and as it was all brought to finish, the images look really cool!
Most of our customers have sculptural applications, work in architectural and construction industries or are using prototyping and reverse engineering processes. We also have customers producing one-offs for special events, exhibits and scenic design, including a variety of highly intricate 3D props and themed environments. Our customers mostly use EPS foam for their displays.
You can see some of the work we have produced in house for customers using Aspire. Once the finished products are installed, the surface coating and paint makes it impossible to tell that it’s made of foam.
We also make our own projects and these Halloween displays were entirely 3D modelled and tooled in Aspire software. Halloween is a fun time of year and a great excuse to show off the combined capabilities of FROG3D and Vectric Aspire. We created these quick projects to act as social content, and to spice up our office space for our Halloween party.
That’s a really clever way to showcase your artistry and technical expertise, and it looks like a lot of fun as this material is so easy to work with and surprisingly robust. Can we take a closer look at how you used the features to create each design and initial scale modelling through to the full-sized end result?
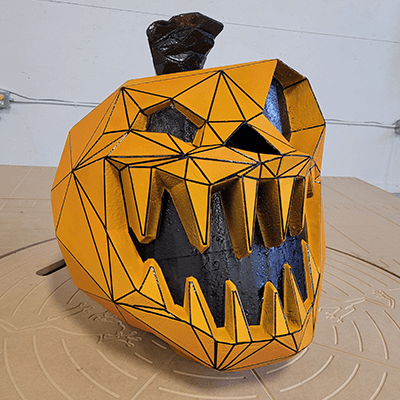
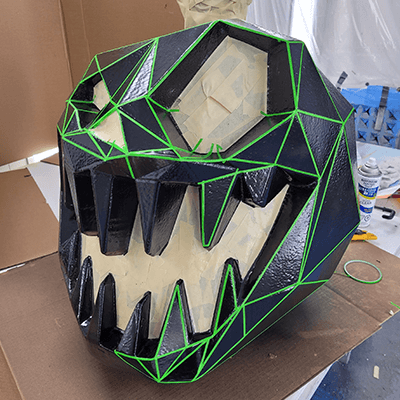
We started by taking the skull clipart from the Design & Make library of models available for free when you buy Aspire, then generated the vector outlines to map out each element. Using the Aspire 3D modelling tools, we generated the organic surfaces that make up the models; including vector tools to draw, trim and join the base layout objects plus the extrude, spin, and rail sweeps functionality to create the tombstones. Finally we used the ‘project toolpaths to the surface’ tooling functionality to prepare the project for machining.
Wow, we’re taken aback at how EPS can be worked in many ways wood can: sandblasted, routed, hand, or machine carved to look like wood grain, pebbled, smooth, and even stone. What machines and tooling were used to cut each part?
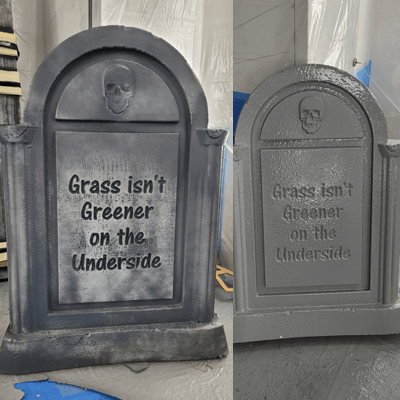
The Tombstones were a combination of 3D finishing toolpaths and we used the VCarve toolpath option which uses an engraving tool and draws nice sharp corners for text work. The “project toolpath to 3D model” is also a very handy tool as you can use text vectors to drive to toolpath, and have it form naturally on the surface of your 3D geometry, without having to 3D model it. This also makes it very easy to create a template for work like this, as well as allowing you to very quickly change the text, font and scaling without making any changes to the 3D geometry design. Utilizing the machining angle settings also allowed us to approach details from an angle that makes sense for the shape, leaving us with a better surface finish, and less sanding.
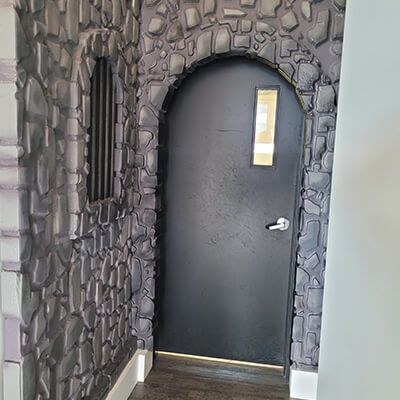
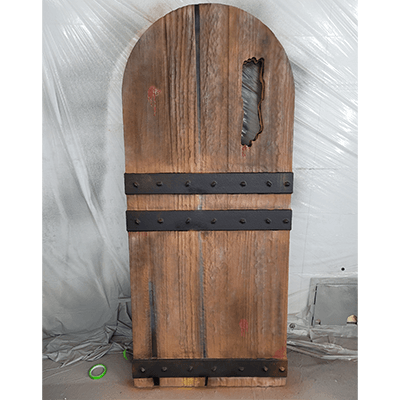
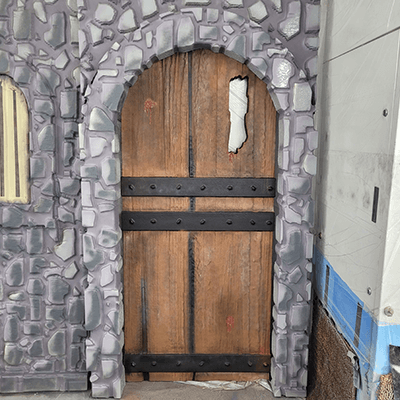
The dungeon walls were tooled with a very simple 3D finishing toolpath, taking only seconds to prepare for the machine once the modelling was complete. The door was created using the 2-sided machining setup, allowing us to carve out a pocket that would enable the existing door handle to fit in the finished piece, leaving us with a fairly convincing scene that attached right to our shop door with a couple ratchet straps!
The manufacturing process, using the FROG3D system, is fast and simple. The FROGWire is a hotwire cutter, and we utilize it to prepare appropriately sized blocks for machining, reducing both waste and machining time.
Our FROGTools are very long, and come in a variety of sizes for detailed or fast machining needs and we went with different tool selections for different parts of the project. The FROGMill used a large, flat endmill tool for the tombstones flat surfaces, a medium sized ball nose tool for the organic slopes and curves, and a 90degree VBit for the engraved text. The dungeon walls and door lacked any deep and fine details so we were able to approach it with a larger ball end tool, getting things off of the machine and into the paint booth in quick succession.
It certainly looks frighteningly real and the benefit of it being lightweight must have made it so much easier to fix to your shop walls. Your video is a great way to show how easy it is to cut and score segments and add textures to the foam using your hot wire technology. How did you finish the project and what materials/techniques did you use?
For the all important finishing touches to set the scene, we used FROGSkin Polyurethane coating to seal and protect the foam surfaces, and prepared it for painting. We use a plural component spray system that applies an atomizing material to the raw foam that can be applied in thick layers, and hardens quickly, generally within a minute. It is a much faster application than other techniques, like brush on epoxies and resins that take hours to cure, tend to run, and must be applied in multiple coats. Polyurethane coatings are a real time saver, especially for large props and sculptures!
We used rattle cans to paint the majority of the pieces plus a little bit of rolling/dry brushing for highlights on the tombstones, painting directly onto the protective coating. If these were outdoor props, we would finish it with a heavy clear coat, but for our needs we stopped the process after paint. Keep it simple!
We always love seeing how your finishing touches add that extra layer of excitement to all your projects. Do you have any top tips or tricks in the software to offer Aspire users thinking about trying this type of work?
My top tips for this project are to make use of the layers to keep your designs and elements organised. It’s simple to toggle on/off these vector layers, as well as 3D elements. This allows you to play around with the design, create multiple elements to change things up a bit and have some variety in your basic designs. Remember, a 3D toolpath generates over whatever is visible at the time you hit “calculate” so you can apply the changes simply by hiding or revealing specific details, and just hitting “recalculate” to see the end results.
Well thank you Brian. Those are really great tips for designing and creating tooling for projects using mixed materials including wood and foam. Is there anything you would have done differently?
We were very happy with the ease of programming, and confident in the outcome of the final part.😊 There’s nothing I would do differently next time except that now we have the designs, it will be an idea to take advantage of the “Project Toolpath” feature to create original pieces next year, and not have to spend any time recreating the base model info.
Huge thanks once again to Brian Novak at Streamline Automation for sharing his spooky creations. Check out how he transformed the FROG3D shop into a dungeon of horrors with Halloween tombstones here:
https://www.instagram.com/p/CkQz162POpy/
https://www.instagram.com/p/Cj8PdlQDatx/
Find out more about all the other incredible supersized foam display projects created by Streamline incorporating foam cutting, coating systems and specialized spray effects, all with the help of Aspire here:
https://www.instagram.com/frog3d/
Then have a go at creating your own immersive atmosphere that transports your guests to another world… design a haunted pirate ship, a spooky graveyard, or a sinister laboratory in foam. Don’t just wait for Halloween: this could also work for film props, sturdy cosplay costumes and faux weapons of your favorite horror characters and superheroes!
Vectric Ltd
Precision House
2 Arden Road
Alcester
B49 6HN
Registered in England Number 05382596
VAT Registration GB115123072
Privacy Policy |
Cookie Policy |
Terms and Conditions


