Here at Vectric HQ, we are always impressed by the projects made by our users. Ted Reischl’s beam compass project was one that stood out to us on the Vectric Forum due to the impressive detailing and finish. For this month’s case study we caught up with Ted and asked him about his background and how he got into CNC…
I am a mechanical engineer. I initially worked in that field designing machinery including early CNC laser cutters. Eventually transitioned to CAD/CAM sales then started writing software to support laser cutters. Mitsubishi Laser bought out my company in 1992, I then became the VP for Laser Software Development USA and worked in that position until I retired in 2002. My first exposure to CNC was actually NC in 1974. I programmed an NC lathe using a Friden Flexowriter and a hand calculator. I now have a CNC Router Parts CNC machine and use your Aspire software with Corel 2019 and Rhino 6.
Ted clearly has a lot of expertise in CNC software, so it’s not difficult to see where he got his skills to create such an amazing project. We wanted to hear more about why he decided to create the beam compass…
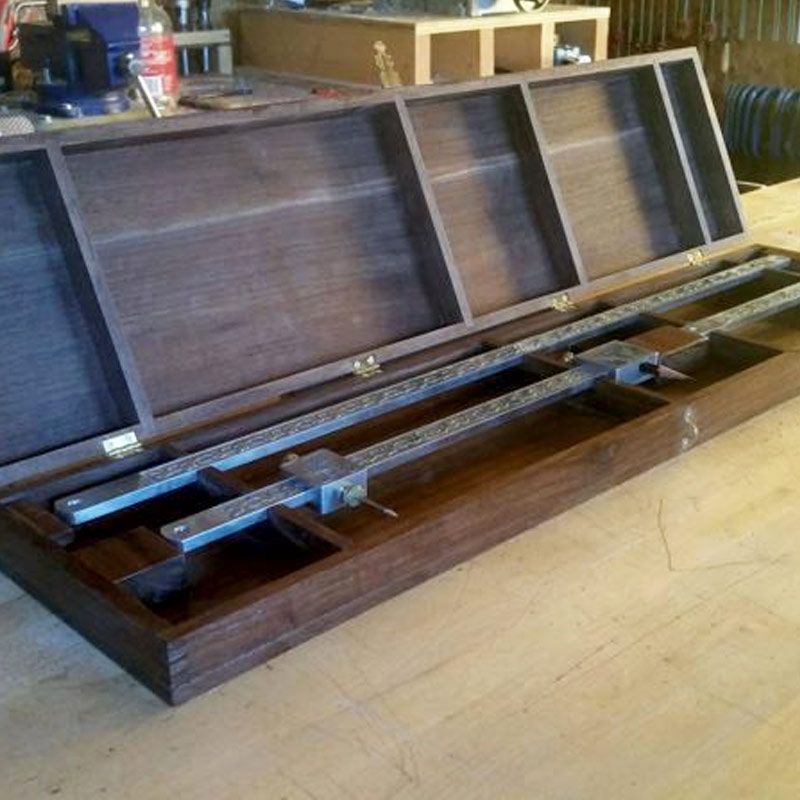
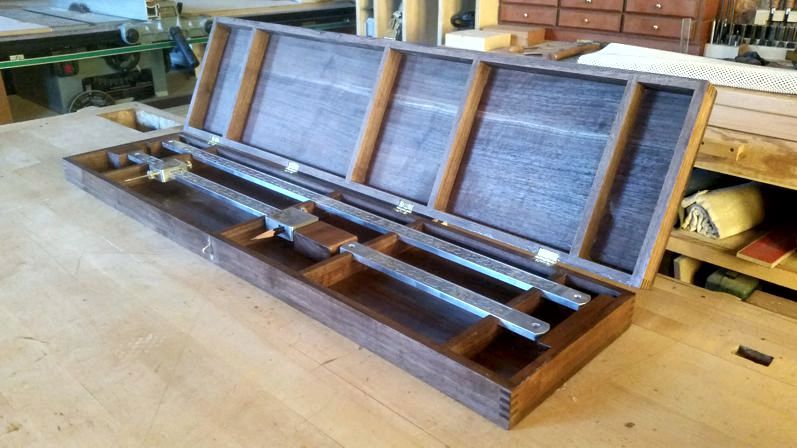
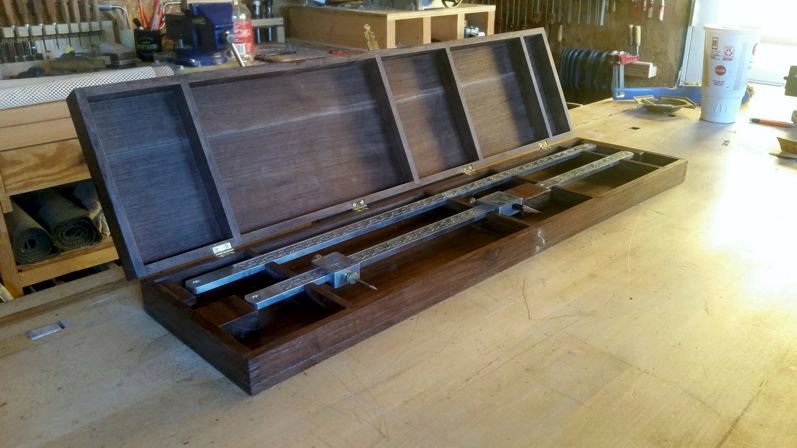
The project started out with a need I had for a good beam compass. As I started to work on it for some reason my brother in law came to mind. He is a superb woodcarver, furniture builder, and a teacher. The holidays were coming up and I thought it would make a nice gift. Of course, I could not just wrap up a beam compass in some paper and hand it to him, so a box was needed. In other words, it snowballed.
The beam compass is primarily made of aluminum sourced at the local scrapyard. There are brass thumbscrews and a hardened steel point. Basic milling was done on a mini mill. Engraving of the compass was done on the CNC. The walnut box was completely done on the CNC machine including the dovetail joinery, hinge pockets, screw locations, etc. The CNC was also used to flatten the edges after the box was sawed in half.
After coming up with the idea and the materials Ted then went to work planning and designing the project to then cut the beam compass…
Design began by researching how other shop-built beam compasses have been built. After rejecting some and modifying others this design evolved. For this type of design with multiple parts that must work closely together, I used Rhino 6 so that I could easily see how the parts interacted. This is actually a strong point of Aspire, the ability to work with other design tools to achieve the desired results.
The engraving was created by researching images on the internet. I found one that was close to what I needed and then traced it out manually. Once this was accomplished all the necessary vectors were loaded into Aspire to create the appropriate toolpaths.
The beam compass made extensive use of both profiling and pocket milling strategies. Feed was about 30 IPM at .02 DOC with a stepover of .005 using a .25mm tapered ball nose. The trammel heads used the VCarve strategy with a 30-degree engraving bit. Feed and speeds were about 30 IPM with a depth of cut of .005.
To accomplish the cuts, I created a fixture using a pocket to trap the parts and guarantee they were level. The depth of engraving on the trammel heads is very shallow so having the face of the part perfectly level was critical. Once in the fixture, a very light (.005) skim cut was taken over the entire surface with a 6mm end mill at 0, 45, 90, and 135 degrees. The face was lightly sanded and then engraved.
The beam was easier since the depth of the cut was much greater. These cuts were basic profiling and pocketing.
The wooden box can be considered to be an entirely separate project. The pieces were cut to size, flattened and squared up. I used a vertical fixture on the front of the machine to cut the finger joints. The toolpath for the finger joints was drawn up in Aspire to prevent chip out.
The dovetails for the inside partitions (to keep the sides of the box from bowing out) were cut using the same basic technique as the finger joints utilizing the vertical fixture.
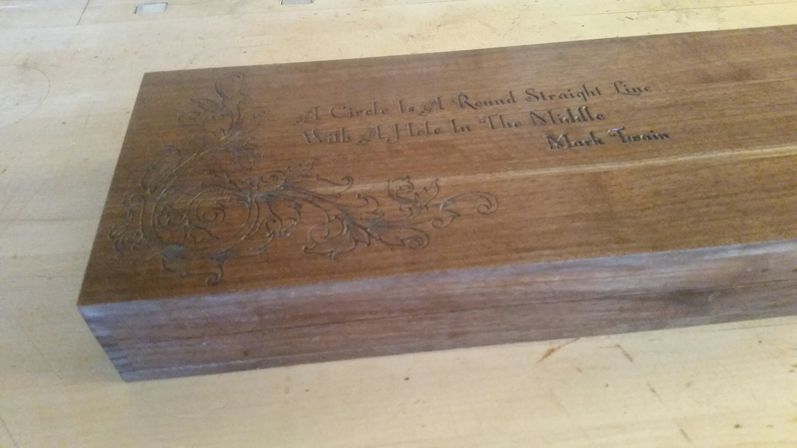
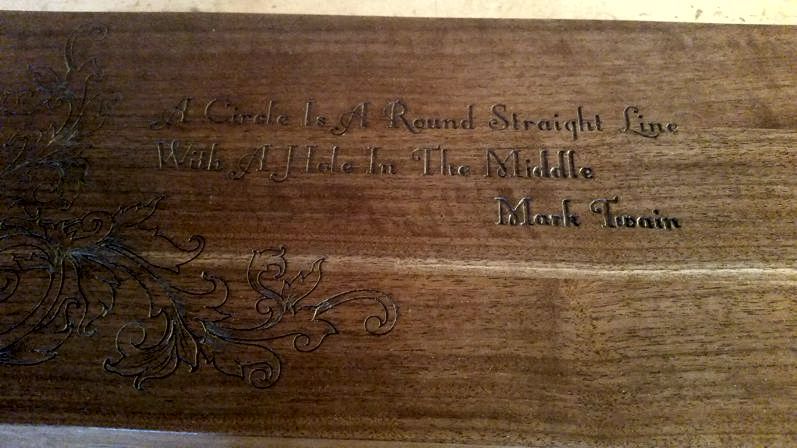
The top of the box was engraved before assembly using a 60-degree v-bit and the VCarve strategy. The vectors were hand-drawn.
Ted explained about the finishing and building of the project with some reflection…
When I build boxes I usually finish sand the parts before assembly to avoid rounding edges. The finish is several coats of shellac sanding sealer sanded/steel wooled between coats. A final coat of shellac is applied, then steel wool with a good quality wax applied and buffed out. This is the finish of choice for many of my projects since it is durable and easily repaired if needed.
The tool pathing was virtually perfect as it has been for the 13 years I have been using Vectric software. Any changes I might make are primarily design changes, there is nothing like having an item in hand to decide what I do not like about it.
We then asked Ted if he has any tips or advice to fellow makers…
The key to successful woodworking projects has always been starting with straight, square, and flat stock. Using a CNC does not change that axiom.
One of my biggest “tricks” is to use a pair of shop-made low profile vices to make it easy to work with small pieces such as the trammel heads on this project. Pockets can be cut in the wooden jaw inserts to hold small parts securely and positively locate them. I use a pair of vices so that I can clamp longer pieces like the top of this box easily and work right up to the edges with no clamp interference.
My other advice is do not “make do”. If a special fixture is required, build it. In the long run, it will save time and prevent frustration. An example of this is milling the hinge pockets in the box. I secured a piece of 2X4 pine to the spoil board then milled the vertical faces parallel to each other with a known distance between the faces. After then it was a simple matter to clamp the box halves to the rail and machine the hinge pockets and pre-drill the screw holes.
Ted’s hard work has clearly paid off shows in this project and hopefully many more to come. Before we let him go, we asked Ted what plans he had for the future…
I have just built a new 4th axis for my machine to replace the one I had cobbled together years ago. I am revisiting making segmented turnings on that axis with the goal to be able to do the inside without using a lathe for the inside cavity. The slicing ability of Aspire will figure prominently in this strategy.
We wanted to say a huge thank you to Ted for taking the time to talk to us about his project so that we could inspire our community to try something new. If you have a story you would like us to feature, please get in touch, simply email online@vectric.com. We would love to hear from you.


Vectric Ltd
Precision House
2 Arden Road
Alcester
B49 6HN
Registered in England Number 05382596
VAT Registration GB115123072
Privacy Policy |
Cookie Policy |
Terms and Conditions


