Michael Castor is Product Innovation Manager for the Maker Shed - the e-commerce division of Make Magazine. In other words, Michael has the very enviable job of selecting and testing all sorts of wild and wonderful gadgets, devices and kits sold by them to people like us here at Vectric! As you would expect, Michael is an avid maker himself and this month he explains how he made his own computer tablet with the help of a couple of CNC routers and a copy of Aspire. In a future edition of the newsletter we'll look at an amazing "Quadcopter" that Michael also created. Before we get onto how he made his "Pi-Pad" Michael starts by explaining to us how he first became interested in the potential of CNC.
Right after I graduated college I met a guy who engraved Corian counter top material with a computerized engraver. After I found out that it was possible for me to own a machine that could turn CAD files into actual parts, I decided I had to have one. I'm a maker at heart and love the precision and repeatability that CNC provides. Also, it's amazing to have the ability to turn your digital creations into reality.
I quickly became obsessed with personal fabrication and building my own CNC machine. Using 100Kgarages.com I got in touch with a guy who lived an hour away who had a ShopBot so I asked if I could come by and see his machine in action. He agreed and gave me an overview of the start-to-part software toolchain, bit selection, and hold-down methods.
He also showed me how to use dowel pins as locators for my parts and how to draw in screw holds so you don't risk hitting them while cutting. Soon after that experience I purchased my machine and was able to get it up and running. My main machine [now] is a self-built 2ft x 3ft CNC based on 8020 aluminium extrusion and parts from CNCRouterParts.com. I also have a ShapeOko2 from Inventables and an Ultimaker 3D printer.
But Michael wasn’t happy with the results he was getting with his first software package:
I started looking for other solutions, free and paid, and discovered Vectric's Cut2D. After downloading the trial and playing around I purchased it, and could not have been happier. It was very intuitive, easy to use, and completely changed the way I used my machine. I later upgraded to V-Carve Pro for the additional capabilities and am now a proud owner of Aspire.
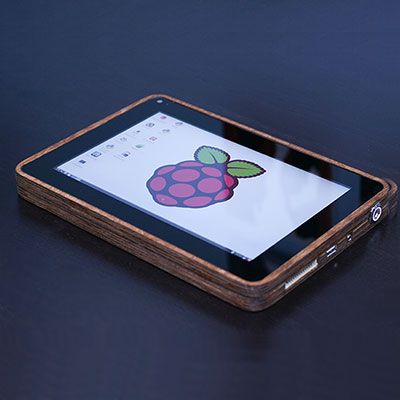
Michael recently came to the attention of many on the internet with an innovative design for a Raspberry Pi computer case. The Raspberry Pi is a UK-based initiative to create a fully-functional computer for just $30. As you might expect for this sort of money you don’t get much more than a bare-bones circuit board right out of the box, but Michael’s contribution was so much more than just a case…
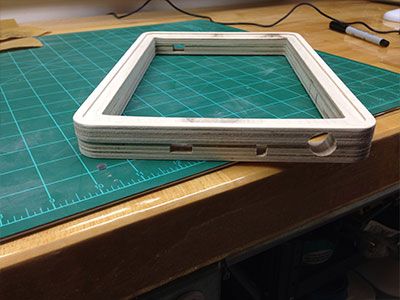
My design goals for the PiPad was to make it simple, functional, and professional-looking enough that the TSA would let it pass through airport security. The most difficult part of this project was squeezing all the necessary parts into the smallest frame possible. By laying all the parts on a scanner and using the image tracing feature I was able to optimize the internal part layout and ensure everything would fit. Next, I used the offsets to duplicate the screen's rounded edges to give thePiPad a consistent look.
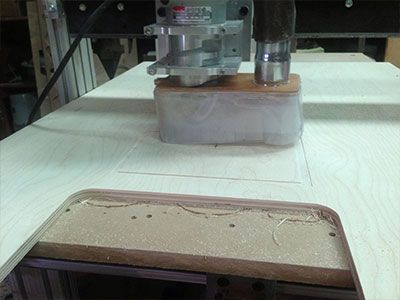
Originally I intended to machine the ports but since this would have been my first experience with multi-sided machining and since I was pressed for time, I ended up abandoning the idea. I machined the frame out of 1/2" Baltic Birch plywood using a1/4" down-spiral bit to help keep the thin plies from splintering. After machining, the frame was sanded with 120 grit sandpaper and the ports were cut in using an X-acto knife. After the hinges were installed I cleaned up the edges with a belt sander then wiped it clean using a damp paper towel.
After the frame was dried, I applied several coats of WatcoDanish Oil finish then applied clear lacquer for durability. The backing was made from carbon fibre which machines well but takes some precautions.
Carbon fibre dust is extremely harmful if inhaled. Before machining, I used a spray bottle to apply a thin coat of water on top of the material and machined through that using 1/16" carbide grout removal bit (Dremel #569.) This effectively turns the fine carbon dust into a soot that can be wiped away with a paper towel and safely discarded (make sure to wear a respirator as well.)After machining, I used 220 grit sandpaper and sanded edges under running water to remove any possible splinters.
Once the frame was completed the components were mounted inside the case. Due to height restrictions, I had to remove the Ethernet port and one of the two USB ports for clearance. After that, it was a relatively simple matter of wiring everything upand mounting it into place using foam tape or double sided adhesive.
To download the design files for this amazing project please visit:
We'd like to thank Michael for sharing how he used Aspire on this innovative project and make sure to look out in a future edition of the newsletter for the story of his Quadcopter build.

Vectric Ltd
Precision House
2 Arden Road
Alcester
B49 6HN
Registered in England Number 05382596
VAT Registration GB115123072
Privacy Policy |
Cookie Policy |
Terms and Conditions


