Dave W has been a manual machinist in a prototyping shop for over 25 years, utilizing basic equipment such as knee mills, toolroom lathes and surface grinders. He has always had a strong interest in CNC, however his workplace had little reason to invest in the technology due to their focus on manual machining. It was because of this that Dave decided to purchase his own benchtop Taig CNC mill. It wasn't long before he went on to build 2 more CNC machines, convert a manual lathe into a CNC and started using Vectric software to create a variety of projects that include metal work pieces, jewelry, signage and cutting vinyl.
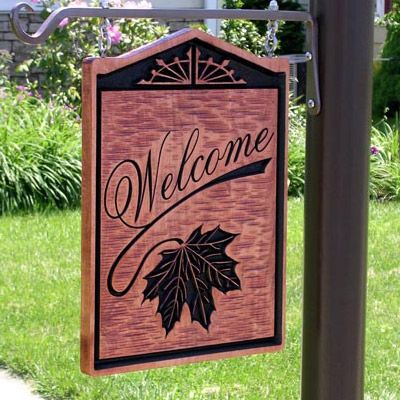
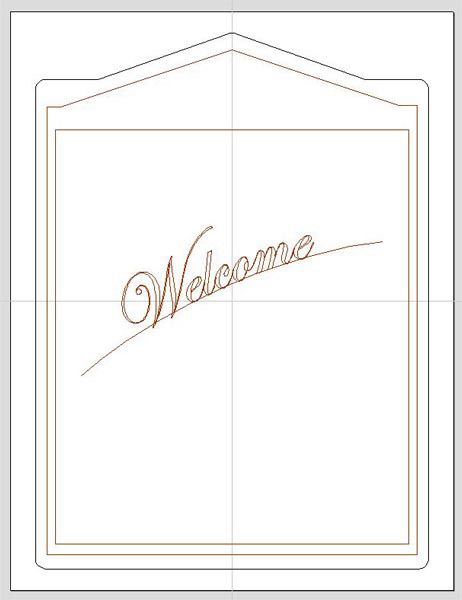
In this case study we showcase a number of Dave's projects and go into detail about one of his latest pieces, a Welcome Sign (right) that proved popular amongst the Vectric Forum community.
Dave begins by telling us how he developed his skills with CNC technology and why he decided to purchase Vectric software. Further into the article Dave demonstrates the design, toolpathing and machining processes that he used when creating the Welcome Sign and shares with us his finishing techniques and a video of his CNC in action...
"Most of what I've learnt about setting up my machines has been through the online forums and blogs. There are so many generous people out there that are willing to help and give up their time to explain what they've learnt and share knowledge gained from their mistakes."
"After setting up my machines I went through quite a lot of software as I searched for the "perfect" program that was just right for me. When I discovered Vectric software (specifically Cut2D), I knew immediately that this was by far the easiest program I had tried, so went ahead and bought a copy. Then it only took a month or two before I upgraded to VCarve Pro as I was looking for the additional functions that it contains. The videos and tutorials alone were worth the cost as they are so detailed and informative."
Using the power of his machines and Vecctric software, Dave was able to go on and produce a variety of interesting projects. You can see a selection of these in the images below. Click on the links below the pictures to read more about each design from the Vectric Forum.
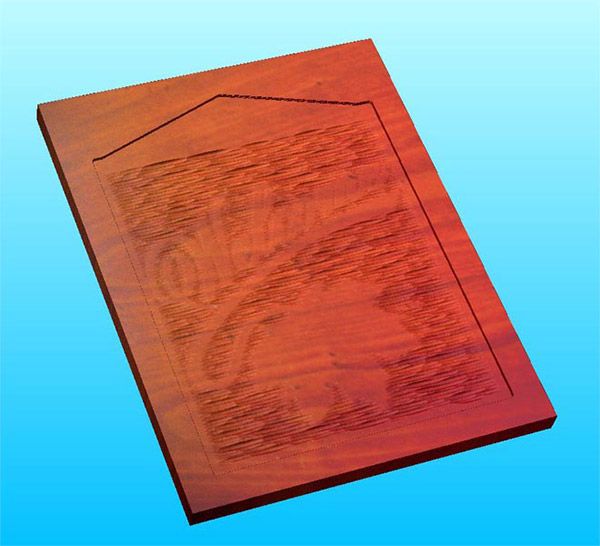
"When approaching the welcome sign I used a lot of the features available in VCarve Pro. All the functions that help you prepare a job, such as material size, layout and location, made the process a breeze. The design and drawing features such as node editing and the ability to wrap text along a curve came in very handy when manipulating the design. I especially love the 3D preview that VCarve Pro offers as it gives a true picture of what the outcome will look like and highlights any mistakes you may have made, allowing you to go back to the drawing and fix it right up."Dave's latest project, the textured Welcome Sign, was cut on his home-built CNC router. The finished piece, which includes a decorative maple leaf pattern, measures 11" x 15" x 3/4". Dave goes on to explain in more detail the steps he took when creating the sign from start to finish...
"Once the design was finalized and the toolpaths were generated I was ready to cut the sign. It was at this point that I had to think about what type of wood I wanted to use. For this particular sign I settled on maple as it just seemed appropriate to do so with a "maple" leaf carved into it and it would've felt wrong to use anything else!"
Design Process:
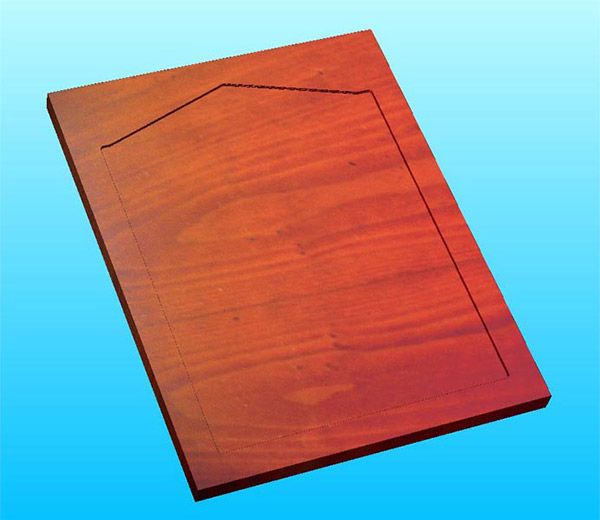
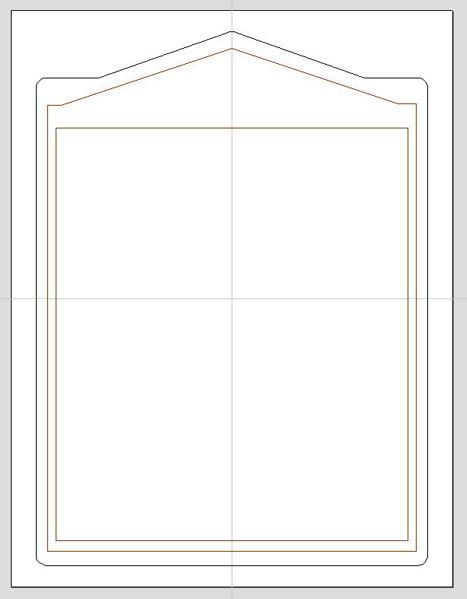
First I laid out the style and size of frame I wanted (15" x 11" x 3/4") which was sort of a "peaked" house front. I always work from the center of material as it just suits my way of thinking.
I entered the welcome text using Edwardian Script and then I drew a curved line to make the text move into a curved shape by using the "wrap text along curve" tool.
From here I converted the text into "curves" and used the "weld selected vectors" tool to get rid of all the unwanted intersections.
I worked on making the loop for the "W" and the "swoosh" below the text just by working with the vectors in the "Node editing" mode.
At the same time as the above step I manipulated the text a bit to open it up for VCarving. This way I'd get more depth and a "thicker" or "bolder" line when machining to give more of an impact.
Next was the maple leaf artwork which was a simple piece of "line drawn" clip art from a free clip art CD I've had for years. I manipulated that as well to "open" it up for machining otherwise it would have been too thin and brittle for wood.
Next I added a piece of "Line drawn" clip art at the top of the sign that I believe was originally intended for a frame corner but I liked the shape and manipulated it into more of an elongated "window". I then used the "mirror selected objects" tool and made a left handed copy of it which resulted in a nice pair of windows with the same exact features.
Toolpath Process:
The first toolpathing operation was going to be lowering the "face" of the sign by cutting an 1/8" recess with a 1/4" cutter which would give the sign some "depth" even though it was only 3/4" thick.
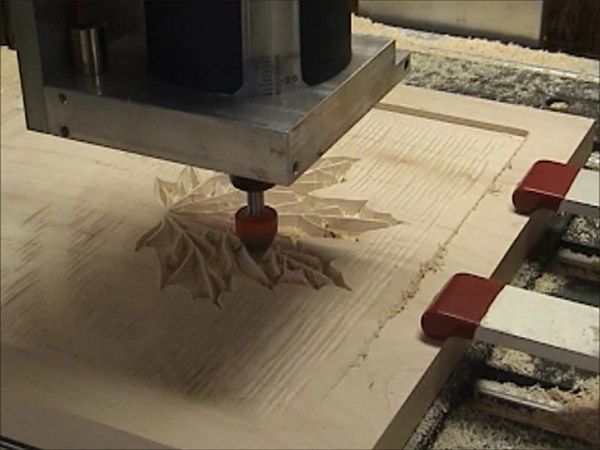
For the second operation I wanted give the sign a 'hand hewn' texture to make it look hand made. VCarve Pro allows this with the "create textured toolpath" feature. I used a 1/4" ballnose for this operation.
The third operation in the toolpathing process was setting the VCarving toolpath to use a 60 degree Vbit.
Last but not least, I used a 1/4" 2 flute cutter to mill out the outer profile using the "add tabs to toolpath" feature in VCarve Pro. This feature sets the part up to be cutout, but helps by inserting little tabs so that it does not break loose from the outer material, thus preventing damage to part.
Machining Process:
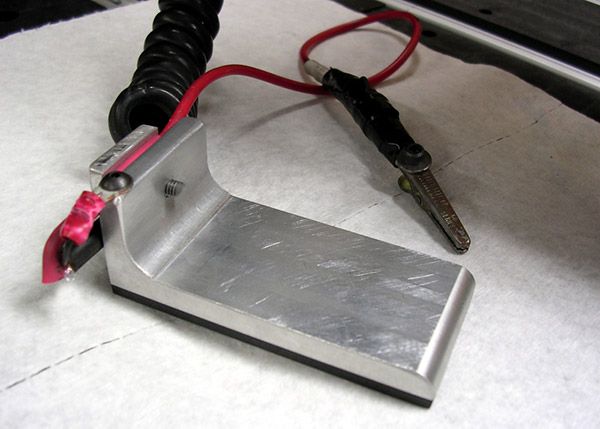
When I was ready to machine I secured my material by using lever clamps as shown in the image (left) and video (below) with a centerline mark on the material. I then aligned the center of my cutter at the point for reference on the machine. From here all the other operations will follow the same center location for each tool path.
I then load up each cutter as shown in the toolpath process above by using a touch plate that I've made that calculates the top of the surface material.
With the design, toolpathing and machining process complete, Dave goes on to explain his finishing techniques. He also shares a video (below right) that shows the Welcome Sign being cut on his homebuild CNC.
"Once the machining was complete I used a light sanding "finger" wheel attachment on my Dremel Moto Tool to clean up all the fuzzies left from the cutter to smooth everything out. I then hand finished the lettering and maple leaf carving by using an acrylic black paint with a paint brush. For the final finish I didn't want to clear coat the sign as that always seems to crack for me, so I used a Teak Oil that was wiped on in 4 layers. I realize it will need new applications through the years, but I really love the hand rubbed finish."
"This was actually the first wood sign that I have cut on this machine and it has been a very rewarding experience, especially as I built the machine myself. I've always been a woodworker at heart and this has just boosted my creativity level to an unbelievable height."
"Whilst creating this sign I learnt the true value of not rushing into a project. Let your machine cut like it wants to and don't push it beyond its limits whether it be speed or stability. If you're doing this for a hobby, take your time and always do a finish pass cut as it yields much better results in the final project and makes finishing a LOT easier."
"When you take a machine, such as CNC router table (or any machine for that matter), and match it with an amazingly simple to use program such as VCarve Pro, the enjoyment is not just the final product, it's in the whole process from designing, to machining, to the end result. Added to that you have the extremely kind and helpful people that stand behind the products and the Vectric Forum that's just full of customers that are willing to help with such in-depth answers and tutorials."
We would like to thank Dave for taking the time to talk with us and for sharing the steps he took when creating the Welcome Sign. You can follow Dave and view all of his previous projects over on the Vectric Forum under the username 'fretsman68'.
Vectric Ltd
Precision House
2 Arden Road
Alcester
B49 6HN
Registered in England Number 05382596
VAT Registration GB115123072
Privacy Policy |
Cookie Policy |
Terms and Conditions


