This project was something I put together to cut at this year’s Bay Area Maker Faire. The idea was to make a Beer* Bottle Tote (carrier) which could be cut out of plywood sheet and then assembled and made functional with no fasteners (glue, screws etc.) In the end it worked out quite well, we made a number of them and even did some “field” testing to ensure they worked correctly…
The starting point I had in my head was something along the lines of an old fashioned carrier that a milk man might use (or at least what we would think of as that in the UK). Obviously important is that is should safely and securely hold the bottles (6 in this case), that it would go together without fasteners and there would be room for your fingers as no one likes to skin their knuckles on a bottle top.
In terms of the design I kept Version 1 fairly simple in order to test how the parts would slot together and to try to ensure it would actually work. I also wanted to make the shapes basic so that once you had a working method of construction that they could be customized to make different shapes but keep the same basic assembly.
I made a few sketches to brainstorm some ideas and then went ahead and started laying out my design in VCarve Pro. One key thing with a slot-together project like this is making sure the slots are the right size for the material you plan to use. This means accurate measurement of the actual piece of plywood you are going to cut. To help manage that I laid the parts out like a traditional engineering drawing (top, side etc. ) as I was drawing I also measured the vectors regularly to ensure the parts that needed to mate together were the right corresponding size.
Next day I double checked all the parts and how I envisaged it going together and then created toolpaths on my design. Then I went into the Lab and cut my first version. (Somewhat surprisingly) it worked perfectly first time, the different parts slotted together correctly and safely held and allowed the transportation of the 6 beers I had bought in (purely for the purpose testing).
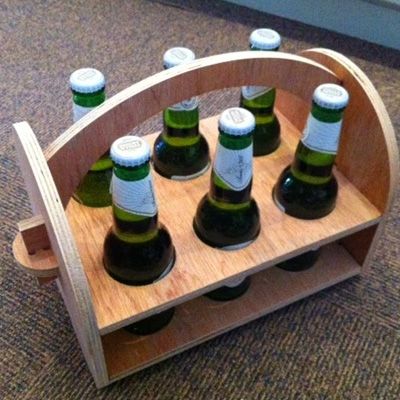
Spurred on by the success of Version 1 I decided that afternoon to create a modified alternative. Version 2 is essentially the same layout and assembly however I decided to strip out the bulk. Really I just wanted to change the shapes to show how they can easily be customized. I started by offsetting the main internal vectors and then joining the offsets to make a new outer shape and have holes within the part too. This version takes more machining because there are more parts to cutout but does look a bit more interesting and probably makes it slightly easier to load and access the bottles (this is a plus). You will notice that the size and location of all the parts that slot together are exactly the same as V1 but it looks very different as you can see in the photo.
I have not progressed any further with the design other than making a lot of sketches while flying back from the Maker Faire for some new variations, hopefully I’ll be able to make time to work on them further...
For now though, the VCarve Pro 7 files for my two variations are included here for download, these files can be opened in Aspire 4 or higher too.
Below is a video you can watch that shows how to assemble V2. Beneath this video you can find some notes on the files. It is very important to read and understand these if you want to edit the files and cut one of these successfully yourself.
If you are unble to view the video above then please Click Here to play it directly on YouTube.
NOTES ON THE FILES
Both files can be opened by VCarve Pro V7 or higher and Aspire V4 and higher. They have each been setup to cut in different thicknesses of material.
As they are presented here they have not actually been cut as I had to clean-up and simplify my original versions! To the best of my knowledge they will work with the right thickness material but should not be run on your CNC until you have carefully checked all the vectors and toolpaths. The following information
*If you really wanted then this design could be adjusted to accommodate other types of drink container…
Suitable for version 8 or greater
Login to V&Co to download the files
LoginPlease access this page on a desktop computer to download the files
Vectric Ltd
Precision House
2 Arden Road
Alcester
B49 6HN
Registered in England Number 05382596
VAT Registration GB115123072
Privacy Policy |
Cookie Policy |
Terms and Conditions


