Carl Lombardo has been a professional sign maker for the past 25 years, working out of Mount Tabor, New Jersey, USA. Carl started out in signmaking by freelancing for a few friends after retiring from a 30 year career as a plumber. After learning the ropes he soon went on to create his own business and began creating some fantastic signs, which you may have seen on the Vectric Forum such as the Bucky's project.
One of Carl's first jobs came about after a friend introduced him to a point of contact at a local army base - The Picatinny Arsenal, who at the time needed some new warning signs made. After completing the job Picatinny were impressed enough by Carl's work to offer him a full time position as their official sign painter, a role that he accepted. Carl now works at Picatinny 25 hours a week and continues to run his own business in his spare time. Carl has now been working for Picatinny for 8 years.
Over the years Carl has built up his own work shop by purchasing tools as and when required for the variety of jobs he has taken on. He currently runs a ShopBot 4'x8' CNC router coupled with Vectric's Aspire software to design and machine all of his projects. Carl has a combination of both technical and artistic experience; this has made it easy for him to combine his physical and digital knowledge to create some fantastic pieces with his CNC, such as the restored Army Sign we go on to talk about in this case study.
We begun by asking Carl to explain how this project came about, then to expand on this and discuss the customization, machining and finishing techniques that helped him replace and improve on the current sign...
How did the project originate?
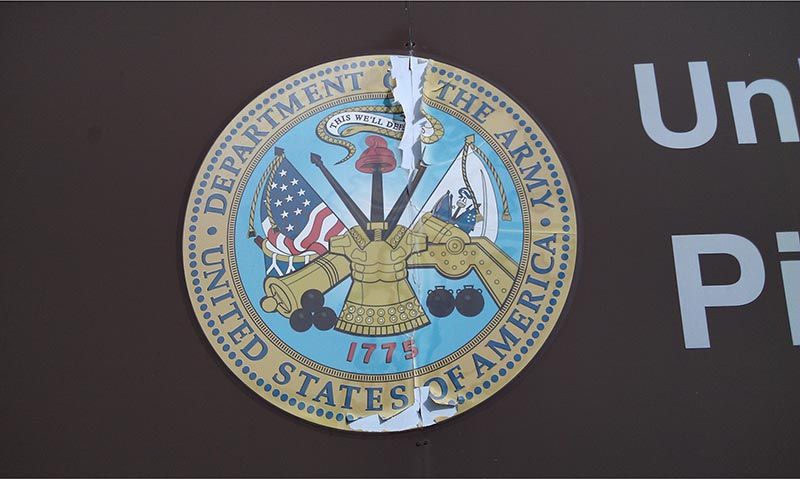
"At Picatinny, any work is generated via a Service Order request that has to go through numerous stages before it gets to me. On this ocassion I saw the deteriorating Army Insignia on the main gate sign everyday and just knew I would get that call. I was so confident that I would get the job that one day I decided to make one in anticipation of the order. I also knew that the sign was only a full color print and that I could make something much better. Finally near the end of February I got the call from the Command Sergeant Major, at this point the sign was already close to done."
How did you create the model and toolpaths for the sign?
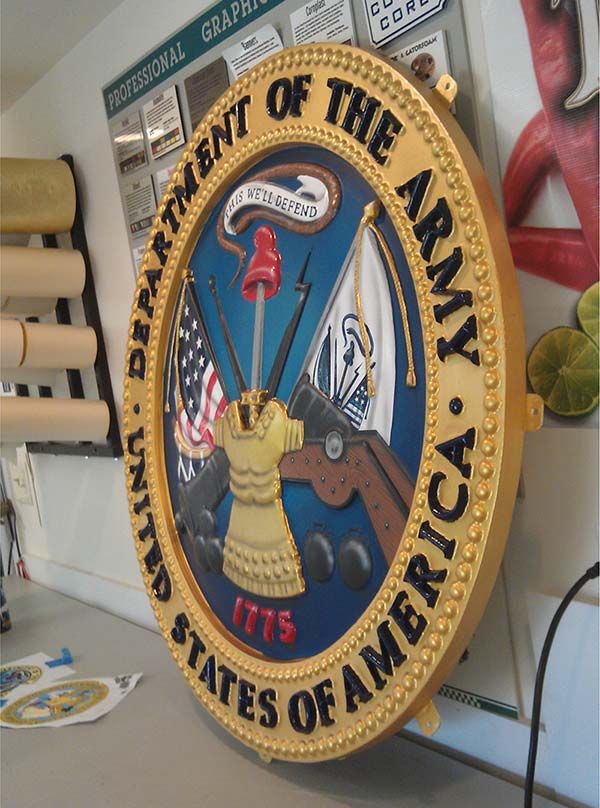
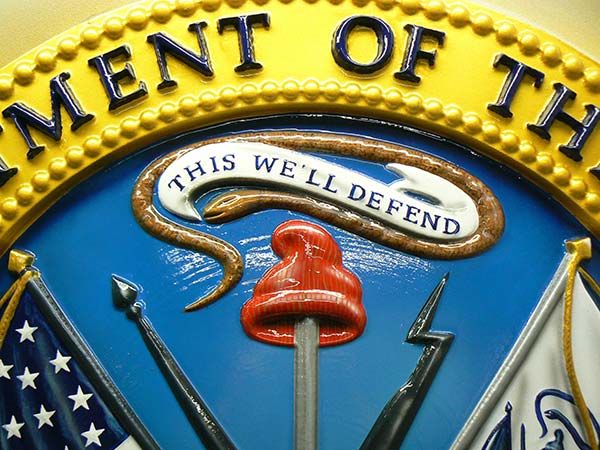
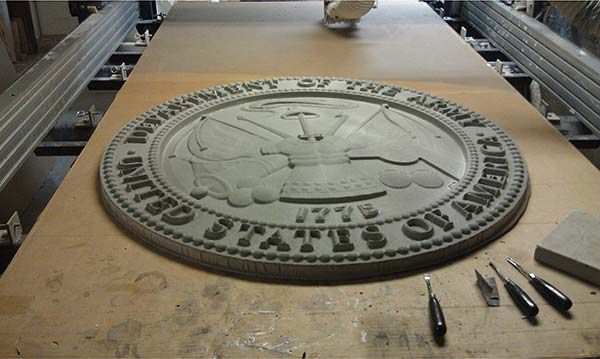
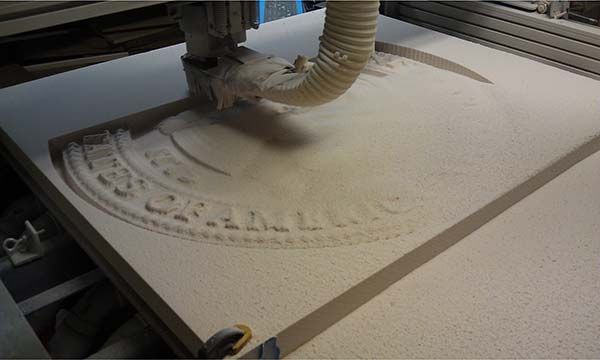
"I looked around for a 3D model of the insignia to purchase online, this would remove the process of having to redesign the logo and save me a lot of time. After searching I finally found the one I wanted from Vector Art 3D and purchased it straight away. I had to tweak the purchased design slightly to incorporate the '1775' date that was on the original sign, as well as incoporate all the surrounding text and additional spheres, but this was a quick job with Aspire's 'fit text to curve' feature. Once the design was finalized it was just a few clicks away from a toolpath file that the ShopBot can cut. The process is surprisingly easy, even for me!"
"When deciding what material to use I already knew that I wanted to use HDU, or a product like SignFoam® since it is pretty much weatherproof and was going to be mounted to a solid sign and not 'hanging' out there somewhere.
A hint to signmakers – some material suppliers sell 'damaged' sheets of HDU. This means that the corners are mis-cast by the factory or damaged by employees. You can save money buying them for projects like this one - round, so there were no corners to worry about! One issue I do have with HDU though it that it sands too easily. Due to this I avoid sanding it as much as possible. In this case, there was none to speak of as I used a ½" ballnose bit to rough out the sign and a ¼" ballnose bit to finish it using basic default settings as HDU is like butter to bits."
What was your approach to finishing?
"I used to hand carve all my signs, so for me getting out the chisels and gouges to finish off the machine carved part is a necessary evil before I can say it is ready for primer. This project is sort of an experiment for me as I wanted to stay away from oil-based paints. I have found that over the years the EPA has taken out all of the 'good' stuff from paints and as such they don't last as long. I can only fight that fight for so long so I've recently decided to use latex. For this project I used a basic HVLP spray gun for the primer and a metallic gold exterior latex paint that really surprised me with how deep and metallic it dried."
"To start the finishing I masked off the outside ring and air brushed the piece with several shades of blue, I even painted over the gold parts in the middle because I did not want a sold blue background, I wanted one with a 'glow'. Once that was ready I took out the brushes and painted all the elements inside. I like to take artistic license on many of the colors, I've never seen a gold cannon or mortar, have you? I wanted this to be one piece so I had to hand paint each letter on the outside ring several times, this is because, as I learned with this sign, latex does not cover all that well with a brush. Next time I may try to cut out the letters individually and inlay them into the sign."
"As a sign painter I know that larger signs seen from far away do not have to be "realistic", in fact you want to exaggerate the details. You will find that highlights are bigger and brighter - this is the same with the shadows, only darker. Even with the 3D model you can see that certain areas will have natural lighting shadows, I added artificial shadows with the airbrush that really makes it stand out. The final touch was spraying it with a two part automotive clear coat. I've done this to my signs for a few years now and while it is relatively expensive I believe it is worth it as many of my older signs still look good. It offers a UV protection and a terrific gloss finish. An annual cleaning and coat of automotive wax do wonders also."
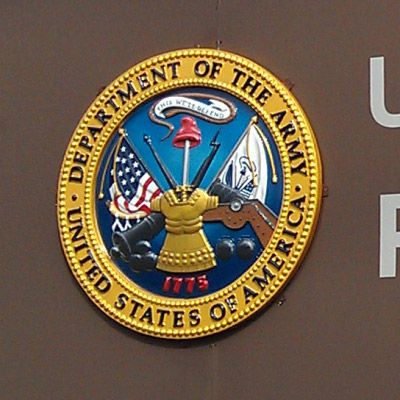
"The new 3D insignia is 39" in diameter, 1 inch larger than the peeling print I decided to leave under it. It was a very easy and light weight sign install and not very high. If I can only convince the Army they need dimensional letters I am ready, I already know I can fit all the letters on one 4x8 sheet thanks to Aspire's nesting feature. "
How was the finished sign received?
"Once the sign was finished the Command Sergeant Major sent me an email saying how good it looked, this was a great compliment."
So what are you working on next?
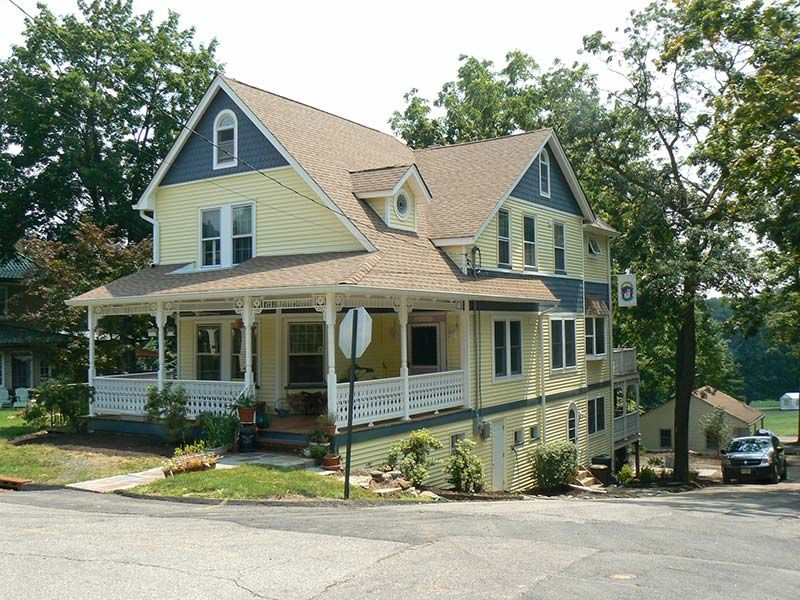
"When I started my business and was purchasing equipment for it, I was also renovating my home and I am still working on this as a project (image right). So far I have designed, machined and fitted 385 balusters that are made of ½" thick Komotex® for exterior signage. Each baluster is approx 6" wide x 32" high. The design has several features, an abstract of a women with long blonde hair parted in the middle at the top, a tulip, a daisy that is V-Caved into the baluster and in-between when the balusters are put together you can make out a silhouette of a sitting cat. You can see the recurring Daisy in the round window over the porch and in the semi-circle windows of the attic. These are also V-Carved as well as several hundred corner rosette blocks that make up the interior door and window trim throughout the house."
We would like to thank Carl for taking the time to get in touch with us about his project and taking the time to explain his process.

Vectric Ltd
Precision House
2 Arden Road
Alcester
B49 6HN
Registered in England Number 05382596
VAT Registration GB115123072
Privacy Policy |
Cookie Policy |
Terms and Conditions


