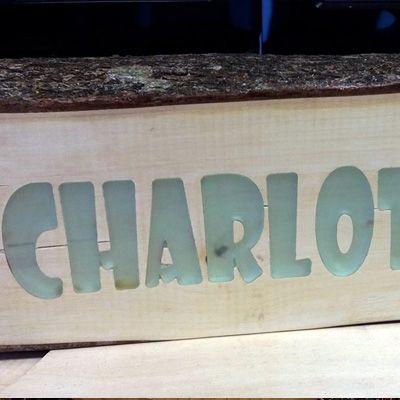
After a long Hiatus I have gotten back to trying out things on the various CNC machines here in the office to find out some of the Do’s and Don’ts of working with CNC machines.
For this project I wanted to make myself a Desk sign, but wanted it to be a little different from the other signs here in the office.
For this design I wanted it also to be a nice a simple project to get myself back into the swing of things.
For this reason I kept the CNC work as simple as I could so if I made mistakes it would not be the end of the world where I ruin a 6 hour project cut.
Keeping this in mind I started out by finding a suitable piece of wood, and as luck would have it we just so happened to have some spare fire wood laying about.
I picked out a small piece and set it in the Window to dry out… My first mistake! It dried to quickly and started to split. Thankfully not to much and I was able to cut off the worst of it in my second step, cutting it to a rough shape using the circular table saw.
With the wood cut down to size I screwed a piece of scrap wood to the back of it, flipped it over and then screwed the rough wood to the CNC machine bed.
This worked nicely to allow me to get a firm hold of it without leaving any marks on the top or side edges.
With the Wood in place, I measured it up and went away to VCarve Pro to get my Vectors and toolpathing sorted out.
I created the text with a nice bold font, and then converted it all to Nodes.
This allowed me to create an Offset vector from the original vector, which I do with the Sharp Corners turned off and then with the offset amount set at the Radius of my cutting bit (0.0625”) I offset inwards, selected the new vector, and offset outwards again.
Deleting the original vector, this leaves me with the original text but effectively fileting every corner that the Endmill would not be able to reach into, giving a great rounded effect.
A Pocket toolpath using a 0.125” bit and a depth of 3mm was applied to these vectors and saved out ready to cut, while the vectors were also exported, as a Nested DXF file, ready to be loaded into the laser cutter.
The Laser made short work of the letters in 3mm Perspex and I got the CNC machine centered on the block of wood with my 0.125” endmill loaded.
The cutting worked well and I soon had the completed text cut out of the wood…. however I learned then that an upcut Endmill performs very differently to a Downcut Endmill and found that around all of the edges the wood had frayed where it got torn.
A bit of clean up with a chisel saw to the worst of it and I Shellaced the final piece and left it to dry.
The Perspex letters were then pushed in to place, with a nice tight fit, and no glue required here!
Lessons Learned:
Know your wood types and the bits that work best for them. I found I wasted a good 20 minutes of cleanup just because I used an Upcut bit instead of a down cut bit.

Vectric Ltd
Precision House
2 Arden Road
Alcester
B49 6HN
Registered in England Number 05382596
VAT Registration GB115123072
Privacy Policy |
Cookie Policy |
Terms and Conditions



