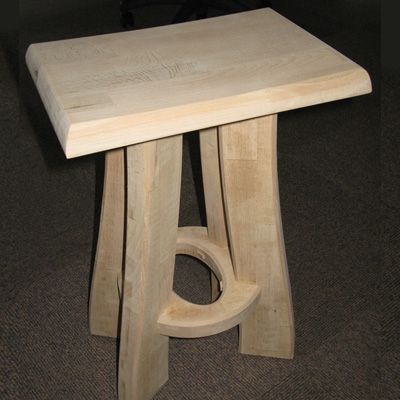
At home I have a workbench that is designed to be both a computer desk and also have places to mount a standard vice and carvers vice. This is ideal for finishing and working on “Vectric Labs” projects.
The cabinetmaker who built it did a great job and so it was important that I get a stool that would fit in with such a nice piece of craftsmanship and also be high enough for this hybrid desk. As such I decided to make something myself that would satisfy the requirements...
Initially I spent a bit of time thinking about different approaches to making the stool and had thought about doing a plywood assembly but realised this would look a bit lightweight against the substantial workstation. Then I remembered that we had some scrap wooden butcher-block style kitchen worktop at the office, this was bought from eBay essentially as scrap. This material is about 2 feet across and 1.5 inches thick so could provide a nice strong substrate and I thought it would be nice to recycle and give it a new lease of life. I believe the original pieces of wood it’s made from are probably Oak but I’m not 100% sure…
Next I started the actual design process. I had an idea of how high and wide I wanted to make the stool from measuring the space under my workbench and trying different seating heights. Next I spent some time on the web and looking through reference books to get more ideas for designs that would be appropriate for the chunky material. They also needed to be relatively easy for a novice woodworker to assemble and (in my opinion at least) look nice when finished.
After my research I decided to go for a smoothly curved seat with four shaped legs that came out at an angle from the middle of the stool in addition I added an elliptical piece to slot into the legs to provide strength and act as a footrest if the kids were sat on it. I thought this also added some visual interest being an oval shape. At this stage of any project before starting with the software I always sketch out some thoughts to think about what vectors I’ll need to construct in the program. As I wanted a curved shape to the top I decided to use Aspire so I could create the 3D model. I also decided with the thickness of material and shapes involved that it would make sense to do two sided machining on all the components so I did not have to make overly deep cuts to get all the way through the material and could add shape to the top and bottom of the seat.
The first job in the software was to work out the position of the joints I would need to create so the parts would all mate together accurately. I used the vector tools to draw out the different elements of the design from the top and a side view to define the correct positions for where the legs would slot into the base of the seat and also where they would overlap with the oval supporting piece. From there it was mostly subjective choices, making design decisions about curvature of the top and bottom of the seat and deciding how I wanted the legs to be shaped. I played around with some different options drawing various iterations in Aspire to see what I liked best. The CNC makes it easy to create shapes that would be hard to make by hand (or require a jig) so I knew I could get these just how I wanted without worrying about how I would make them!
Once I had constructed the vectors for the different pieces of the stool I added the t-bone fillets that would allow easy assembly of the joints. Next I realised I was not going to fit all the parts onto a single piece of material so create two separate files to lay out all the copies of each part I needed – the four legs, one seat and one oval support. This was more complicated than I anticipated as one of the pieces of material had some holes in it already. So I had to create a vector to mimic the position of those so I could avoid them when laying out the legs. As the seat had shape to it I also did the modeling to create the top curved area and the shapes for the side of the bottom of this component.
Next I had to set these up so that they could be cut using the standard process that we teach for two sided machining you can see the tutorial for that here: Two Sided Machining Tutorial
This method uses dowels to locate the top and bottom side to each other and requires the creation of two sets of files one for the top and bottom of each piece of material. So in this case I ended up working with four different files; one each for the legs (top and bottom) and one each for the seat and support (top and bottom). The toolpaths consisted of 3D roughing and finishing on the seat, for this I used a 1/4 inch ballnose tool as the lack of small detail allowed me to use a larger tool. For the other parts I decided to add a chamfer using a 90 degree v-bit to soften the edges and add more interest to the design. I ran this first using a Profile toolpath strategy and then a series of profile toolpaths using a 1/4 inch downcut spiral end mill to do the cutouts.
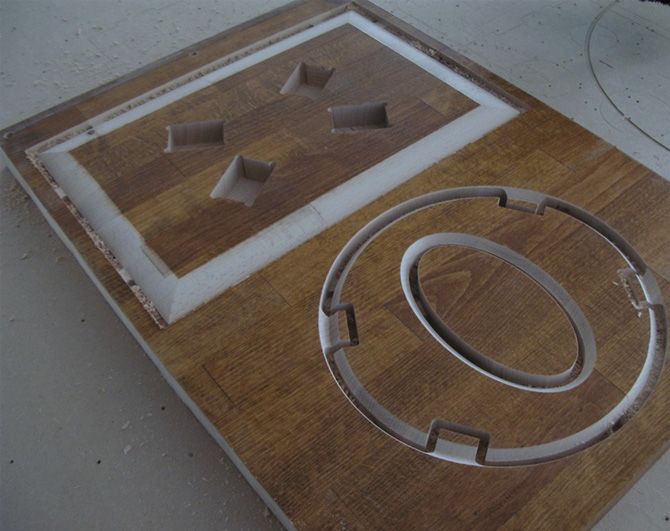
Cutting the parts went well and everything lined up with no problem. After machining I took the parts off the machine and used a flexible saw to remove all the tabs which I’d left to hold the parts in place while they were cut out. This was a bit tricky in a few spots but I’d tried to ensure they were reasonably accessible when I setup the toolpaths in the software.
The final stage was sanding, finishing and assembly. I made a few test fits to ensure that it looked plausible that it would all go together correctly then started on the sanding and finish. My biggest regret with this project is not surfacing the material to get rid of the finish that was already on it, this would have taken about 15 minutes and saved a lot sanding to get it all off after the fact – lesson learned! So consequently much sanding was done to get everything down to the original wood. Once everything looked more or less the same I did several coats of shellac on all the parts with sanding in between to seal them. Final finish was to rub all the parts with beeswax to give the stool a very slight sheen and subtly bring out the grain, this gave me the nice natural finish I was looking for.
Final assembly went well, there was a bit of help from the mallet required which I guess is reasonable given the size of the pieces of wood. Using the T-bone fillets in a way where they were hidden by the joint worked well. Even without glue it was pretty sturdy but I decided as it was going to have the kids sitting on it and moving it around it would be prudent to glue the joints and also add 4 screws through the bottom of the oval support piece to ensure everything was tight and would not come apart.
I can now report the stool has been in operation for over a year (yes, it’s taken me that long to get round to writing up this blog entry!) It’s the perfect height for my desk and quite comfortable, I am actually sat on it as I type these last few sentences. In addition I am really pleased with its shape and how it goes with my desk, so definitely a success.
Other than surfacing-off the finish to save a lot of sanding, what else did I learn from this project? If doing a similar job I would probably try and hide the joint a bit more by pocketing into the legs to allow the support to slide into it. However they still look good so this is not essential. The other thing I learned is the butcher-block worktop is good material to work with, its very stable and cuts cleanly. Some people may not like the look of the blocks but I think it worked well with the style of my stool. Its biggest downside (especially if you leave it full thickness) is probably its weight. The finished stool is quite heavy, although they does make it stable and is a good work-out for the kids when they want to pull it out from under the desk…
The files I used to cut this in Aspire are available for download from this post on the Vectric User Forum - http://forum.vectric.com/viewtopic.php?f=29&t=23793

Vectric Ltd
Precision House
2 Arden Road
Alcester
B49 6HN
Registered in England Number 05382596
VAT Registration GB115123072
Privacy Policy |
Cookie Policy |
Terms and Conditions



