This case study explains what lithophanes are and how these priceless 3D pictures can be CNC machined using PhotoVCarve.
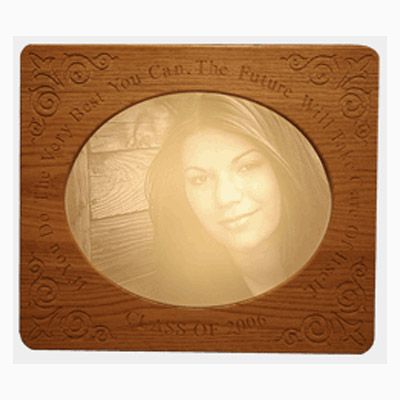
With the ever increasing demand for unique personalized work, why not use your CNC router or engraving machine to carve stunning family portraits that will last for generations.
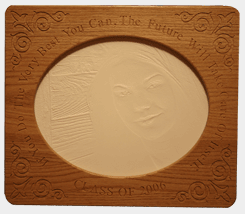
Family, friends and work colleagues will all want 3D Lithophanes of their loved ones carved into permanent visible memories that won't fade or age.
A flat piece of 18" x 12" x 1/4" thick Corian or Plexiglas costing around $10 can be transformed into a family treasure that looks beautiful and will last a life time!
What is a Lithophane?
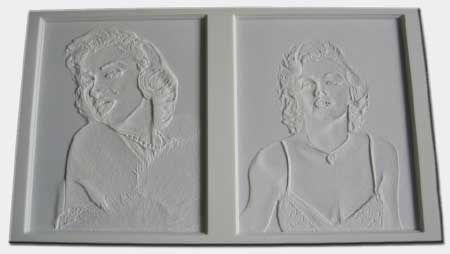
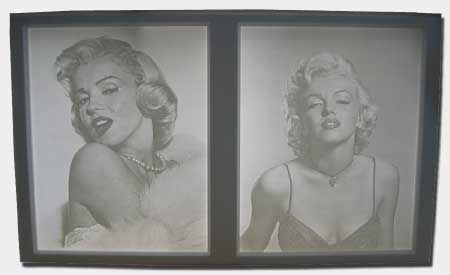
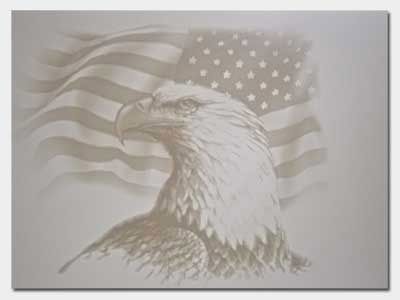
Lithophanes are 3D photographs that when viewed in normal lighting look a little dull and lifeless. But when back lit transform into stunning 3D pictures with depth and detail that cannot be seen in a flat 2D photograph.
Lithophanes originate from a process developed back in the mid 1800's for mass producing 3D pictures in porcelain. A 3D design was hand engraved into a thin sheet of bees wax that was placed over a lighted candle to show the effect of light passing through the wax. This master design was then used to make a mold for casting designs in porcelain. Varying levels of light to pass through the porcelain depending upon the thickness
The Greek origin of lithophane work means "light in stone" or to "appear in stone".
Examples of what lithophanes were used for include Decorative Lamp Shades and Window Panels that came to life when lit from behind and German Beer Jugs that had a translucent bases that turned into 3D pictures once the beer had been drunk. Very few of the original antique lithophanes have survived because the 3D images look crude and worthless unless held in front of a light.
For more information about lithophanes visit the The Blair Museum of Lithophanes and the
How to turn your own photographs into 3D Lithophanes
Sourcing suitable materials
For a lithophane to spring into life when lit from behind or held up to the light, the material must be translucent - allow light to pass through, but NOT Transparent. The 3D effect is a direct result of machining the photograph thinner for the light regions and leaving the darker areas thicker, which PhotoVCarve does automatically. The variation in material thickness determines how much light passes through the material.
The ideal material to machine lithophanes into is1/4" (6mm) White Corian which is a synthetic solid surface material manufactured by DuPont. It can be hard to acquire Corian because it's only sold to specialist suppliers and used by accredited tradesman. Many customers have contacted their local kitchen & bathroom fitting suppliers and purchased off-cuts and scrap pieces. Although Corian appears to be a tough and hard material to machine, it turns to a fine powder and machines very easily.
Avonite is a material with translucency properties similar to Corian and gives good results when used for lithophanes.
Plexiglas or Acrylic (white translucent) can also be used and although cheaper and more widely available, these materials are often more difficult to machine. The Acrylic is available in Cast or Extruded sheets and the Cast option being much easier to machine because it doesn't melt and stick to the cutter.
The cutter needs to be very sharp and Cooling with a jet of air or using a lubricant will help when machining these materials.
What cutter to use?
To machine a smooth high quality lithophane a Ball Nose cutter should be used. And generally speaking, the smaller the design the smaller the cutter diameter is required to ensure the maximum detail is machined into the piece. The larger the cutter diameter the less detail will be machined.
A 1/8" (3mm) diameter Ball nose cutter will give a good level of detail when cutting lithophanes larger than around 10" x 10" (250mm x 250mm). A smaller diameter cutter will always give greater detail but it's important to remember that the smaller the cutter diameter the smaller the stepover and this will result in longer machining times.
For smaller jobs a 1/16" (1.5mm) diameter Ball nose cutter is recommended.
Conical ball nose cutters tend to be stronger and less prone to breakage because the cutting edge gets wider / thicker and stronger.
Click here for a list of Tooling Suppliers
The process of machining 3D Lithophanes is very simple
Open a digital or scanned photograph (colour or black & white) into PhotoVCarve
Specify the required size
Choose a Ball nose cutter from the Tool Database
Save the toolpath file and run it on your machine
Take a look at the Training Video below to see how easily Lithophanes can be made.
It's important to remember that Lithophanes will typically take a couple hours to machine, but remember the CNC machine will cut unmanned while you are doing something else.
On-Line Training Materials for machining Lithophanes with PhotoVCarve
This video tutorial and pdf document explain how you can convert your own photographs into stunning lithophanes and cut them on your own CNC machine.
If you have any questions about Lithophanes or PhotoVCarve please e-mail - support@vectric.co
m

Vectric Ltd
Precision House
2 Arden Road
Alcester
B49 6HN
Registered in England Number 05382596
VAT Registration GB115123072
Privacy Policy |
Cookie Policy |
Terms and Conditions


