This month we look at the work of Aspire user Eric Schimelpfenig. Eric, a kitchen and bathroom designer is also now the founder of SketchThis.net, which offers training in the use of SketchUp particularly for use with a CNC. The creative work that Eric produces has taken him international, showcasing his work at trade shows, Maker Faires and he’s been featured in many online and print publications. As you can see from the images in the articles Eric has been able to create many diverse projects using his software and CNC skills in particular a Foosball table combining many different digital manufacturing techniques that we’ll be taking a look at later on in the article, but lets start by finding out how he first got interested in utilizing CNC machining in his work…
Well I first discovered CNC when I read an Instructable on how to build a CNC from a hobby electronics kit and wood. The design was incredibly complex. I ended up cutting it out on a band saw. The resulting machine was; shall we say quite unreliable. That lead me to redesign my own machine that had a 24×36” cutting area. It was powered by Cut2D and that’s what got me started…
I’ve always been a fan of digital fabrication. For me the ability to control a machine to make whatever you want is not only fascinating, but something that’s scalable in a way that not many other tools are. As I make something, I make my designs and cutting files better with each cut. Those improvements are not lost over time, they accumulate in the computer. These solid layers of improvement allow me to focus on many projects at once, incrementally improving them over time.
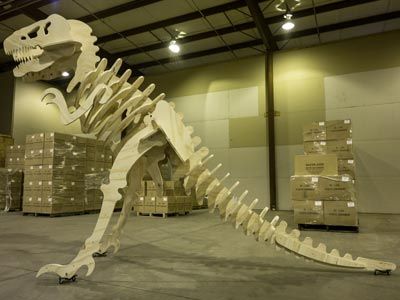
I worked in kitchen and woodworking design, but now I am a contract maker of things. Any kind of weird or interesting project I will (possibly foolishly) take on. The projects I’ve done over the past two years have ranged from Foosball tables to geodesic domes and it’s great because now I have my own shop these are all possible to make. I have equipped my workshop with some more powerful CNC’s since the days of my hand built machine. I’ve now got a shopbot Handibot, a 4×8 shopbot PRS, a 5 axis pocketcnc, and several 3D printers. My 4×8 shopbot features a fixed Z Zero plate which allows manual tool changes. I retrofitted a spindle speed controller and relay board. This allows the machine to change the spindle speed on the fly. The relay board allows me to control the external warning lights I’ve added. I also added an 8 zone custom designed “V8” vacuum system that is powered by 4 220 volt lighthouse motors in a custom enclosure.For software I use sketchup to design and then import those designs into Aspire to mill. Aspire is perfect for me, the ease of use, power, and extensibility of it make it great right out of the box. The excellent support and community are immeasurably powerful additions to the software.
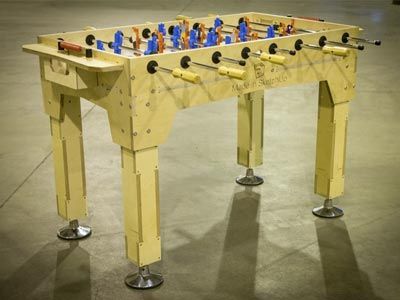
We think it’s safe to say Eric’s equipment provides him with everything he needs to create his projects. With the tools at his disposal and more importantly his experience and curiosity, turning creative ideas into reality is made a whole lot easier, which brings us on Eric’s amazing Foosball table.
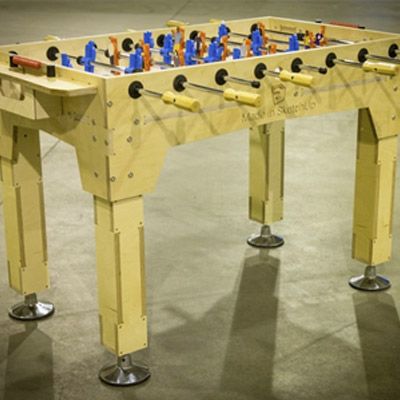
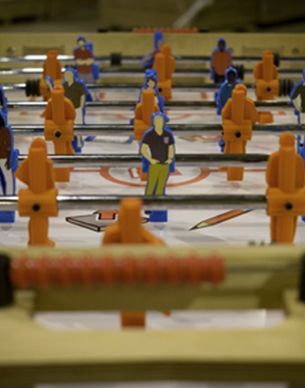
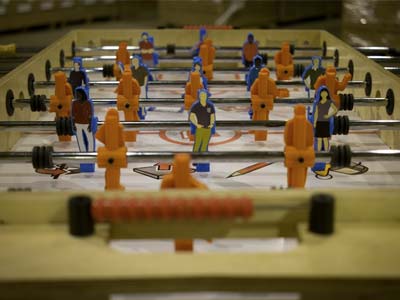
The Foosball table was designed to be a fun way to show how one could combine different mediums together to create one super cool project. This particular project combined CNC milling, 3D printing and vinyl graphics. I designed the whole thing in sketchup. I use the sketchup models in vcarve (which I was using at the time I made this) to create the toolpaths, the graphics were designed in sketchup sent to the vinyl printer, and finally I used the 3D models of the foosball players to send to my 3D printer. After I milled and printed all of the parts, they all fit together exactly as I intended them to. This only worked because of the accuracy of the digital tools I used throughout.
The CNC milling took a few hours. Then there was sanding and finish time. Assembling the plywood actually was quite easy. I like to use bolted connections for things to make them easy to assemble, and easy to modify afterwards. The 3D printing took about 80+ hours to complete, and the vinyl printing took just a few hours. After I had all the parts together assembly took about 2 hours. Now that I’ve done it before it can go together in about 15 minutes. This foosball table travels around and I’ve got it setup in a special shipping crate so that we can pull it out of the box and be playing in just a few minutes. I milled these on a shopbot PRS standard so I did 3 passes with a compression bit at 4 inches per second. The 3D printed players were done with 5 shells and 50% infill so they’d be strong. Baltic birch plywood for the body, PLA filament for the 3D printed players, lacquer for the finish and vinyl for the playfield. The rods and other hardware were sourced from Thompson game supply.
There were two important features within Aspire that I had used for this project (and many other projects I have made) The sketchup import is key to making these as the whole design was made there. After it was imported using the dog bone feature is indespensible. I’d like to take this time to thank sketchup because they funded the project and gave me the creative latitude to do it. Outside of that it was totally designed and built by me. You can read more about it on their website.
The final assembly went spectacularly. I expected there to be the moment where I’d find out all sorts of things were either wrong, or needed a lot of hand work to fix. Because I carefully designed it, and I created all of the parts using digital tools it all worked out. I think the real key to this working, aside from using the digital tools was to measure and draw absolutely everything. Even down to the bolt heads, it was all drawn in sketchup so I could check all of the clearances. Sure, the feet didn’t really needed to be modeled here because I bought the as an off the shelf item, but having them in my 3D model helped inform how I positioned the legs. Modeling everything else let me see how each and every part worked together.
In the future I think I’d get more 3D printers to pull off a project like this. My single (old) makerbot worked around the clock for over 80 hours to print these. After the very last player was printed it broke down. I’ve since gotten a few extra printers so that when I do a project like this again, I have backup machines and I can produce the parts quicker.
Well, as we can see Eric’s experience and meticulous eye for planning each aspect of the design have allowed him to create a brilliant showcase of what accessible digital manufacturing is capable of. We would like to take this opportunity to thank Eric for taking time out of his massively busy schedule to send in his work and tell us all about it. But before we let Eric go we had to ask him what he has planned for the future…
What don’t I have planned… The crazier the projects, the better! I’ve been making more digitally cut work benches and furniture. I’m working to make the process as easy as possible for anyone using a CNC machine.
Vectric Ltd
Precision House
2 Arden Road
Alcester
B49 6HN
Registered in England Number 05382596
VAT Registration GB115123072
Privacy Policy |
Cookie Policy |
Terms and Conditions


