For this month's case study we talked to Steve Palm, a hobbyist CNC woodworker from Columbia, Maryland, to learn more about some of the projects he has built with his homemade CNC. We were first saw Steve's work via his posts on the Vectric Forum (user name 'SPalm') where his boxes received a lot of positive comments.
Steve explained to us why he started out in CNC, his general approach to design and machining and how Vectric software has helped enhance his projects over the past 6 years. Steve begins by telling us how the combination of his interest in woodworking and technology inspired him to develop a home-built CNC router and then goes on to discuss a few of the projects he has created utilising this machine.
"I first discovered the world of CNC 6 years ago when I decided to combine my childhood attraction to woodworking with my career in electronic design. As a youngster I was so passionate about woodworking I even bought a used lathe at the age of 13 with my paper route money! This attraction has followed me through raising children (and now grandchildren) and is evident by all the cabinets, furniture, toys and boxes that I have designed and built over the years."
"The first time I ever heard about CNC was when I noticed an internet advertisement for building your own router. I had no idea about what was involved, but I knew I had to have one as this was the combination of my three passions: design, woodworking and computer control."
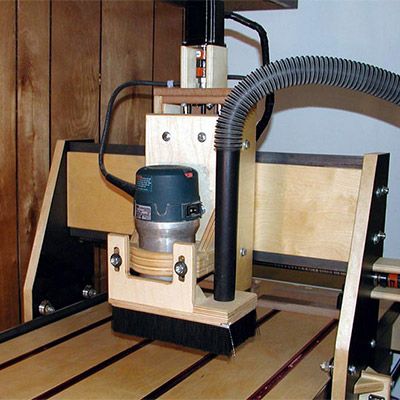
Homebuild CNC
"I have spent the last several years pursuing the build of my CNC router. Before I started I knew absolutely nothing about the subject, either hardware or software, so it has been a demanding experience. The CNC which is now ready to be used was completely designed and built by me and is currently on its third generation. It is made mostly of Baltic Birch and can cut 3/4" hardwoods at a decent clip of around 2 inches a second. It also has dual lead screws for the long axis, and special V-bearings riding on the rails. I added a tail vice so I could route with the work piece held vertically so now I can route dovetails, fancy mortise and tenons etc., it can also do the more standard horizontal work of part profile cutting, sign making, decorative carving and more. What I ended up with after several years has proved to be a very adequate and balanced design."
"To compliment the design I have been using Vectric's VCarve Pro software since I built the machine. I use several different CAD packages in my work environment but VCarve Pro is unique. By integrating design, toolpaths and simulation into one package, it has allowed me to really see my projects before I cut them. If required I can then go back and tweak the design, toolpaths etc. and recalculate. This led me to trust my machine a lot more and I cannot say enough about the software, I recommend Vectric all the time."
"So at this point in time I have got great software and a fancy router that I can use along with my other woodworking skills. I have tackled a variety of projects but recently I have been using it for wooden box designs, carving out a block of wood for the box and creating a carved top that can attach with a wooden hinge. I have developed this idea further to create several carved boxes that then stack on a pivot and swing out to become trays. You can see some of my designs below. "
To view Steve's CNC build log visit - http://lumberjocks.com/SPalm/blog/2248
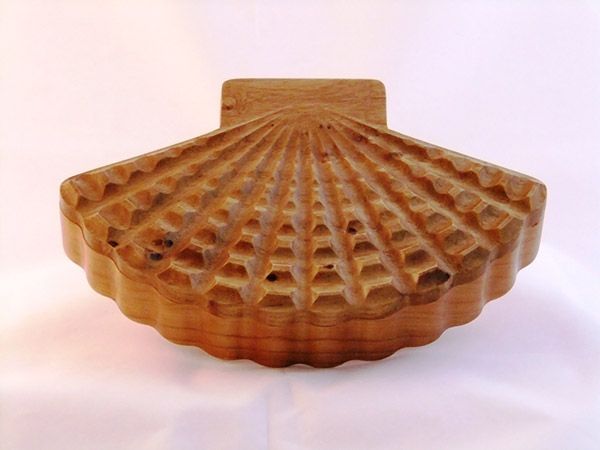
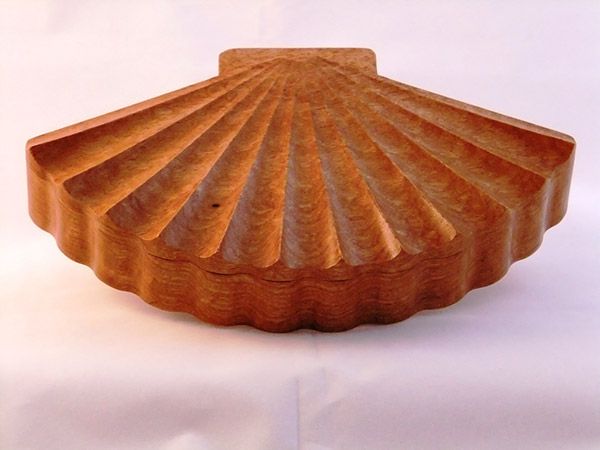
Shell Boxes
"These are two versions of this classic seashell box. It is an original design, but a lot of the features have appeared in other woodworker's versions. For the first box (below left) I used African Rosewood and cut the scallops on the top with a 1 inch diameter core box bit. These have a linear slant to them starting near the hinge and slowly dropping down to a .3 inch depth. Because the flutes overlap, the scallop edges have a nice scoop to them along their length."
"For the second box (above right) I used Siberian Birdseye Elm and routed the top with a 1/2 inch diameter core box. Again both the straight and the arc lines go deeper as they radiate out from the center. The box bottom is cherry. The photos do not do the finish (shellac, Tung oil, and wax) justice, the completed project measures approximately 6 inches by 9 inches."
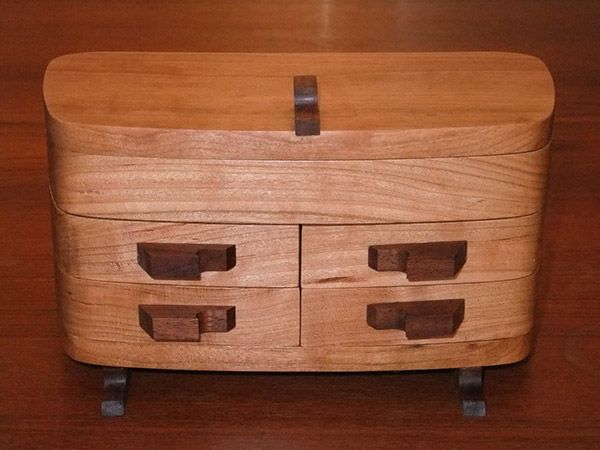
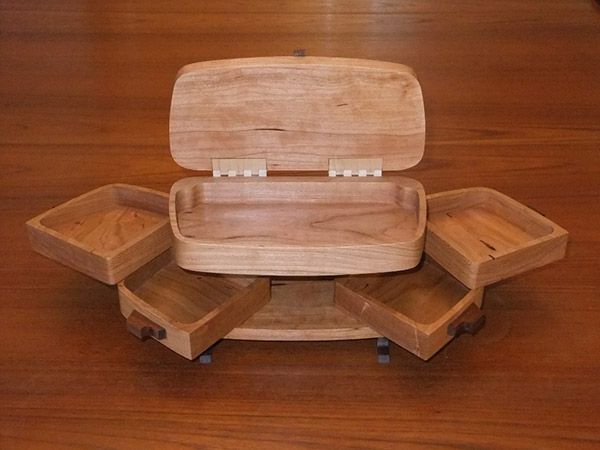
Jewelry Box - Free project files below!
"The building of this box presented a number of challenges, especially as I resized the design to fit my lumber and ended up not being able to use the hinges I bought. In the end I decided to use wooden ones instead."
"The basic carcass is held together with five dowels - two are used as hinge pins for the drawers and the other three are hidden inside the back. I made the back plate out of separate pieces to keep the assembly easier (dowels are so unforgiving). The drawers press against this back plate which allowed me to slightly sand the back of the drawers until they closed with just the front gap that I wanted. I used brass washers to separate the drawers. It all worked out quite nicely in the end."
"The cherry all comes from one board and I used walnut for the feet and handles. I also used maple for the hinges. It has several coats of Tung oil finish and when closed the box measured about 8.5 inches wide, 4.5 inches deep, and 4.5 inches tall."
"I may try it again as I often wonder whether the walnut is too much. If I do decide to make another jewelry box I will definitely add finger grabs for the draws and line the trays."
Steve has kindly shared the VCarve Pro files for the Jewelry box design on the Vectric Forum. To download the files Click Here to view the forum post where you can also see another variation a Vectric customer has created.
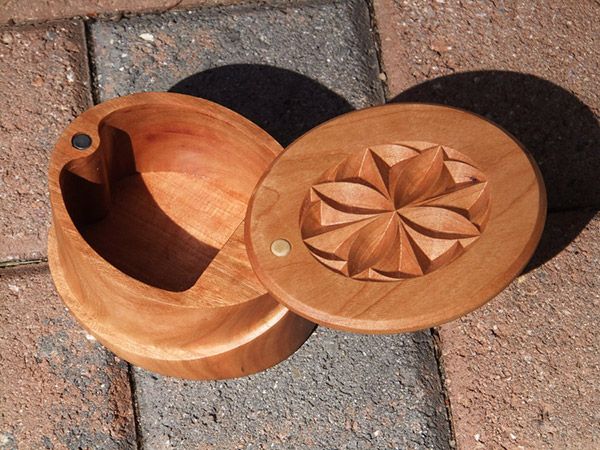
Salt Boxes
"This box is made from Cherry and was designed for the kitchen when a 'pinch' of salt is called for. It can also be used for the storage of other types of salt and spices or just as a general purpose box as well."
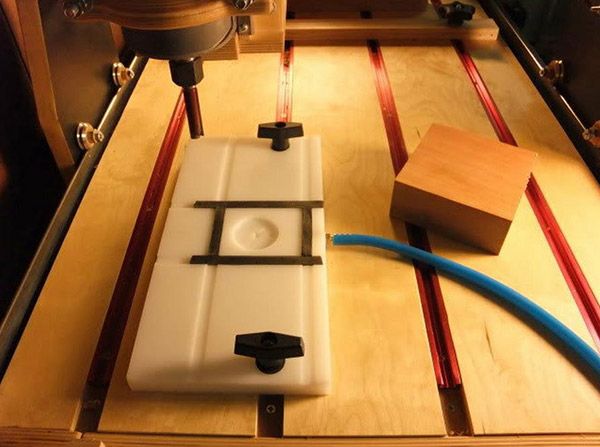
"I came up with the original design for this box so it could be made using my CNC. To start with I first routed out a few different shapes on scrap wood and learned a lot about cutting wooden parts this deep. Two of the early ones I carved actually shattered as I pushed it too hard! I am really proud of the carved design on the top, the thin walls and the way the sloped carving on the sides came out. To keep the lid shut I installed a magnet. The size of this box is about 3.5×4 inches, with a tung oil finish."
"You can see a picture (below far right) of the salt boxes just off of the machine. You can see the web at the bottom that holds the work piece in place during all the separate operations – Pocket Route, Inside Profile, Outside Profile, Curved Flute, and Drill. The main routing was done with a two inch long 1/2 inch router bit. I then changed to a 1/4 inch bit for the small holes. The separate top carving was done with a V-bit and then a 1/4 inch bit did the drilling and the final profile cut out."
To view Steve's blog about some of the machining operations visit: http://lumberjocks.com/SPalm/blog/26065
Summary
"Each project is an opportunity to learn and think about different ways to use my experience from previous boxes to create the next one! I am currently in the process of working on a design that utilizes VCarve Pro's ability to lead an image. I create a new job then import a picture of a sea shell to the bitmap layer and use the drawing tools to create the vectors on top of it to match. This has allowed me to make sure I use Nature's proportions. I love it."
We would like to thank Steve for taking the time to discuss his projects with us and we look forward to seeing more of his posts on the Vectric forum soon.

Vectric Ltd
Precision House
2 Arden Road
Alcester
B49 6HN
Registered in England Number 05382596
VAT Registration GB115123072
Privacy Policy |
Cookie Policy |
Terms and Conditions


