A few years ago Randy Johnson wrote an article in American Woodworker magazine showing how to make an big wooden chain with a CNC. I really liked the simplicity of the method and I decided to make one myself however I also wanted it to be part of something more functional.
A variety of ideas came to mind but in the end it struck me that some comedy size handcuffs that matched the size of the chain but also actually locked would be entertaining and completely pointless which seemed like a good use of my time (NB this post includes the files to cut the parts at the base of the page)…
The first pair I made I cut out of fairly cheap plywood as I did not expect them to work. This lack of confidence was well founded and the prototype did not latch properly the way I designed it, just out of interest though I tried the rocker reversed and it latched much better backwards although it did not then fit the pocket properly. As such I decided to change the design based on this, I reversed the rocker direction, made it fit the pocket and then cut a couple of replacement parts. After that the prototype worked as intended. These cuffs did the rounds of various Maker Faires and trade shows as you can see in the image to the right (Brian and Angus included for scale). They survived for over 2 years and I eventually gave them to a member of the San Mateo Police Department to put in their squad room with the idea I would make a new pair from nicer material. The most amazing thing with this original set was at the first Bay Area Maker Faire we took them to, as could only happen at Maker Faire, a man with giant wooden hands walked onto the stand – this is one of the strangest bits of serendipity I have witnessed – see image below left.
The design for the cuffs was taken from some technical drawings of a standard pair of handcuffs I found on the web. I used these to start laying out the basic vectors and thinking about how the mechanism might work. I was able to use the rotate tool, setting the rotation point around the pivot to check the cuff would rotate correctly and connect with the locking mechanism plus it needed to create a satisfying ratchet sound.
To provide a place for the mechanism to fit and to make it easy to construct I decided to use 3 layers of plywood. In the end I settled on 1/2” to allow for space for the mechanism but still be strong enough. Once the basic vectors were laid out for a single cuff I started assigning toolpaths and then made a second copy and optimized the layout within a 24” square work area as you can see in the image on the right.
For the toolpaths there are a selection of different depth pockets and then the cutout toolpaths. There is a large shallow pocket to clear away material from the sides of the cuff to allow clearance for the rotating part to move. This is only around 1/16” deep. Then there is a pocket for the elastic band mechanism which is around 1/4” deep and then a slightly deeper pocket for the dowel locations.
The small dowels are intended for assembly location only so are cut only slightly bigger than the dowel diameter and are intended to be a tight fit. The large dowels are for assembly and also to allow the rocker and large serrated part to rotate around. As such on the sides the fit should be tight and then the hole on the parts that needs to move had to be slightly larger. These will need to be adjusted to match your dowel diameter if you plan to make your own pair, although its not too hard to sand dowels to size.
There are two toolpaths for the cutout, the first one pockets out the material at the pivot point on the large rotating piece and also the material where the cuffs attach to the chain (more on the chain below). These are pocketed to avoid leaving a small piece of material that would need to be tabbed and be difficult to remove. The second cutout toolpath is a typical profile cutout with tabs to hold the parts in place while being profiled.
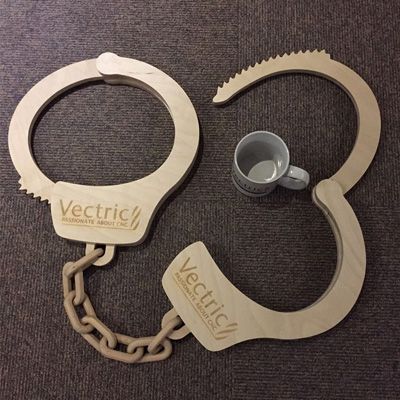
The new pair of cuffs I cut were made out of some nice quality birch ply. Although its listed as 1/2” it was actually around 0.47” thick. I don’t think with this project that is overly crucial to worry about this as long as your material is close to 1/2”. You may need to change the depth of cut for your cutout toolpaths if yours is thinner! With this new pair, In addition to cutting the parts on the CNC I added some Vectric logos with our laser to brand them for use at future shows.
So that pretty much takes care of making the cuffs however as I said at the start of this article the whole point of this project was to create parts to work with the wooden chain. Thankfully I don’t have to explain this part of the process as Michael Tyler created a free Vectric Project of the Month which shows this process and includes the files to cut here: Wooden Chain Project – the files work with VCarve or Aspire (v8 or higher). The cuffs are designed to fit the size of chain in Michael’s project. Make sure you that when you glue the links at the end of the chain you put them through the hole in the appropriate part of the cuffs.
Once you have cut the parts the assembly is pretty straightforward but to show the process I have created a video that you can see here: Giant Wooden Handcuffs Assembly. For my cuff design I used dowels that measured just under 0.6” diameter for the large ones and just under 0.36” for the thin – these are the size of the holes I machined . The dowel was not particularly round so did need a little sanding. In terms of length each piece of dowel was cut to be 1” long. The pockets on each side are 0.3” deep with the middle section of material 0.47” thick. This length ensured they would be long enough to connect the parts but not too long to stop them seating correctly with each other. My cuffs are assembled without glue as if the elastic band comes off you may want to take them apart. There is a small hole just next to the chain loop that acts as the lock, If you push a dowel (or screwdriver or anything small enough to fit) it will push the rocker away and allow you to pull the cuffs apart. This is important as people seem inexplicably drawn to putting them on their heads and then closing them up…
Below is a link to download the files, these are saved in Vectric’s VCarve CRV file format and you’ll need V8.024 or higher to open them. They will open in VCarve Desktop, Pro or Aspire. They are pretty easy to make and as I said earlier almost completely pointless, although they might make a fun gift for a law enforcement officer on graduation or retirement or perhaps a novelty present for a stag and doe party.
Regardless they are definitely a talking point and to the best of my knowledge unique, if you decide to make a set you of course use them at your own risk…
Suitable for version 8 or greater
Login to V&Co to download the files
LoginPlease access this page on a desktop computer to download the files
Vectric Ltd
Precision House
2 Arden Road
Alcester
B49 6HN
Registered in England Number 05382596
VAT Registration GB115123072
Privacy Policy |
Cookie Policy |
Terms and Conditions


