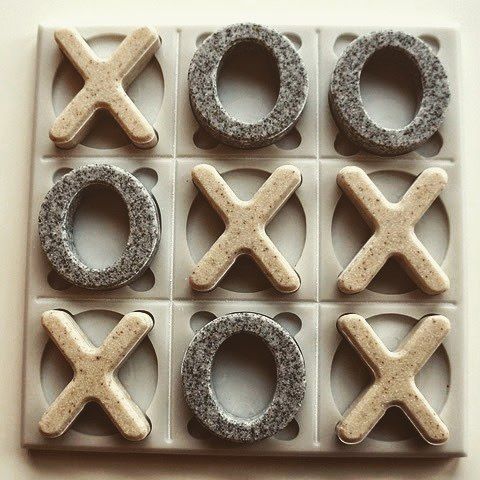
The first of our “12 Projects of Christmas” for 2014 is a Tic-Tac-Toe game board and playing pieces. We cut our version from off-cuts of Corian but this could also be made from contrasting woods or all cut from single piece of material then painted or stained.
This makes a great gift as a game for all ages or even just a fun ornament.

My inspiration for this project was thinking about how how games make both a good present and are a great way of bringing people together (and hopefully not causing too many arguments after Christmas Dinner!). Tic-Tac-Toe (or noughts and crosses as we call it here in the UK) is traditionally a pen and paper game and I thought transferring this game to a physical piece with the help of VCarve Pro and a CNC machine would make a timeless, smart gift for any little person in your family or an interesting ornament.
I started by drawing up my design in VCarve Pro – creating a board that would fit within a 7 inch wide, half an inch thick piece of Corian – as I thought this material would be ideal to create a children’s game with. If it gets dirty it can easily be cleaned up and it looks very classy with minimal finishing.
The design side of things was fairly easy – I drew out a board, and the counters, ensuring that each square was the same size and that either a nought or cross would fit nicely without going over the lines.
To make the game a little smarter James suggested pocketing the silhouette of both the 0’s & X’s into the board, so that the counters will fit in snug, so we then made edits to accommodate this. We also decided to make the counters reasonably symmetrical as well to not make it too much of a puzzle to fit them into a space. In addition I did 2 offsets both inwards and outwards for the X’s and the Pockets to ensure that the radii on each corner of the could be cut with a 0.25” End Mill without needed to use an inlay-toolpath.
The part was setup to be cut with 2 different tools: a 90° 0.5” V-Bit and a 0.25” End MIll. The V-bit would be used to create a chamfer or bevel on the board and each piece, then also to add lines to the surface of the board. The End MIll would pocket the spaces on the board, pocket in the center of the O’s and cut everything out.
To create a profiled bevelled edge on the board I set it to cut outside the vector with the cut depth was set to 0.16” and an offset allowance of -0.15”. This technique is a neat way to create an accurate bevel depth and avoid the tip of the tool creating a lip on the part. Next using a 90° 0.5” V Bit I ran a profile toolpath to create the dividing lines on the board, and to bevel the outline of the counters (using the same –ve allowance offset technique). Applying these bevelled edges to everything was purely for aesthetic purposes and does look nice but is not essential to the project working if you want to avoid a tool-change.
After cutting the bevels we changed the tool to run the rest of the part with a 0.25” End Mill. First we used this create spaces on the board for the X’s and O’s. They were cut with a Pocket toolpath, machining them at a depth of 0.125” and a negative pocket allowance of -0.02”, this ensure some space so that the counters will fit in nicely (you may need to adjust this depending on material choice and finish). Then a series of pockets was created to cut-out the inside of the noughts as we thought this method would be more convenient than adding tabs to hold these parts in place - anything to help speed up the finishing process! To finish we ran a profile pass around the counters and the board with tabs to hold the parts. An alternative method to hold the parts would be to adjust cut depth to not quite cut through the material and then use a sander to separate the pieces.
The nice thing about working with Corian is that the clean-up is minimal, just a little sand here and there to remove the tabbed areas was all it needed. Everything fits in place and now all I need to think about is which lucky person is going to receive this.
You can click on the link to download a single file that has the vectors and toolpath setup for the parts for this project – have fun making your own version!
Suitable for version 8 or greater
Login to V&Co to download the files
LoginPlease access this page on a desktop computer to download the files
Vectric Ltd
Precision House
2 Arden Road
Alcester
B49 6HN
Registered in England Number 05382596
VAT Registration GB115123072
Privacy Policy |
Cookie Policy |
Terms and Conditions