Peter Smith has been Chief Engineer at Morris Yachts for the past 6 years, previously holding the same position with Hinckley Yachts for about 20 years. After pushing to use a CNC router at work (Hinckley and Morris) for the past 15 years, knowing the cost would justify itself, he could never persuade management to buy one. Finally, about 12 months ago, Peter decided to buy a used Shopbot himself and start his own company on the side. Since buying the Shopbot, Peter has been cutting marine plywood, Starboard, Corian, Formica, teak, and other core materials.
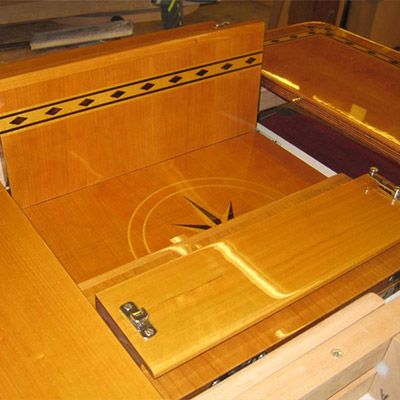
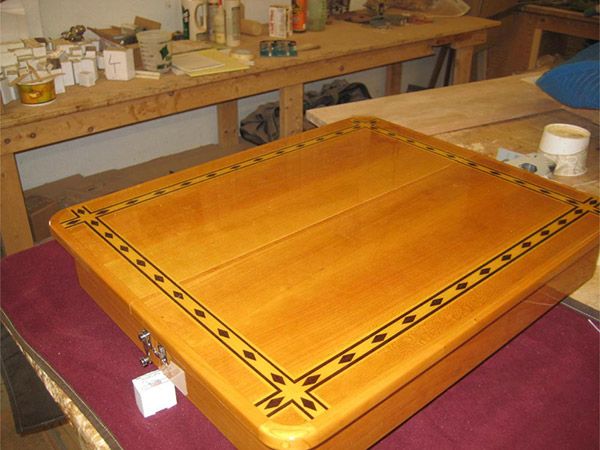
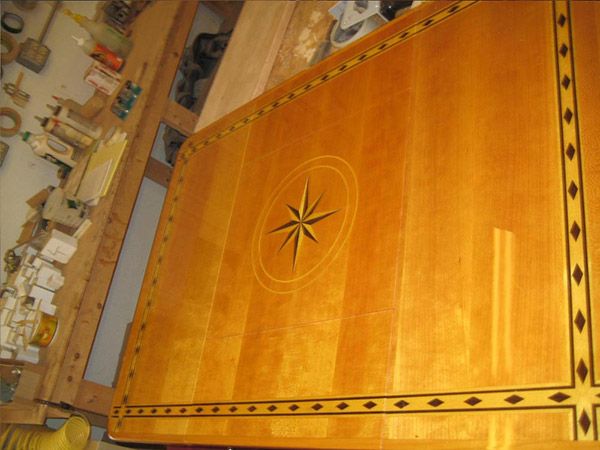
After a client of Morris Yachts requested a pair of smaller custom tables to replace the standard drop leaf table on a new boat, Peter was eager to start on the project with his associate Dale McCafferty. The pair of custom tables were requested to have sliding outer leafs with a removable center leaf. The center leafs would be removed for cocktail table mode, and installed for dining table mode, and needed to be stowed inside the table. In addition, the owner requested a diamond inlay around the perimeter of the table, and a compass rose inlay in the center leafs. The wood species were Cherry for the table top, with the dark features being Wenge, and the lighter features being Maple. Peter continues to explain the process of creating this unique custom boat table...
"We do all of our design work in a solid modeling program called Solid Edge. All of our toolpath work is done in Partworks (VCarve Pro). Based on these parameters, my associate, Dale McCafferty designed the tables and center leafs. At the same time as the table was designed, we needed to work out the spacing for the diamond inlays so that the spacing was essentially the same for the ends, the sides, and the center leaf. This was important so that the diamond spacing looked the same no matter whether the table was open in dining mode or closed in cocktail table mode. We used Solid Edge to get the spacing correct for the diamonds, and to draw the 3D shapes of the diamonds. Using the 3D features, we then created the male dark diamonds and stripes (from Wenge), and female lighter parts of the border (from Maple)."
"Concurrently as the table and inlays were being designed, we modeled the compass rose and circular border around it. Using the model, we could create 3D individual parts for each of the points in the compass rose and also create the tool paths, that were cut from the back side in the cheery veneer for the table top. Using the individual parts, we created tool paths for each of the individual points of the compass rose, and cut male forms for them. These were then glued together with epoxy under a vacuum bag."
"After they were glued together we sent the veneer through a timesaver sander, then glued it onto a plywood substrate that created the table surface."
"The table surface was intentionally left slightly over size so that we could cut the seams into it with a thin kerf saw blade. After we cut the pieces apart, we then glued them back together with a piece of paper in the seam. This piece was then put back on the router table so we pocket out the grooves for the diamond inlays."
"The same approach as the compass rose was used to cut the diamond inlays. We cut individual male (dark Wenge) and female (light Maple) strips for each area of the table inlays. These were glued together, with epoxy under a vacuum bag."
"After they were glued together, we sent them through the timesaver to sand off the extra Wenge. These pieces were then glued into the pocketed areas of the table, and the whole thing was sent through the timesaver again to get a finished consistent, planar surface. The final result was as shown."
"We used a 60 degree V-bit for the male and female pieces of the diamonds and compass rose inlays. The bit for the pockets sections and "large" area clearance sections was a 1/4" downcut. We zeroed to the top of the material for all pieces. The Wenge and Maple strips were screwed to plywood substrate that was held to the router bed with vacuum. We used vacuum to hold the cherry veneer to the router bed when we initially cut the compass rose into the backside of it. After it had been glued to the plywood substrate, and needed to cut the pockets for the diamond inlays, we screwed it to a piece of plywood and used vacuum to hold the plywood to the router bed. Normally we use the corner of the table as the X/Y zero, but for cutting the pocket inlays for the diamonds, we used the center of the compass rose as our X/Y zero. We also needed to make sure our seams were completely square to the router bed so the diamond inlay pieces would slide open and close properly. This was easy to check as we could visually see the seams, by dropping a V bit down very close to the surface, and running."
"This was our first foray into cutting anything like this. All of our previous work had been done with cutting shapes from planar material like plywood. The accuracy of the software, and the ease of using it, made the whole project a success." Peter Smith, Chief Engineer at Morris Yachts


Vectric Ltd
Precision House
2 Arden Road
Alcester
B49 6HN
Registered in England Number 05382596
VAT Registration GB115123072
Privacy Policy |
Cookie Policy |
Terms and Conditions


