I’ve written previously about designing furniture for my sons room and had designed a table that fitted into an odd space in his (at the time) relatively small room. Just over 6 months ago we completed an extension to the back of our house which means my son now has a bigger bedroom.
Once we got the furniture back into the new space we realised the table was now redundant as the space it fitted no longer exists but he did have a need for a set of shelves that would have to fit over a box that covers some pipes, so it was back to the drawing board… or the modern equivalent at least.
As tends to be the case with these projects what should have taken a week or two turned into several months due to the typical distractions that occur with a busy job and young family. I did work through quite a few iterations of the design – starting on paper and later laying out vectors in Vectric’s Cut2D. The problem was that it would be a couple of weeks in between so each time it was like I was coming back to the problem for the first time.
What I did know is I wanted to make a set of shelves that would slot together tightly for assembly and ideally not need any glue but just be able to be screwed together and secured to the wall. In addition as previously mentioned there was a box that the shelves had to sit over that houses some piping. It was important to remember though that this box was not load-bearing so the shelves had to sit just above it. I knew the size – approximately 7 feet long (just over 2 metres) and around 5-6 feet high (just under 2 metres) and that my son’s bed would be butting up against the base. I also measured his books and made a note of the different types of sizes I’d need to accommodate. In addition he also had a light mounted on the wall that the shelves would need to go around.
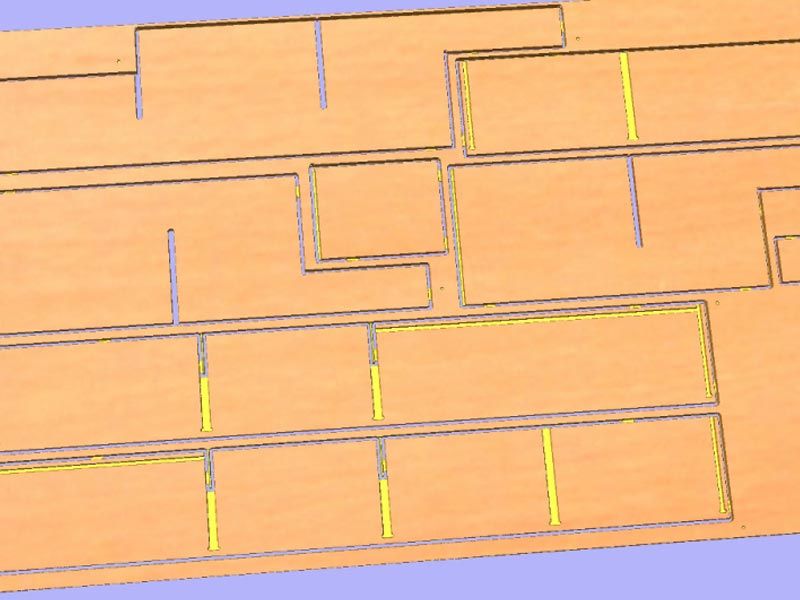
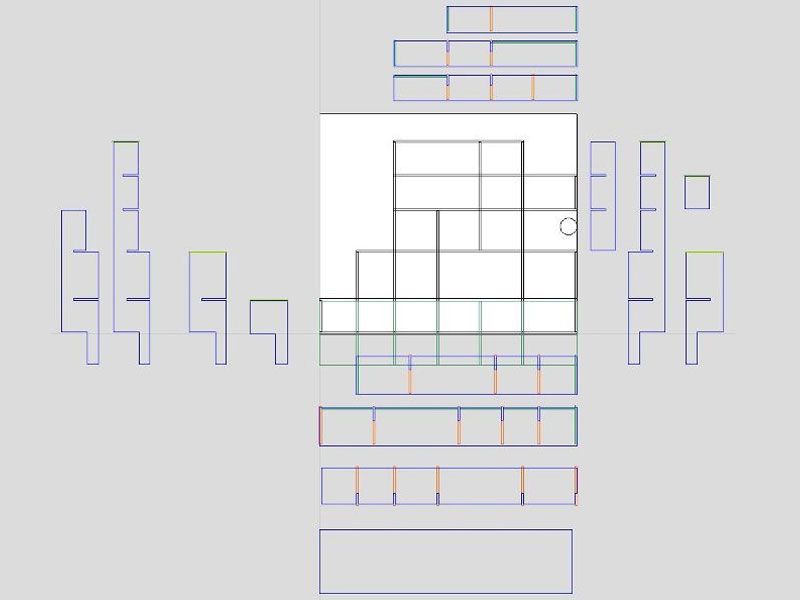
Eventually I settled on a layout I liked and basically drew the front elevation in Cut2D and then created each component around it using the middle layout to ensure I got all the pieces in the right place. You can see a screen shot of this above and to the right. This required me to know the material thickness that I planned to use so I could get the slots the right thickness. Rather than a straight slot I decided to add a shallow pocket to each one to provide a tighter fit and also to make sure the upright sections could not warp or bend out of being straight.
I also decided to take a few pieces and make a small test model to check for fit so I could dial in the correct allowances for the joints. This test cut was very helpful and in the end I settled on using an allowance –0.01” for most joints and on the cutout a general –0.005” just to provide a bit more wriggle-room. I also pocketed the ends rather than cutting through to create a way to hide the shelves on areas with exposed ends.
"the great beauty of CNC cut components (when done right) is the parts all fitted together perfectly"
With the things I learned form the test and the actual material having been delivered I made my final adjustments to the parts. Part of this was to spend time mentally fitting pieces together in the correct order to ensure they would assemble and also measuring various parts on the drawing to double check they were right.
For the toolpaths I used a 0.25” downcut end-mill and a combination of pocket and profile. The ply-wood (which was at best medium grade!) Was 0.67 inches thick. With one final check I felt confident I was ready to cut the parts, post-processed the files and headed down to the CNC.
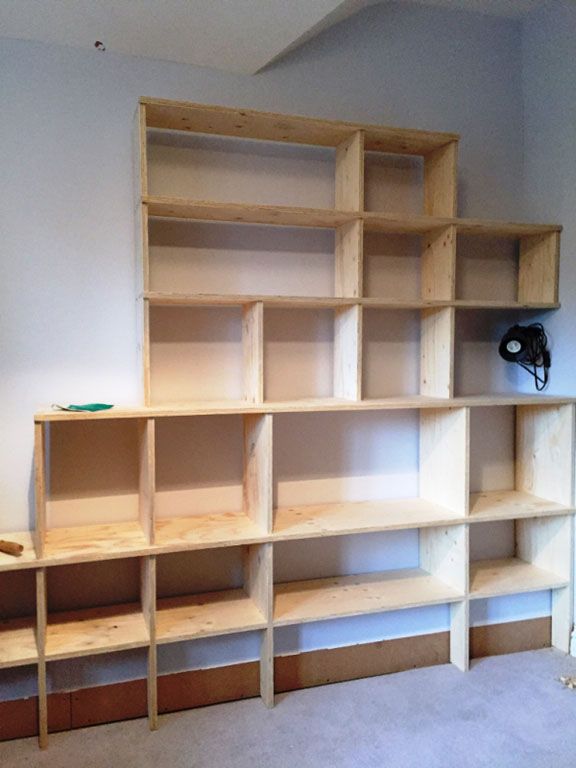
The cutting went well and I worked through the three sheets without issue, I used the tabs feature in Cut2D to hold the parts in place. The tabs we’re pretty quick to clean up and I found myself with a stack of wood to take home and aim to assemble. I did some basic test fits which suggested everything would be ok but we live in a 100+ year old house and the stairway is too thin to be able to pre-assemble anything so I wouldn’t really find out if it was going to work until I actually assembled it in my son’s room!
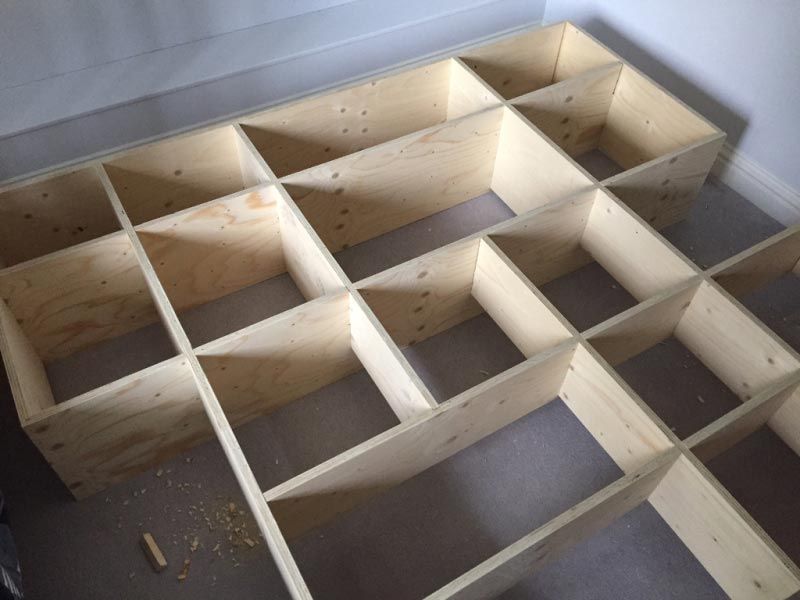
For installation I waited until I had a day spare so I could move around the furniture in my sons room, grabbed a mallet and got to work slotting all the pieces together. The great beauty of CNC cut components (when done right) is the parts all fitted together perfectly. As intended they were a nice tight fit so the mallet was employed for the last part of the fitting to get them all flush. At the very start I did have a panic that I had messed up the design as it looked like the slots were on the wrong side but then I realised I’d laid some parts out upside-down (duh!). The picture above right shows the assembly process and the one to left with all the parts together on the floor.
I did find one problem where when I had tried to make it so the shelves did not show through the end panels I had accidentally set up some of the internal vertical pieces with the same type of joint which did not work. As such I had to go and get a saw and chisel and do a bit of manual modification! Thankfully I was able to use the partially cut joints to guide where these modifications needed to be made and they only took about 15 minutes and we’re not too noticeable!
Once all the parts were slotted together I lifted the shelves up and pushed them against the wall. They slotted over the box that runs along the floor next to the wall as designed so there was a small space above but I had not accounted for the base board. So I removed the baseboard where it overlapped the shelves. They did correctly align with the wall-light, though so I was pleased I’d measured everything more-or-less correctly.
The bottom part of the shelves needed covering so the bed could be pushed up against it. I did not have a full sheet of material left to cut one long piece so I measured where each upright was and then CNC cut panels with lap joints that overlapped on those vertical sections so they could be screwed together to both secure the panels to each other but also to the shelf assembly too. My wife and I then applied a few coats of matt varnish with some light sanding in between to finish and protect the shelves but mostly decided to keep them natural.
To finish I got some angle brackets and secured the shelf to the wall just to make sure if there was a climbing incident it did not end in disaster. At the end of this they were very sturdy indeed!
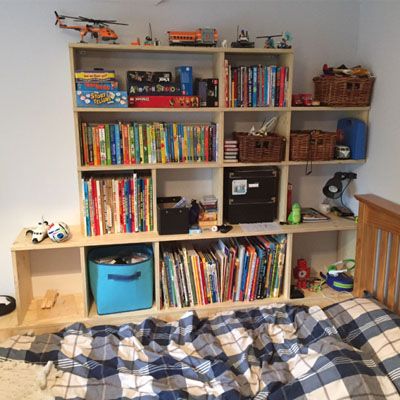
My wife and son then got all his books and toys, argued about what should be kept and got rid of, then sorted it out and populated the shelves. You can see the finished result in the image to the right. Both my son and my wife were happy with this which of course means that I was happy too!

Vectric Ltd
Precision House
2 Arden Road
Alcester
B49 6HN
Registered in England Number 05382596
VAT Registration GB115123072
Privacy Policy |
Cookie Policy |
Terms and Conditions


