This step-by-step guide has been written by Tim Merrill to explain the process of glazing a 3D wooden carving created and machined using Aspire. Depending on the project, not every 3D carving will benefit from glazing. However, as most projects end up on the wall and the act of glazing allows the image to be recognized from across the room.
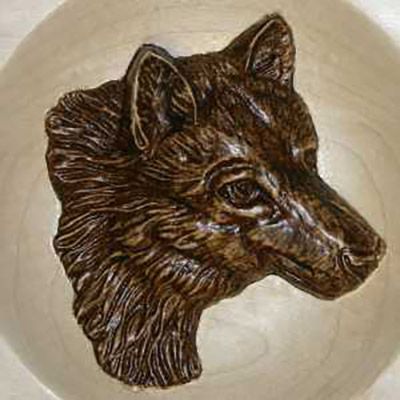
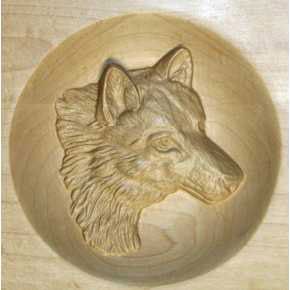
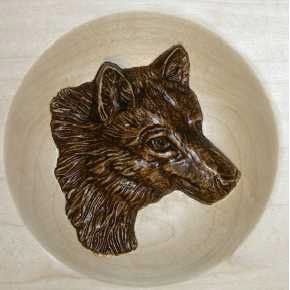
Looking at these two pictures, the one on the left is after machining and the one on the right after glazing and finishing. It takes time and patience to achieve this result, but if you are going to invest hours to carve a 3D image, why not spend a little longer and make it the best it can be.
Glazing has been used for hundreds of years, so the concept is not new. I learned about it years ago and have used it in my furniture finishing. You can find information about glazing in just about any quality finishing book, on numerous internet web sites and even videos on YouTube. After completing my first few 3D carvings, I decided to experiment and see if glazing would give them added depth. That was over 2 years ago and I have been doing it since. I am not a professional furniture finisher, so if you are, or already have a finishing process for your carvings, then this guide may not be for you.
The process I use can be separated into five major steps. This guide will take you through each step and discuss techniques, tools and materials. For a 3D model, I have chosen the Wolf Head from Vector Art 3D. This model was chosen for three reasons: Its final appearance is greatly improved by glazing (my opinion), the detail is enough to be a challenge, and it is one of the included 3D clip-art models with Vectric's Aspire.
Wood Selection
There are a couple of considerations when you choose wood for a 3D carving. For machining quality, my favorite woods are walnut, cherry, and hard or soft maple. In my experience, you will get better machining results and finer detail with the harder woods.
However, for glazing, you need a lighter wood so the darker glaze provides a contrast that produces the feel of depth in the image. Therefore, I do almost all my projects in maple and the carvings for this guide were done in hard maple. Should you do a carving in a darker wood, it is probably best not to glaze it. There are light color glazes and stains, but I have never tried them in a situation where the glaze is lighter than the base wood. This would be a good area should someone want to do some experimenting. And if you do, please share your results, good or bad.
For me, oaks and ash fit into a special category. They machine great due to their hardness, but if you are not careful, their strong grain patterns can become more dominant than the design. There is so much personal preference in play here and I will stop at the above statement.
Glaze or Gel Stain?
The bottom line is both work and people use both. I looked in my finishing books and did internet searches to see if there was a distinct difference between the two. I didn't find anything earth shattering, simply that glazes are formulated for more open time and are easier to work. However, I suspect there must be some trade secrets here or the marketing people would simply label every gel stain as "gel stain and glaze." I have used gel stains as a glaze during furniture making because of the larger variety of colors and shades available but have found two glazes I like for carvings, Burnt Umber and Van Dyke Brown. For example, the Wolf Head carvings used in this guide were glazed
with Van Dyke Brown. You can also mix glazes from a single manufacturer to produce shade variations or use different glazes in separate layers to obtain a special look. General Finishes also markets a clear base that can be tinted with a water based dye or tint, but I have not tried that yet.
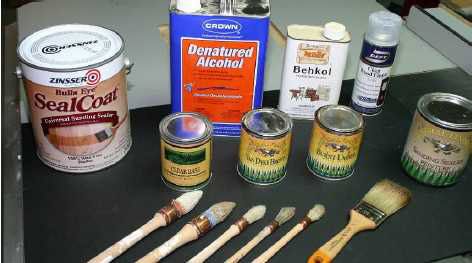
Finishing Products
This photo pretty well sums up the finishing products I normally use for doing 3D carvings. General Finishes' products are a favorite of mine and I have used them for years for furniture finishing. Similarly, I have always been a fan of shellac andZinsser's Seal Coat shellac is a relatively new product on the market. Although marketed as a sanding sealer, it is quality shellac which can be used as both sanding sealer and finish coat. Also, and most importantly, it is a dewaxed shellac. If you buy some to try, be sure it is their Seal Coat product. They also market a Bullseye Shellac, but it is not dewaxed and you should only use that if your entire finish will be shellac based.
If you have not used shellac before, it is a good idea to read about it first. However, a few important points are in order here.
I have just started using General Finishes' new water-based Sanding Sealer. The 3D images prepared and photographed for this guide had two coats of the sanding sealer applied before the shellac and I am very impressed with it. Being water-based it did raise the grain, but that was removed quite easily with synthetic steel wool. It also stiffened the "fuzzies" so they removed easily. I have not tried applying the glaze right after the sanding sealer, but plan to do so soon. For this guide, I decided to keep with a process that works: Multiple coats of shellac followed by the
glaze.
Tools
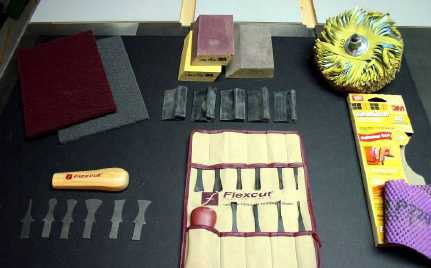
We all want to go from machining to finishing without any preparation required and that is a good goal for us all. However, we are working with wood, a fantastic material with no two pieces the same. So let us accept the fact that we will most likely need to spend some hands-on time with our projects before we start the finishing process. When I started with 3D, the images were simple and I used abrasive methods such as sandpaper and sanding mops. However, as the images got more detailed, using aggressive abrasives made it too easy to remove detail. Then, as I started using better bits (covered in the next section) the machined surface quality improved to the point where the only material that had to be removed was "fuzzies" that occasionally appear in parts of the carving. Now the focus, and tools used, is more to get into the detail areas and remove the fuzz that is left without
reducing detail. For the Wolf Head carvings, sandpaper was used only on the dish shape. Only a brass wire brush and synthetic steel wool was used on the Wolf Head image. The picture shows my tool collection, with the favorites being the brass wire brush, synthetic steel wool pads and Flexcut Carving Scraper Set. The effectiveness of all these tools are increased significantly by first applying
one or two coats of either a sanding sealer or 1 lb. cut of dewaxed shellac.
Machining Tips and Bits
Without going into machine specific detail, there are two factors that can directly affect the quality of your machining; the bit you use and the stepover you set for the finish pass. Starting with the bit, the smaller diameter ball (round) nose bit you use, the more detail it will produce. Therefore, for detail, a 1/16" diameter ball nose is better than a 1/8", which is better than a 1/4" and so on. These carvings of the Wolf Head are 7" in diameter and I choose to use a 1/16"
tapered ball nose bit to capture all the detail I could. Of course, the time to machine works against you with the smaller diameter bit taking longer than a larger diameter bit. Not only is the machining area at the tip of the bit smaller, but a smaller bit may require slower feed speeds to protect the bit from breaking. If you own Aspire, the good news is a technique called rest machining. We will not go into details here; you can find a tutorial on Vectric's web site and doing a forum search for rest machining will get you even more info. With rest machining you can perform a quick finish path
using a large diameter ball nose bit, then go back with a smaller diameter bit and only machine the detailed areas where the larger diameter bit couldn't get
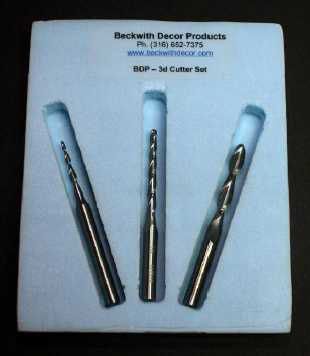
For the finish path, I highly recommend the tapered ball nose bits sold by Gary Beckwith. They are well designed, quality made bits. While their initial price is
more than some, they will last a long time and save countless hours in hand work. My 1/8" bit has more hours on it than any other bit I have, and still cuts like new. The bits are long, allowing for carving deeper designs and the tapered tip adds strength. However, the tapered design adds another consideration. If there are vertical walls in your design; they will end up matching the bit's taper instead of being vertical. However, I have not found this to be an issue or present problems. For the roughing pass, I normally use a 1/4" down spiral router bit.
For the typical sized projects I do, this bit is adequate and able to remove the majority of material, leaving the minimum amount for the finish
pass. The down spiral leaves a good finish and does not have the tendency to tear out or lift material.
The other important consideration is stepover. The smaller the stepover, the better the finish, but the longer the machining time. Realize there is a point where a smaller stepover will still increase machining time, but the increase in finish quality will be insignificant. I normally use 8% and get great results. However, I have also used stepover values from 7% to 10% depending on the image I was machining, the bit's diameter and the overall size of the carving.
Roughing Pass or Not?
This is another good question with no correct answer; it really depends on your personal preference. My thoughts are simple: I do not want to trade a $50 bit for a few minutes of machine time. If you look on the Vectric forum, you can find some threads where people give their techniques for using a finish pass only and they do it successfully. However, I will give you one tip if you want to do that: Do not use an offset finish path strategy, only use the raster. I have used the offset strategy and observed the bit rise, travel to a different part of the design, plunge and start cutting. This was not a problem for me as the roughing path had removed the bulk of the material. However, without a roughing pass, this would have plunged the 1/8" bit about 3/4" and started cutting at 3 ips in walnut and I am not sure it would have survived that.
Step 1: Machining and Preparation
If you have done everything right, you should now have a detailed carving almost ready for finishing. For the less detailed areas, you can use sandpaper to touch up any rough areas just as you would with any woodworking project. It is the detailed areas that present a problem and the more detailed, the greater the challenge. I have grown to like Flexcut's Carving Scraper Set. It is not inexpensive, but high quality and they do a great job if prepared correctly. If you have never used a scraper, the technique is easy to learn. What is more difficult is maintaining them so they continue to cut effectively. This can be discouraging to the first time user.
For this carving, I first used some synthetic steel wool and a scraper to remove the larger "fuzzies" followed by two quick coats of sanding sealer applied about 30 minutes apart. This stiffened the remaining fuzzies, allowing them to be quickly removed with the synthetic steel wool. As I said previously, my use of a water based sanding sealer is
relatively new. In the past, I would have applied two to four coats of 1 lb. cut shellac, which would have done the same thing to the fuzzies.
Both the shellac and sanding sealer will help with preparing the surface, the difference being the shellac will apply an amber tint, while the sanding sealer is clear or color neutral. After the sanding sealer (or shellac) is completely dry, you can use scrapers, sandpaper and synthetic steel wool to create a smooth surface for the glaze to "flow" over. Glaze is nice as it adds depth, but it will also highlight any problem areas. And finally, the carving must be clean before applying any finish products. Compressed air is the best technique, but a powerful vacuum is a good alternative.
Step 2: Seal before Glazing
Glazing is not staining. With staining or dyeing, you want the stain or dye to physically penetrate and change the color of the wood. With glazing, you want the glaze to "flow" over a smooth surface and tint the finish, not penetrate the wood. Therefore, an important first step is to seal the carving by some method before starting to glaze.
I always use Zinsser's Seal Coat shellac straight from the can at a 2 lb. cut to seal the carvings. This picture shows the carving after applying four coats of shellac. This might sound like a big effort, but I was able to
apply four coats within ~3-4 hours and your carving may not require this many coats. What you are trying to achieve is when you look at the surface of the carving in different light, it looks smooth and the shellac has made it into all the detailed areas. But do exercise caution here; you can apply too much shellac and loose detail.
After you are satisfied with the appearance, let it dry at least overnight before applying the water based glaze in the next step.
Step 3: First Coat of Glaze
Once you are happy with the surface of your carving, it is time to apply the first coat of glaze. My first coat of glaze is normally very thin. This does two things, it starts the glazing process and gives you a feel for how the carving is going to look so you can better apply the second coat. There is an important lesson here: It is always easy to apply more coats, but once you have applied too much glaze, especially in the deep and detailed parts of a carving, removing it can be very difficult. Therefore, thin coats are better than thick coats, and since the water based glazes dry so fast, it does not take much time to perform this.
I have tried foam brushes, bristle brushes and folded rags to apply the glaze but have finally settled on tapered round brushes as the best method. The shape of the tapered round brushes gives you a point to get into the detailed areas and sides like a traditional paintbrush for the remaining areas. Mine were purchased from Lee Valley, but are available from many sources.
To apply a coat of glaze using a brush, dip the brush into the glaze then use a piece of scrap wood or cardboard to work the brush back and forth to remove excess glaze and even it out in the bristles. You do not want to apply "globs" of glaze onto the model.
After applying the first coat of glaze, you can use three techniques to remove it from the high points. The goal is to ensure the glaze remaining forms a smooth layer over the carving, with higher areas being lighter.
My favorite technique is to work the surface with a dry round or flat paintbrush before the glaze has dried (and you may have to work fast depending on drying conditions). Going in different directions, you can work the glaze around and start to lighten up the higher areas while keeping more glaze in the deeper areas. You do this by first holding the brush almost straight up and down to use the tips of the bristles to work the deeper areas. Then, holding the brush at a shallow angle (brush handle close to the surface), you can use the sides of the bristles to work the higher areas. As
an example, look at the neck fur of the Wolf to the left of the ear. If you use the brush in the direction of the fur, which is almost horizontal, you can even out or remove glaze in the low points. If you hold the brush at a shallow angle, and move it against the design or vertically in this case, you will remove glaze from the high points and start to give definition to the design. You may need to finish up with gentle, light strokes to ensure you do not leave streaks in the glaze that conflict with the design.
Another technique to use before the glaze has dried is to make a pad out of a damp lint free rag (such as cotton from an old tee shirt) or even a quality paper towel. Use this pad to work the higher areas; you will not be able to get into the details with it. This technique works better for larger designs. Again, go with the grain in case you do leave some streaks.
The final method is to wait until the glaze has dried to the touch then use a synthetic steel wool pad to abrasively (but gently) remove glaze from the higher points. The longer the glaze has dried, the harder it gets and this technique will take longer. Real steel wool works better, but do not use it if you are using water-based products. You could end up with rust spots from the minute pieces of metal that may stick into the finish and be hard to remove. After satisfied with the first coat, let it dry completely and then proceed to the next step.
Step 4: Second Coat of Glaze
After the first coat has dried, inspect the results and adjust as necessary. By using a fine synthetic steel wool pad, you can lighten any areas that appear too dark. If you do not do this, the second coat is only going to make this area darker. At this time, you should be able to start to see how you want the final image to look, especially the parts you want to get peoples attention. For the Wolf Head image, I wanted the eyes, ears and nose to be the focal points. Therefore, before starting
the second coat, you should understand which areas can be darkened, and which should be left lighter. Again, remember that it is easy to darken areas more and lighten the high points. It is not easy to lighten the deeper areas if they are too dark.
Now you can apply and work a second coat using the same techniques used for the first coat. Depending on the results you are trying to achieve, your second coat could be a light coat, a heavy coat or variable depending on the area of the carving. I know this sounds difficult, but think it will make sense as you do it. Do remember what I said about many thin coats better than one or two heavy coats. Therefore, you may want to keep everything light in the
Step 5: Touch up and Final Finish
After you have applied the second coat and removed the excess from the high points, let it dry overnight. After it is dry, you can still make minor adjustments. If an area is too dark, use one of the methods to remove some more glaze from the high points. If an area is too light, or you remove too much glaze, simply use a soft artist's brush and carefully apply more glaze to adjust. At this point, you could carefully use sandpaper, sanding sponges and sanding mops to make final adjustments by only removing glaze. You do not want to sand through to bare wood, and this takes care. One trick it to use the finest grit abrasive you have. It may take longer to achieve the result you want, but this is effectively giving you more control over the process.
When you are finally satisfied with your results, the last step is to apply a final finish to seal and protect the glaze. My two choices
are another one or two coats of Seal Coat shellac or multiple coats of a spray lacquer. Both work great and dry fast. One significant
difference between the two is the shellac will continue to add an amber tint to the project while the spray lacquer is clear. For spray lacquer, I use Deft's Clear Wood finish in a rattle can, which is widely available in my area. Another decision you have to make is how dull or glossy you want the final project to be. Shellac will be glossy as shown in the Step 5 picture. I prefer a satin finish, so if I use shellac for the final coats, I will still give it a few coats of Satin Deft Clear Wood finish to reduce the gloss. If you only use a
spray lacquer for the final finish, you can choose the level of gloss you want.
In Summary
Trying to keep this guide simple, there are two good techniques that have not been covered. One is staining or dyeing the wood before starting this glazing process. You can easily do this, but similar to the discussion in the Wood Selection section, I would keep the color light to ensure the glaze still provides the contrast between light and dark.
The second technique is the use of two different glaze tones to achieve different results. The two glazes I typically use are Van Dyke Brown and Burnt Umber. Van Dyke Brown is a darker brown with a hint of gray color and it is what I used for these carvings. Burnt Umber is lighter and browner in color. I have used Van Dyke Brown for the first coat and followed that by Burnt Umber. The effect is different from using just one or the other, and it would be a good area for you to do a little experimenting if so inclined.
I hope that this has been presented in a manner you can understand and provides you with a good starting point should you want to give it a go. Thanks for reading,
Tim
Download Glazing PDF Here: https://www.vectric.com/PDFS/Glazing.pdf
Tim's Disclaimer:
Everything presented here is offered free for your personal use. If you do use any of the techniques, products or tools mentioned, it is at your own risk. It is your responsibility to use your CNC and other power tools safely, including wearing the proper personal safety gear. Also, please take the time to read the MSDS sheets for all finishing products and observe the necessary safety precautions. To make the process easier for you, specific products are mentioned by name and manufacturer as appropriate. This is to provide you a starting point, assuming if you use these products, you should be able to achieve the same results as shown. I am not saying these are the only products to use or even the best products available, just the ones I like. I do not have any financial connection with any of these companies and will not benefit financially if you choose to use them. You probably do not want to try this process for the first time using that unique piece of wood you have been saving for that special project. Please start by doing some samples and practice, practice, practice.
Vectric Ltd
Precision House
2 Arden Road
Alcester
B49 6HN
Registered in England Number 05382596
VAT Registration GB115123072
Privacy Policy |
Cookie Policy |
Terms and Conditions


