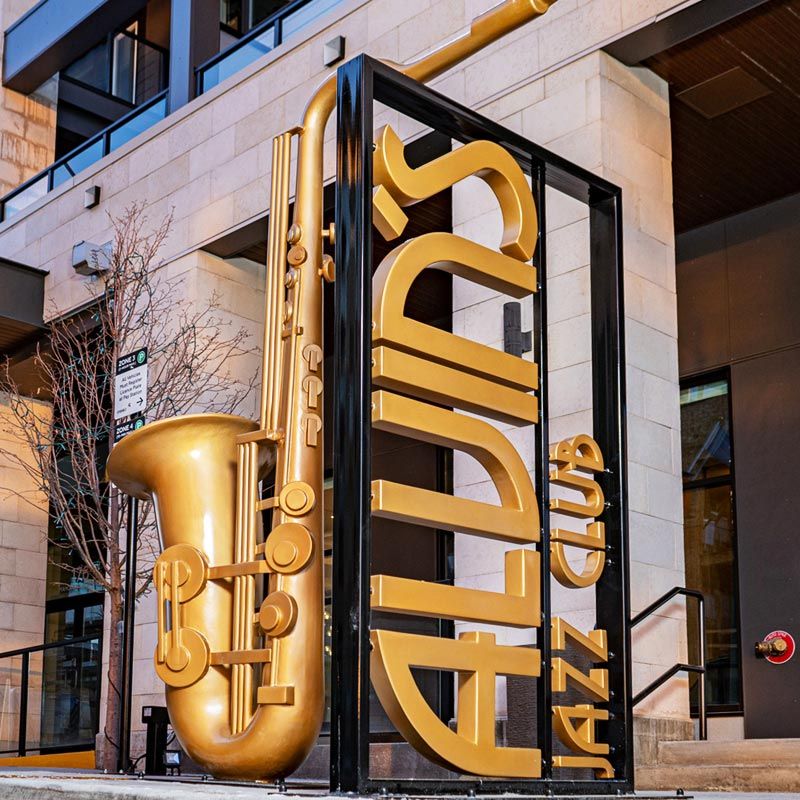
Maximize your kerb appeal and become an artistic heavyweight with lightweight sculptures! Here at Vectric we see some pretty impressive projects created by our community but have you ever thought of working in foam to scale up your projects from miniature to monumental? When Brian Novak of Streamline Automation approached us with this supersized saxophone jazz club sign, we thought our eyes were playing tricks... How can that not be metal I hear you say! So we simply had to find out how he created this larger than life foam sculpture.
Streamline Automation is a Canadian company who have been selling FROG3D milling machines, wire cutters, printing machines and tooling for over 20 years. Focusing on helping clients with their production processes, enhancing productivity and ensuring quality cutting has been key to their success over the last two decades. We caught up with Brian to find out why he teamed up with Vectric and hear about more incredible projects he has been creating in Aspire.
Welcome back Brian. Tell us a bit about Streamline and how you integrate Aspire into your sculptural fabrication work?
We manufacture systems that process various materials including EPS and HDU foam, MDF, plastics and acrylics, as well as woods. Clients of ours work in a variety of industries ranging from artistic to industrial with many processing wood and MDF using FROG3D.
We use Vectric Aspire as it allows us to provide end-to-end solutions for design and build processes, and including Aspire in our system packages allows us to deliver exciting high-quality software for CNC routing, milling and engraving coupled with CAD/CAM training on a single platform. Supporting the Vectric ethos, we want to help our customers see how easy it is to cut parts on a CNC and to make it an enjoyable and productive experience. Using the combination of power and simplicity in Aspire to efficiently generate or manage their designs, we help them see how they can quickly create precise toolpaths to drive their CNCs.
It’s great to hear you’ve been spreading the word about how easy and fun it is to use CNC. How did your props samples come about?
Lately, we have been putting together some content for social media, trying our hardest to show how simple things can be. We built a few themed props for our office and took the opportunity to record the process from idea to milling then finishing touches with paint effects. Using Aspire, I was able to completely create the 3D models of the props. At the end of it all, we thought what really great projects they are as they reflect very well on the capabilities of Vectric software for both design and tooling, and as it was all brought to finish, the images look really cool!
That’s a great way to showcase your solutions. Who would you say are your typical customers?
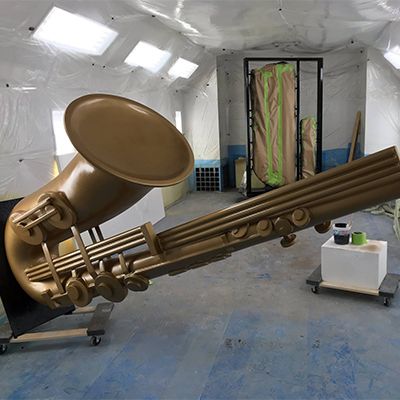
Most of our customers have sculptural applications, work in architectural and construction industries or are using prototyping and reverse engineering processes. We also have customers producing one-offs for special events, exhibits and scenic design, including a variety of highly intricate 3D props and themed environments. Our customers mostly use EPS foam for their displays so here is some of the work we have produced from our in-house bureau service using Aspire. Once the finished products are installed, the surface coating and paint makes it impossible to tell that it’s made of foam, so the images here are unfinished pieces. You can also see https://www.frog3d.com/
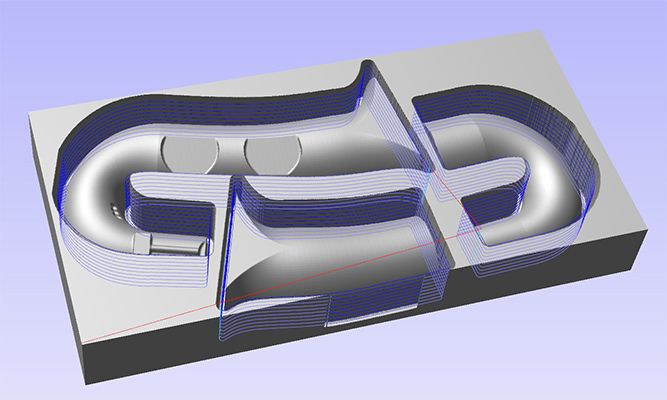
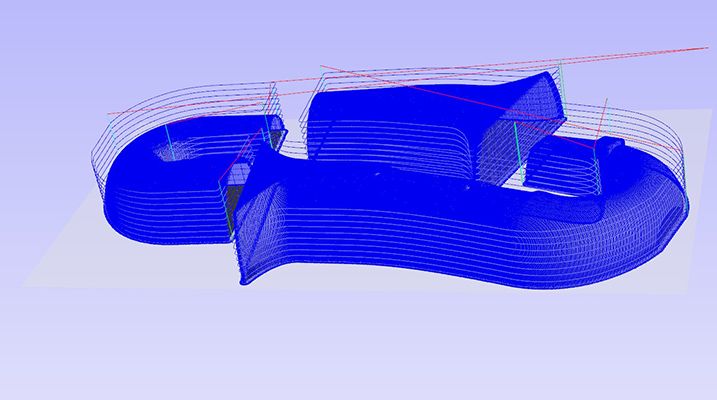
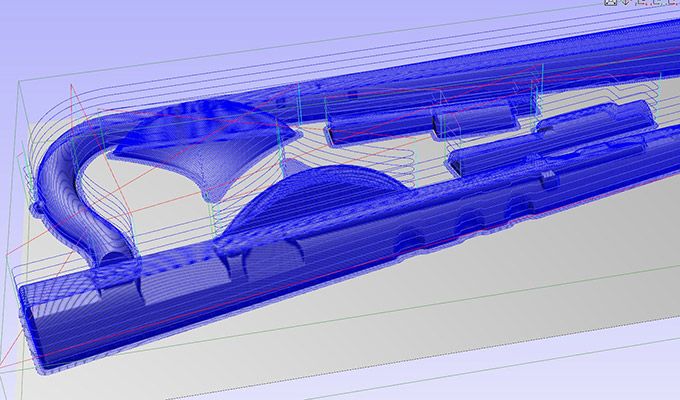
We just can’t get over the sheer scale of the projects you work with. Tell us EVERYTHING about how your Jazz Club sign came to life…
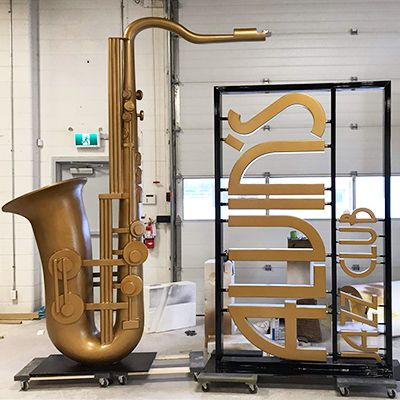
Alvin’s Jazz Club commissioned us to produce this flashy entrance piece and we were tasked with creating a 3D bronze rendition of an alto saxophone along with their club banner to be placed in front of their entrance. Our goal was a clear and smooth metallic look but we had time constraints so had to prepare and turn over this work within a very tight schedule! Our team got to work right away designing, machining, constructing and installing the saxophone and banner utilizing different machines before assembling the entire saxophone.
Wow! That’s a lot of work to do in a short time. What technical elements of Aspire helped you with this process?
We used the easy-to-use tools in Aspire to split the model information in half then arranged them onto our sheets of raw material. We always make our supersize projects by breaking them down into jigsaw pieces to manufacture, then reassemble. Aspire is wonderful for the way it deals with tracing 3D geometry, giving you bounding vectors that can be used for driving toolpaths, pre-forming extrusions, and even clipping/merging sections of the 3D geometry without having to go back to a secondary design software. A combination of profile and 3D finishing toolpaths were all that was needed to finish the machining of the 3D geometry. The 2D letters were dealt with entirely on the FROGWire so the 2D design space in Aspire came in handy. Using the tools in Aspire, we were able to provide an offset vector file for the Plasma cutting process which was outsourced, then the foam letters were mounted to the steel frame.
It’s great to hear how you can take full advantage of multi-sheets to map out the huge shapes you are cutting and make the most efficient use of your foam blocks. What are the manufacturing steps in the unique FROG3D process?
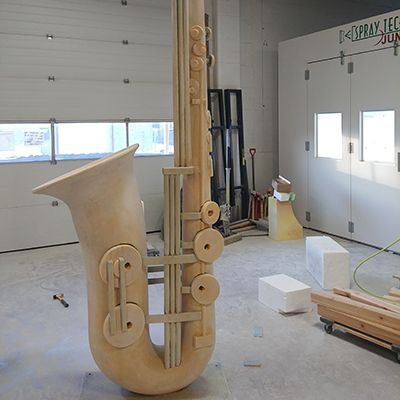
Oversized props and custom fabrications take time and effort so we use a tried and tested formula using several automated processes in tandem. Firstly we did rough cutting on the FROGWire hotwire cutting machine to remove the bulk of the additional material, then we used the FROGMill 4-axis CNC router with a number of 3D roughing toolpaths to further break down the block. This got us closer to the final 3D surface then we used a selection of FROGTools to achieve the finishing machining for each segment of the saxophone and letters then assembled the entire Jazz Club sign.
That’s an incredible game-changer for busy production schedules. How do you effectively turn an oversize foam form into an outside art installation?
Once we were happy with the overall shapes and assembly, we used custom finishing techniques to cover the entirety of the model using the FROGSkin Polyurethane coating system which is an industrial strength plural component electric spray finishing technique. This adds a protective layer that allows the sign to be installed in an outdoor setting… including the harsh Canadian winters we face here in Calgary! We then added a simple color scheme using high gloss paints to make it stand out and give it that unique and mystifying metal effect finish. Then another serious clear coat was applied to the finished piece to help it last a long time.
Your finishing techniques are incredible! Do you have any tips or tricks on overcoming technical obstacles with machining those huge pieces of foam?
When building larger props especially using foam as your media, the more substance is needed to your part to make it more stable during the finishing processes. For this reason, sometimes doing multiple passes to get you to your required cut depth can be beneficial. Using the limit planes, extrusion tools and merge modes in Aspire really helps create “forcefields” that will limit your tools cut depth, avoiding machine crashing. Also, if time is something you are battling against, don’t forget to make use of the Aspire toolpath previews and estimated time calculations. Spending a few minutes in the design process to determine the largest tool you can get away with using can save you hours on the machine! Another top tip is to draw a small circle on an area of your 3D geometry and calculate that small area with a different tool or a different step-over value. Now you have side-by-side comparisons of the results, giving you a better understanding of the best tool for the job!
Thanks for those top tips! If you had to revisit this project again, is there anything you would have done differently?
We were very happy with the ease of programming and confident in the outcome of the final part, so there’s nothing we would do differently on this job as it turned out perfect
An enormous thank you to Brian Novak for sharing more of his jaw dropping projects. To get to grips on the mastery behind these beautiful sculptures, why not check out the entire production process here:
https://www.instagram.com/p/CgSRJSYrpX9/
And watch this space for more FROG3D decorations, props and scenic fabrications coming soon!
Vectric Ltd
Precision House
2 Arden Road
Alcester
B49 6HN
Registered in England Number 05382596
VAT Registration GB115123072
Privacy Policy |
Cookie Policy |
Terms and Conditions


