Every day is a new day at Vectric with our talented makers surprising us and it’s the sheer variety of work plus the fascinating stories behind how they’re made that always astounds us. Last year we featured a selection of oversized sculptures designed and machined by Streamline Automation on their FROG3D machines. We’re starting this year by bringing you a new story of an oversized but simple project they created for their own offices.
Streamline Automation is a Canadian company who have been selling FROG3D milling machines, wire cutters, printing machines and tooling for over 20 years. Key to their success has been helping clients with their production processes so they get the highest quality cutting in the shortest possible time using automated solutions. We caught up with Brian Novak to find out about the incredible artistic projects they have been creating in Aspire, and why they created these stunning art panels for their offices.
Welcome back Brian. For those people that haven’t seen any of your last stories, tell us a bit more about your business and how you use Aspire to support your customers?
For those who don’t already know Streamline, we manufacture systems that process various materials including EPS and HDU foam, MDF, plastics and acrylics, as well as woods. Our clients work in a variety of industries ranging from artistic to industrial, with many processing wood and MDF using our FROG3D manufacturing solutions. Our aim is to help our customers see how easy it is to cut parts on a CNC so we use Vectric software as an integral part of our service because it allows us to provide high quality end-to-end solutions for design and build processes.
Using Aspire can help our customers efficiently generate or manage their designs and we help them see how they can quickly create precise toolpaths to drive their CNCs to route, mill and engrave their end results. We’ve also taken a lot of time to develop supporting CAD/CAM training on a single platform, as well as bureau services for those customers who need our expertise to get them up and running quickly or produce projects on their behalf.
That’s a fairly extensive service you’ve developed to support your clients. What have you been doing to help educate your makers on the world of CNC?
Lately, we have been putting together some content for social media, trying our hardest to show how simple things can be. We built a few themed props for our office and took the opportunity to record the process from idea to milling then finishing touches with paint effects. Using Aspire, I was able to completely create the 3D models of the props. At the end of it all, we thought what really great projects they are as they reflect very well on the capabilities of Vectric software for both design and tooling, and FROG3D for the manufacturing. As it was all brought to finish, the images look really cool!
So tell us about how your latest project came about?
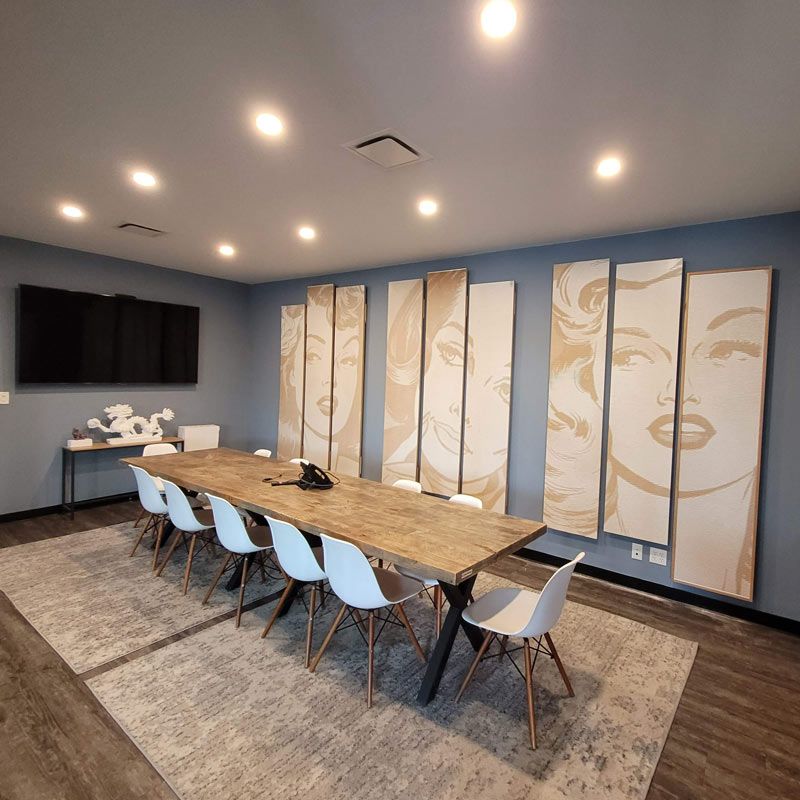
We required a solution for our boardroom to help with sound deadening, but wanted to maintain an artistic approach. FROG3D, where Function and fashion can find a balance! There were certain criterias this project had to meet. They were; to reduce noise, take up minimal space, be fairly simple to process and mount to the wall, not obstruct the electrical outlets and be fully achievable using the tools/materials we have available in our workshop.
That all sounds sensible. So where did you start?
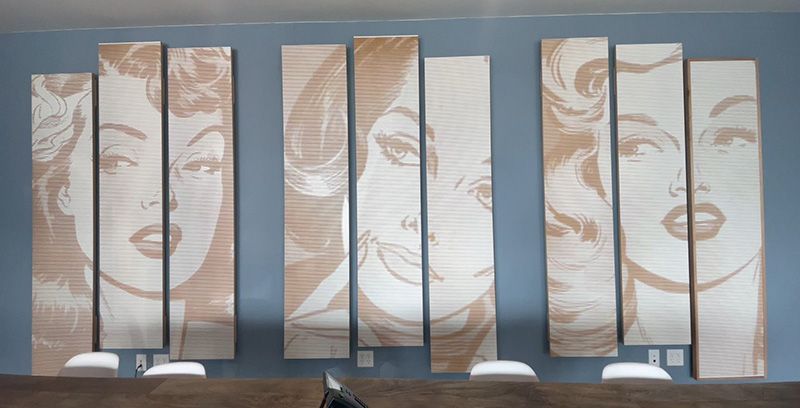
First of all we took a look around the workshop at materials we already had available and decided to use MDF panels, as we had a lot of off-cut material hanging around from creating our table tops for the machines. Then we had the idea of using a comic type artwork as this was a great fit for the general theme of our office space. Finally during our initial planning we decided to stagger the upper and lower dimensions while maintaining the alignment of the artwork, to give the panels an extra punch of style.
Talk us through the design and machining process.
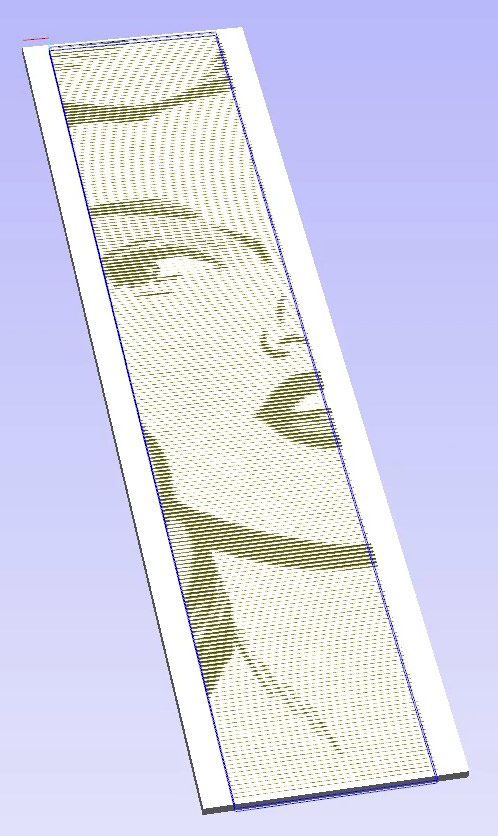
Using the criteria mentioned above, we found appropriate artwork that we liked, sliced the artwork into 3 panels for each, and simply exported the sections ready to import in to Vectric Aspire for toolpathing.
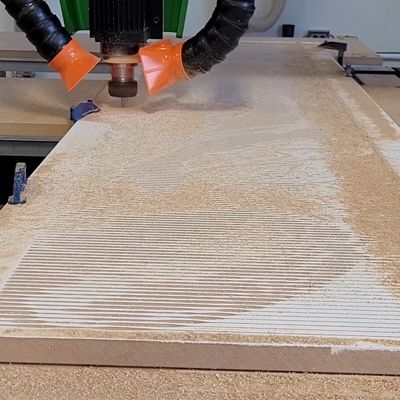
Aspire has a really handy tool that automatically creates this type of groove called a PhotoVCarve toolpath, using a few variables such as max cut depth, line spacing, and line angle, and requiring nothing more than the .jpg image
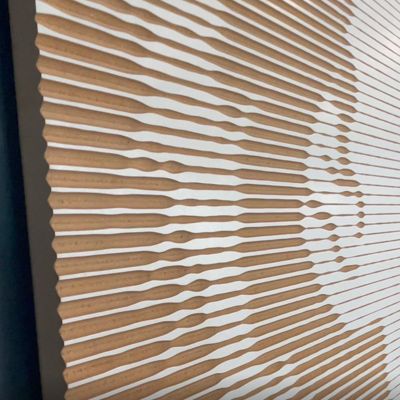
From there, Aspire creates a toolpath where the darker areas are cut deeper, and the v-bit tool makes the lines wider the deeper it plunges. After the PhotoVCarve toolpath, we just had to create a profile toolpath to cut the outer dimensions of the panels, allowing us to remove the cut panel from the full sheet of material we were using.
Once the designs were completed and the toolpaths were generated, the files are supplied to the machine operator, and the prep work begins. In this case, we wanted to use a clean white surface. We rolled white paint onto all of the panels before machining. This gave us the two-tone effect we wanted, where the cuts would reveal the material under the paint, leaving a stark contrast between the cut and non cut areas of the artwork.
Once the panels were dry, we put them onto the FROGMill and loaded up the cut file, one file per panel. We used two tools for each panel – the 90 degree V-Bit for the engravings, and a .25” compression bit for the profile pass. Each panel took under an hour to complete, so the machining was completed in just over a single shift.
The next step was to quickly clean out the cuts and remove any packed in dust from machining, before applying a clear coat to all the panels. We used a spray gun for this process. The clear coat not only seals the machined surface where the paint was cut away, but also gives it an even glossy surface, and allows the panels to be wiped down and kept clean without worrying about ruining them.
Wow that is an amazing effect for such a short amount of machining and workshop time. Pre-painting the panels to create an effortless contrast as the panels are machined is such a simple but genius technique.
Now that you had produced all of the panels what were your intentions for installing such large structures?
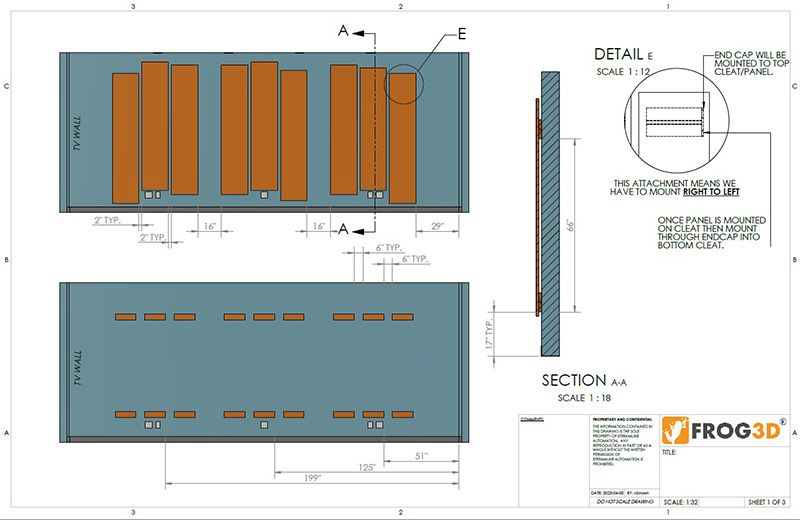
As maintaining a simple installation process was very important to ensure that the artwork stayed aligned once it was hung on the wall, we created all of the panels at full height during the machining process, leaving us a constant point to take our measurements off of. Before we trimmed the upper and lower sections of the panels, giving them their staggered look, we measured off of the tops of the panels, and installed the cleats so they were all at the same height in relation to the artwork. It was a simple process of drawing a straight line across the wall (we used a level laser line) measure out the spacing, translate the hole locations from the cleats, and secure them to the wall. A total of 9 cleats were installed, and the completed panels simply hang on the cleats. This makes it very easy to remove the panels without damaging them, rearrange them if needed, or even replace them with new artwork for whatever reason.
Once the cleats were installed, we could trim the panels without ruining our mounting strategy. We trimmed the panels as per the design criteria, and debated over adding mahogany frames as a finishing touch. The frames looked OK, but in the end we opted to leave the MDF panel edges exposed, as the V-Groove cuts add an additional element to the work when viewed from the side. As the mounting hardware was all attached to the artwork itself, the frames were just ornamental, and could be installed or removed without effecting the overall plan.
Thank you so much for sharing all of the details of your wall art with us. We have loved hearing about how easily you have created such impressive and practical structures and so cost effectively too. Are you happy with how they turned out and do you have any plans for any enhancements?
The panels really do suit the space very well! They help a lot with the sound deadening in our boardroom. We don’t have any plans to actually make any enhancements to them but in the case that we wanted to enhance their function, we could add shaped foam behind them, as they are all stood out just over an inch from the wall.
They are a high-impact installation, due to their overall scale, and were very easy and quick to produce. The cost of the materials was negligible, considering the amount of wall space they covered up. The ease of generating the toolpath in Vectric Aspire makes this a very simple process regardless of the image you are trying to create, and playing around with the toolpath variables can easily change the level of clarity in the image, leaving you with endless flexibility related to the design.
Huge thanks to Brian Novak at FROG3D for sharing their take on this simple but effective PhotoVCarve technique. If you would like to see more of what their team are working on check out their website and Instagram channel here:
Vectric Ltd
Precision House
2 Arden Road
Alcester
B49 6HN
Registered in England Number 05382596
VAT Registration GB115123072
Privacy Policy |
Cookie Policy |
Terms and Conditions


