We’re always taken aback by the projects our customers share with us on the forum, trailblazing the ‘maker verse’ with radical ideas, new inventions, or just more effective ways to make things to help another maker save time or materials. One of our most active makers on the forum is Gert Burkhardt AKA Tailmaker who’s a self professed ‘retired nerd with a knack for geometric challenges’. That sounds a bit cryptic but Gert does love a puzzle so let’s catch up with him to find out what he’s been getting up to with his latest project using VCarve moulding toolpaths to cunningly carve this two-sided cherry bowl.
Gert, thanks for sparing a moment to talk to us. For those who don’t already know you, let’s recap about yourself and how you got started with Tailmaker.
I’m an electrical and mechanical engineer by trade, working in electronics hardware development and engineering & operations management. I retired in 2017 but have been a woodworker since childhood and had projects on the go all my life. Woodworking is in the blood as my dad was a wood shop and arts teacher a long time ago in Germany so he taught me the basics. For most of my life I did not have a shop and was working out of a cramped garage with only minimal equipment so this limited my woodworking activities, but it hasn’t stopped me and for the last 20 years I managed to grow bit by bit my interest in CNC woodworking. My first machine was a small NextWave Shark bought with VCarve Pro in 2011 and I used this to learn the basics but sold it after a few months! Sounds completely crazy doesn’t it but I had a specific job in mind so it allowed me to cut the parts I needed for making my own CNC router. It’s a mid-size router mostly made of bamboo plywood so it’s quite rigid and massive at 750 lbs, but it’s sturdy and served me well for the last 11 years! For some projects I wrote my own dedicated CAM software that needed custom operations like flat machined finger joints, the design and toolpaths for mazes, or guilloche patterns and puzzles. I sold these custom apps as a side business for several years but discontinued the sale in 2019 since real-time customer service as a one-man company can be kind of challenging.
That’s a real achievement to be able to build your own CNC but creating your own customized software for specific repetitive tasks is very clever. We last caught up with you in 2020 when you shared your fantastic plant stand project. What wood shop setup do you have now and are you still using your bamboo CNC?
After our move to Colorado in 2020 I suddenly had ample space for a nice hobby wood shop and the basement was a perfect location. It’s got 1,300 sq ft of space, a polished concrete floor and the walls are finished with drywall, heating.. and the A/C which has been a life changer. After being bugged constantly in my last house, I can sincerely tell you that without the mosquitoes, my woodworking life is now a dream! I’m still missing a paint booth and would really like to have the space for a smithy but I’m happy. The main shop equipment consists of my new Christmas present; a Harvey 15” band saw, a decent table saw, General 24” swing lathe, Jet 16/32 drum sander, helical rotor planer, and of course my trusty Big Bamboo CNC machine. I’ve also got numerous handheld and desk mounted power tools and hand tools including some metalworking equipment… plus a separate room to store lumber and other materials.
Do you still use your customized software for your own projects?
Yes absolutely because I often write a piece of software to solve a tricky problem like the maze design, just because I like the challenge. My own software tools are individual programs dedicated to specific tasks rather than one monolithic package, but I’m always updating and refining them. The great thing is I’ve been able to supersede them with newer Vectric features! I used to use my special software to make round and rectangular bowls but no longer need that as VCarve and Aspire provide the moulding tool paths! Right now, I’m working on fully flat-machined and void-free dovetails and may make that available as freeware when I’m done. Some of my software like the puzzle joint program outputs .dxf files and those are dedicated for generating toolpaths in Aspire or VCarve Pro.
Wow that takes an awful lot of dedication and patience. We couldn’t help but notice your scalloped cherry bowl project so thanks for sharing this project on the forum for other Vectric makers. It’s lovely that you were able to find a purpose for the cherry wood and we’re always interested to hear how makers are conserving by using recycled wood and upcycling other materials. Where do you source your wood and what is your favorite wood to cut?
I am quite opportunistic about the wood sources and the cherry bowl blank was part of a mixed box of figured and exotic bowl blanks that I bought on eBay about 20 years ago. I was more into wood turning especially when stuff on eBay was still cheap. Other woods I have collected over the years and lots of odds and ends from woodworking stores and sale items from hardwood lumber places. Some of my nicest pieces are however the re-sawn blanks from my neighbour’s mulberry tree plus some mountain mahogany boards and rounds I got from other people.
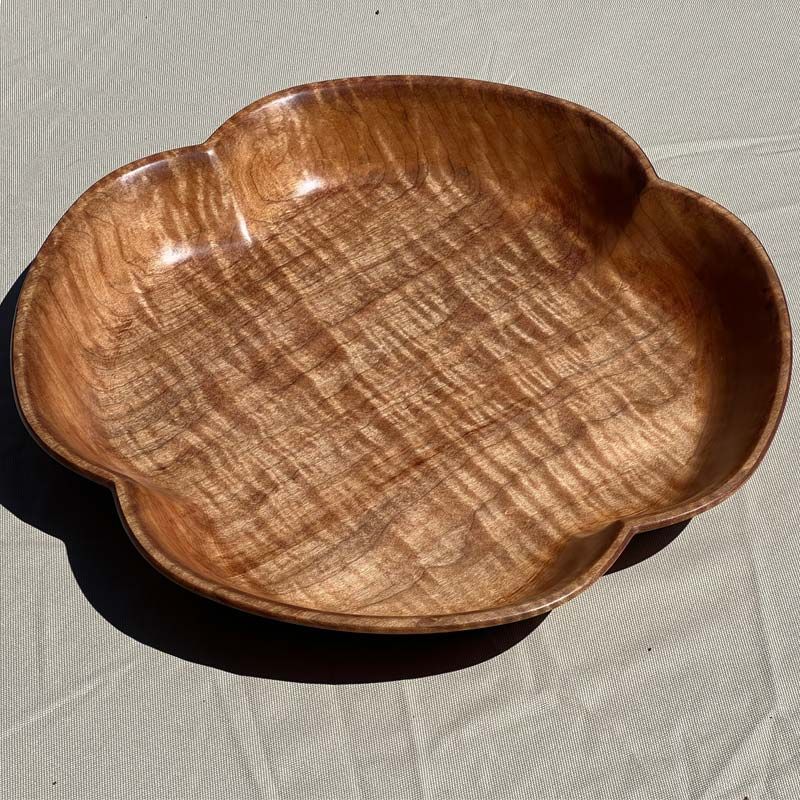
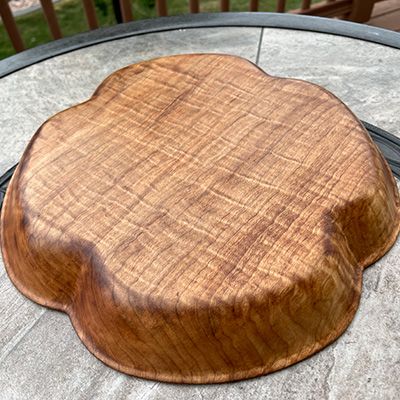
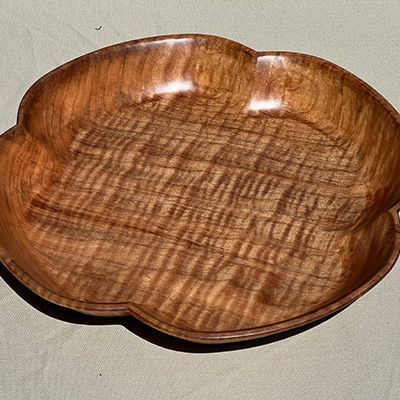
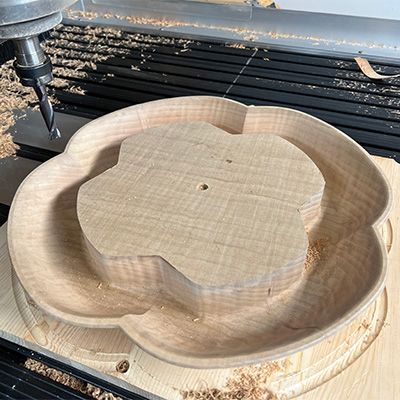
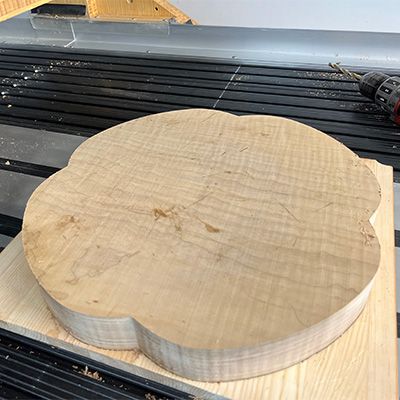
It’s a fabulous two-sided project. What were your original ideas and how did you arrive at the cherry bowl and the scalloped detail?
I needed a bowl to store my keys, wallet, glasses etc for easy access and I had that right size of bowl blank. Normally I would make that into a circular bowl like I have done many times on the lathe and CNC. I just wanted this bowl to be a bit different and Aspire really makes that possible. I came up with the idea of the scalloped outline and the added bonus was it still left most of the available bowl volume intact.
How did you use Vectric software to set it up as a two sided project?
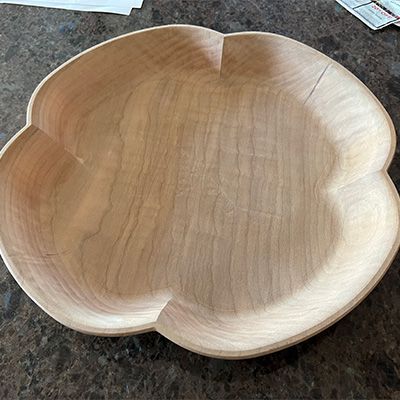
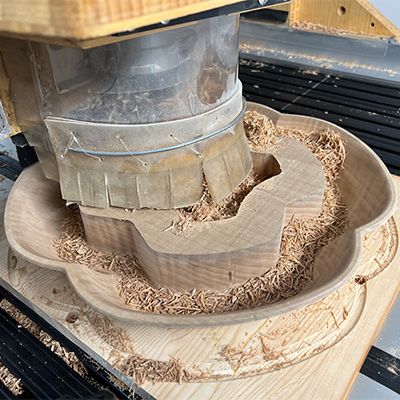
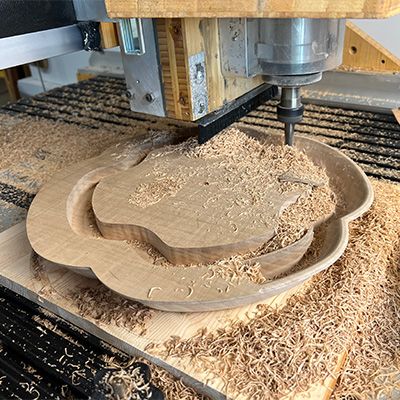
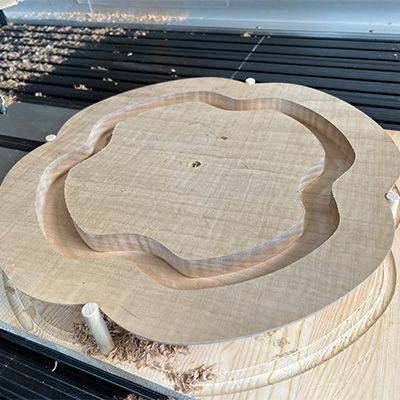
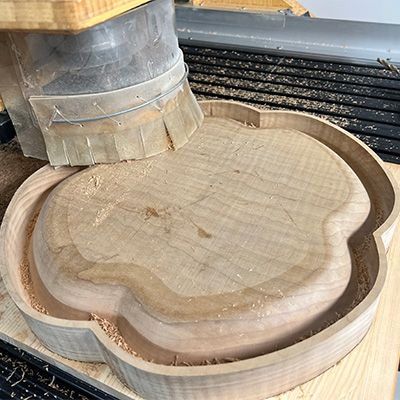
Starting with a circle, I added one of the scallop coves, tweaked it until I was happy then rotate-copied that 4 times. I realized later that 5 or 6 scallop coves might have looked better but, oh well. Then I created the bottom side profile vector and simulated and modified the bottom shape until it looked good. I then created an offset vector with the desired wall thickness of 6mm as distance and copied to the top side. That way, the inside and outside rim shape conform with each other having the same constant wall thickness. The depth of that profile vector with 41mm is the same 6mm wall subtracted from the 47mm thickness of the blank. I had to bend the outside ends of the profile a bit to get a reasonable rim edge. I would have preferred doing the top side as a continuous profile cut on a closed guide vector but Aspire or VCarve does not currently allow that on the inside of such a closed vector so I had to split the guide curve into 2 halves as open vectors.
We’ve made a few two sided projects here at Vectric and dowels and markers are a key part to accurately repositioning and cutting each side. We’re curious as to whether the dowels worked well holding the job when you flipped it over?
Well, this was a special situation! I usually have rectangular or odd shaped blanks and use 3 separate dowel holes well outside of the part to cut. With this circular blank, I didn’t have that luxury plus I didn’t want to waste material so I used the 4 scallop coves directly for locating dowels. It worked quite well as they’re only used to locate the bowl until vacuum is applied and they don’t have to take up a lateral force. Actually, the dowels could just as well have been removed after vacuum is on.
The crosscut is a clever detail and really adds to the design. What inspired you to do that and what machine setup did you use?
I’d never tried the double-sided moulding profile cuts before and wasn’t sure if it would work, and of course finish cutting through the real bowl with a band saw to check the wall thickness is obviously not a good idea. Fortunately, the machining simulation in Aspire can be relied on to represent exactly what happens on the machine and I made that “virtual cross-section” to visually check the desired wall thickness. I can’t exactly measure it that way but it’s good enough to tell me if it is too thick or thin somewhere.
I cut the bowl on my big Bamboo machine which has a 36” x 48” table of extruded T-slot profiles and an operating range of 34” x 31” x 8”. The job setup could also work for cutting larger numbers of bowls by adding a sturdier reusable vacuum jig to allow for swapping blanks and partially machined pieces between the tool changes. You could also try to machine the top side moulding toolpath from the inside out using a closed guide curve vector as this would be faster and cleaner. I didn’t dare try it as I had that one piece of material and it would machine the thick outer ring while it’s only connected to the work holding center with the thin 6mm wall which may or may not work due to chatter and deflection. You would definitely need a very rigid machine when cutting such thick pieces with long ½” diameter bits. I keep playing and trying new things, and I’m learning by looking at other people’s projects.
What’s the most unusual or interesting project you have created?
Now that’s tricky because over the years I’ve completed so many projects that I really like and might also be interesting for other woodworkers. I’m not at all into ‘artsy’ or decorative projects, and for that reason, I am probably missing out on many Aspire modelling capabilities! Most of my projects are more utilitarian and often done in 2D or 2.5D with modest use of 3D functions. I can say that my most unusual newer project is my Wheel of Time marble machine clock which I shared on the Vectric forum https://forum.vectric.com/viewtopic.php?f=29&t=39428 You can find this and lots of other interesting projects in the Aspire gallery or on my YouTube channel.
https://www.youtube.com/channel/UCtnvbWLYnxgmdGMwvIFYslA
Any top tips and tricks for others makers building their own CNC?
I love woodworking as a hobby as it’s really rewarding, no matter whether you start with a chisel and hand saw or a CNC machine! I would recommend building your own CNC machine only if you enjoy the design and build process and have some mechanical and electrical skills, not primarily to save money. If the machine is capable i.e. reasonably fast, rigid and precise, the cost is probably around the price of a small commercial well-built machine. But if the goal is just to have a CNC machine for simple projects, with modest money you could give it a try using Arduino electronics, 3D-printed parts, extrusions or MDF panels. My machine build log on the CNC-Zone forum gives a lot of detail about the making of my Big Bamboo machine here: https://www.cnczone.com/forums/cnc-wood-router-project-log/135232-cnc-software-forum-posts.html
A huge thank you to Gert for sharing more Tailmaker projects with us and we hope this will inspire customers to try their own two sided machining projects or even build their own CNC!
Check out the project gallery showing each step of the process for making the cherry bowl. If you’d like to see more Tailmaker projects, go to Gert’s YouTube channel.
Gert Burkhardt – Tailmaker, Colorado

Vectric Ltd
Precision House
2 Arden Road
Alcester
B49 6HN
Registered in England Number 05382596
VAT Registration GB115123072
Privacy Policy |
Cookie Policy |
Terms and Conditions


