Lindsay and Ryan Neathawk from Williamstown, Massachusetts each own and operate their own successful businesses. Both companies benefit from the Neathawk's use of Vectric's Aspire along with their ShopBot CNC machine. In this month's case study we talk to them about their journey into the world of CNC, how it has helped them evolve what they do and they also detail some of the projects they produced for their clients.
Ryan begins by talking about the events that influenced them buying their first machine and the evolutions of their current setup, "Our Interest in woodworking has developed over the years. I had been messing around in the garage making small signs and carving things by hand with a router. As things progressed, I was looking in different magazines at different CNC machines. In 2010 Lindsay was laid off from her job as a graphic designer. It was that day when we ordered our first CNC machine (CNC shark from Rockler), this came pre-loaded with V-Carve Pro. The combination of my woodworking knowledge and Lindsay's graphic design expertise made this a great fit."
"After about a year, we realised we would benefit from a larger work area so we moved on to a 4'x8' ShopBot CNC. We love our ShopBot. We spent a lot of time looking at their forums and realized there is a lot of support out there for them. The size, flexibility, pricing, speed, and ease of use all made ShopBot a good choice. We purchased the standard unit because we can always upgrade it later. We went with the 4 HP spindle because it's quiet, powerful, and is cheaper to buy up-front."
Ryan then went on to explain how they ended up working with the Vectric programs and upgrading to Aspire, "We first began with V-Carve Pro and Cut 3D because they were bundled with our CNC Shark. We found the software to be very flexible and fairly simple to use. We upgraded to Aspire within 6 months of owning our first CNC because of the 3D capabilities. We also added Photo V Carve along the way as well. Lindsay will often jump back and forth from Aspire to Photoshop and or Illustrator, which is easy to do and opens up even more possibilities for what we can offer our clients. The price point of the software is good, and the ease of use is excellent. It's not always easy. There are often issues that arise, but both Vectric and Shop Bot have excellent customer service along with extensive forums with extremely knowledgeable people. We have found that the combination of the Vectric suite along with our CNC machine gives us a huge leg up in our business. It allows me to do things that other contractors cannot do."
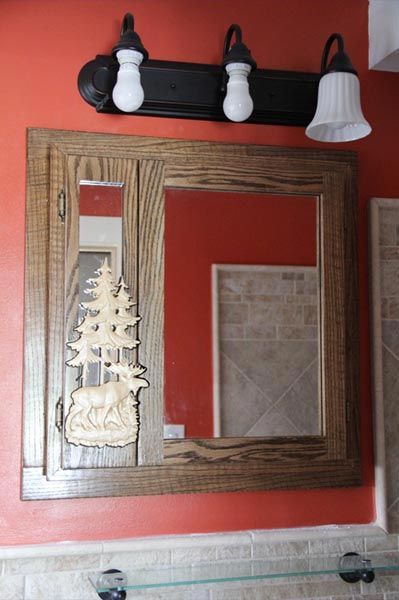
Although they operate separate businesses Lindsay and Ryan collaborate on a lot of the jobs and also use the same approach when looking at how to provide something special for their customers. Ryan elaborated on their thought process for this, "With every single project, we usually start with asking, "Can we make this better by using our CNC?" Typically, our customers to the contracting business ask for simple things, such as the medicine cabinet. Then we ask ourselves, "What can we do to make this better than the average medicine cabinet?" Vectric software allows me to offer my customers something that most other contractors can't do."
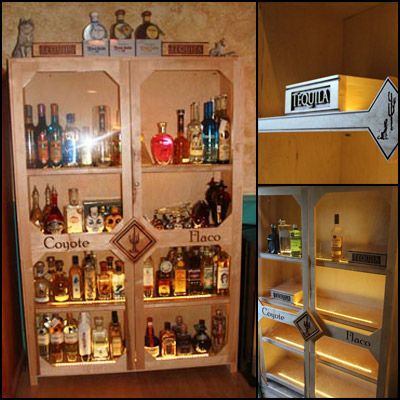
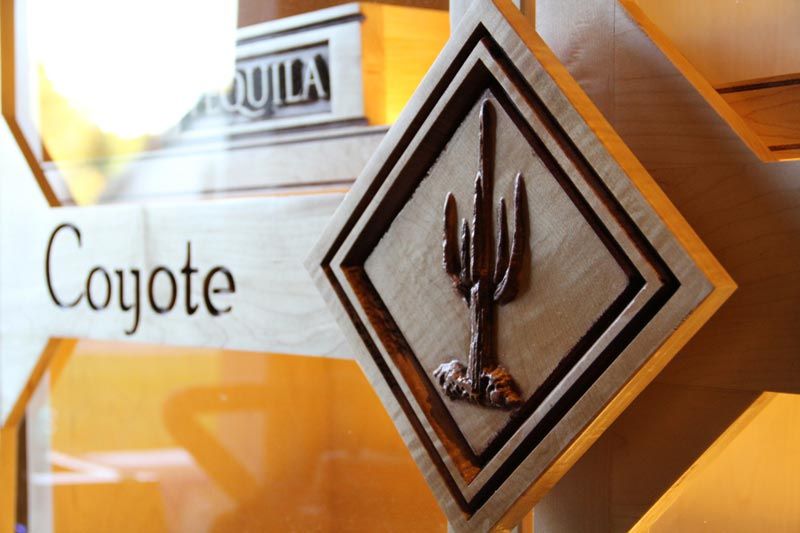
"The Tequila cabinet was supposed to be a simple cabinet to store Tequila in. I wanted to push the envelope a bit and make it more exciting. They even asked me to put fluorescent lighting in (which I thought was an awful idea!). I didn't want to make something boring and then be known for making boring things, so we spiced it up. The Medicine cabinet is very much the same way. It was originally supposed to be "just" a medicine cabinet. When I show customers a concept of what their projects could look like, it's hard for them to say no. In that case they specifically asked for a "Wow" medicine cabinet. We simply downloaded the vector art, designed the door, and printed out a picture of what the cabinet would look like. They loved it, so we built it."
"I often use our CNC capabilities in our sales pitch. I usually get around to saying "we can pretty much do anything you want." I often give away free signs or freebies to large customers that spend a lot of money. It's a nice way of saying 'Thank You', and also promotes Lindsay's business."
"As for the sign work, Lindsay is always trying to push our capabilities in testing new materials, finishes, and techniques. Her Background is in graphic design. Often times, people approach her for graphic design work, which can easily translate into sign work. Lindsay often offers to design a logo for the client free of charge if they commission her to create a sign for them, the client is thrilled to be saving money and also being able to get a nice 3D sign"
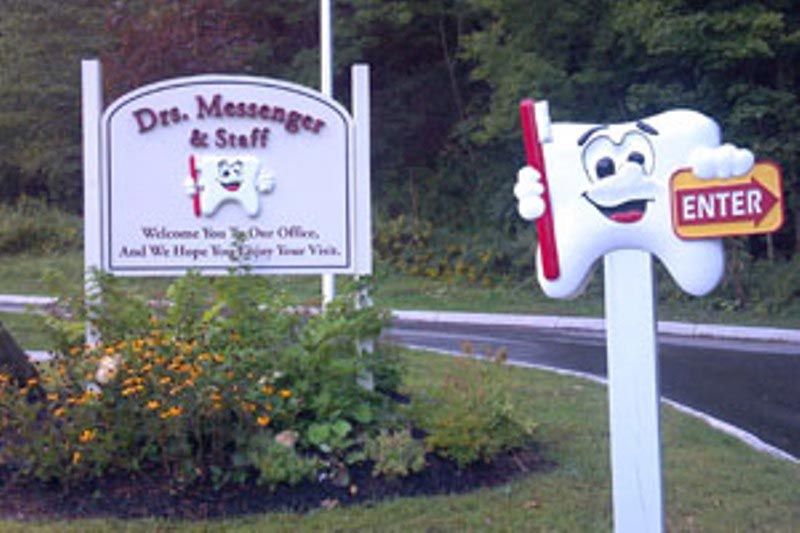
Lindsay added more information about how this has influenced the sign side of the operations and how this has developed what they can make, "On the sign business it allows us to offer 3D capabilities for our signs that no other local sign shop can. Most sign shops are primarily cutting vinyl then they outsource to another shop for a VCarved or routed sign. In the few short months of "officially" starting the business we have already become the known 3D carvers in our area. The original decision to upgrade to Aspire was specifically made because of the ability to design in 3D for a project that we were working on (3D teeth for a dentist)."
"When we first bought the CNC Shark, we never had the idea of doing 3D, just thought of VCarve and 2D signs primarily. But as Ryan mentioned when a customer comes to us with an idea on what they want we ask ourselves how we can make this better. Case in point is the tooth sign. The customer came to us with a picture on his rug of a tooth holding a toothbrush and a smiley face and asked us to do a simple outline of a tooth with a smiley face. We then figured out we could make the face 3D and add arms and have it holding a tooth and then a sign saying "Enter" or "Exit," whereas the customer had just wanted the words written on the tooth's belly. After we had to figure out how to install the tooth to make it look good from all angles. So many signs are mounted with nothing but the bracketing system being shown on the back, this is fine when no one can see the back, but this is located in the parking lot and people will be seeing it from all directions. So the customer came up with the idea of adding a "tooshy" aka a butt to the back of the sign. From there I knew I didn't want to keep a space open between the front and back, so we came up with an idea to fill the inside of the tooth and hard coat it to look like one complete tooth."
We asked Ryan to provide more specific detail about the Tequila cabinet they recently finished, "As I mentioned before, the cabinet was supposed to be a simple cabinet with shelves and doors. I came up with a design in my head and drew it up on paper to show the customer. They had a tight budget, so I also had to think of ways to make the cabinet low cost, yet look awesome. In this case it was a case of using some simple techniques that required a little extra effort to take the cabinet to a whole new level. Otherwise, it would have just been another piece of furniture up against the wall!"
"I started with ¾" maple veneer plywood to make the box and shelves. I have cut the cabinet parts in the past using Aspire but for this one, I simply used a circular saw. I assembled the box using a Festool Domino Joiner (which I also love). That's the end of the boring part…"
Face Frame
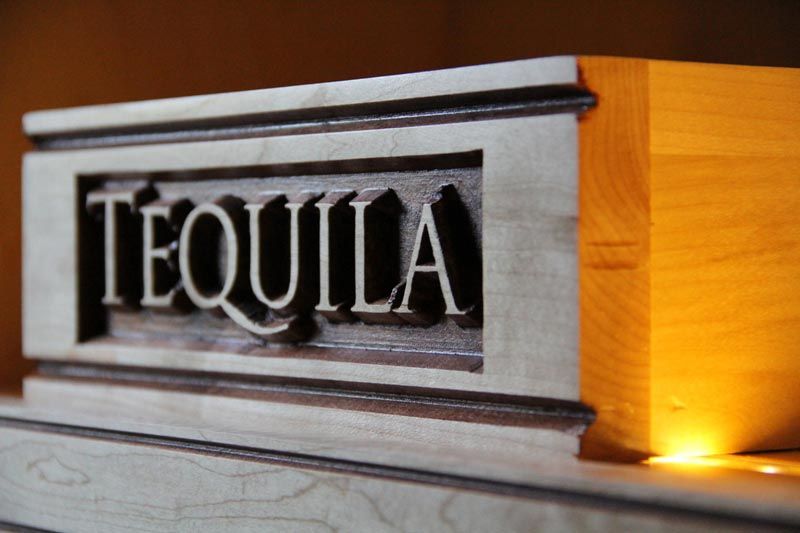
"The restaurant provided us with inadequate files for their logo (very pixilated). Lindsay cleaned up the logo files and imported them into Aspire. I then added the designs and borders to the cabinet face which were VCarved. It was simple touches like this that gave it a bold look. In order to save on cost, I used rough sawn, kiln dried maple, which was about half the cost of maple from the local lumber yard. I cut the face frame on the CNC using a 60 Degree V bit and profile cut using ¼" end mills. I did manage to break a few bits when doing the profile cuts so would recommend keeping the feedrate down when carving in hard maple. The face frame pieces were then assembled and attached to the cabinet using the domino joiner."
Doors
"The doors were assembled first by milling up the parts and gluing them together. After that we did simple VCarving on the CNC to engrave the restaurant name. We had to secure the doors down to the CNC table using blocks and pieces of scrap wood."
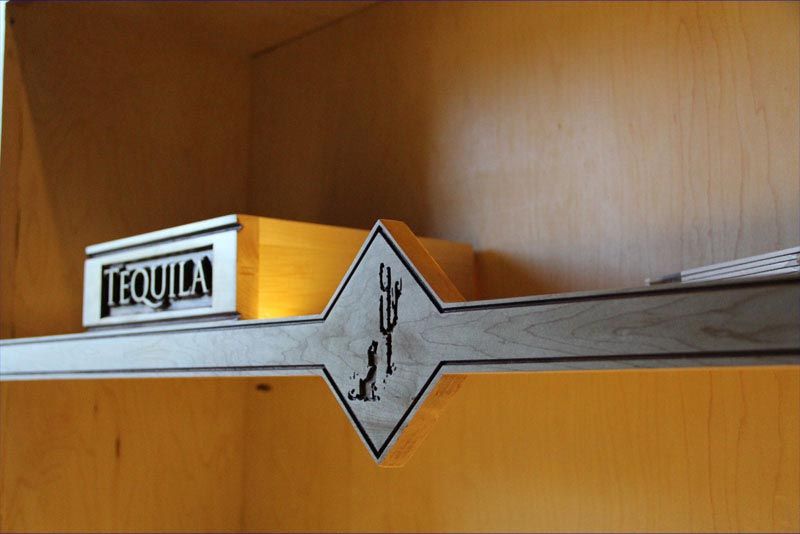
"For the door pull, we simply surfed the web for a 3D cactus that would fit the bill. I had a local glass shop install the glass. "
The Finish
"Our finishing technique came directly off the vectric web site (Click Here to view the finishing tips article). I had used it before for some Photo VCarvings, and really liked how I looked. It gives it almost a wood-burn appearance. It also allows me to use stain inside of the letters without it bleeding through the wood. In my opinion, the stain looks much better than paint. The whole project was then coated in a few coats of spray lacquer."
Lighting
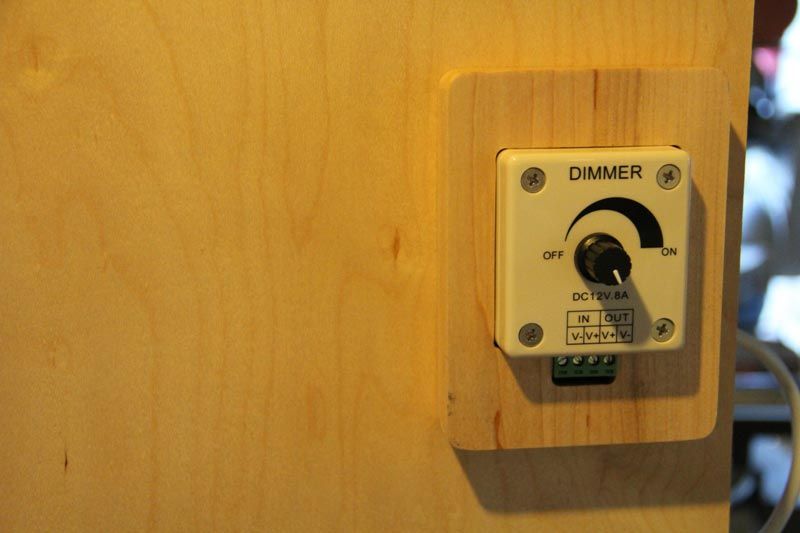
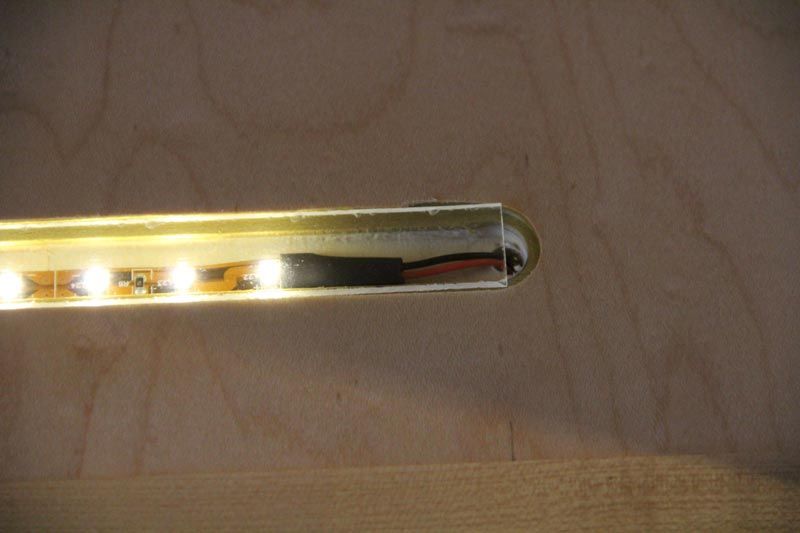
"I think that owning a CNC machine typically leads to thinking out of the box and trying to be innovative. I knew that adding the requested fluorescent lighting wasn't an option, especially when lighting is so important in a restaurant. The cabinet was nearly done when I decided that we had to figure out a better way to light it up. Naturally, the gears start spinning and I hit the web. For less than $50, I found online; 16 feet of LED lights, the LED power supply, a dimmer, and a soldering kit. I watched a few YouTube videos on how to solder wires, and off we went. I took a laminate trimmer and routed a ½" dado in the top of each shelf toward the front where the bottles would sit. I cut the LED strip into 4 equal sections that would fit. I took my new cheap soldering iron and soldered the wires to the strips and added heat shrink. The rest was easy. I had some scrap clear acrylic that I cut down and used to cover the lights and fit into the dado cuts, If I were to do it again, I would have cut the cabinet out including the Dado's on the ShopBot."
"The only thing left was I had left some exposed wires around the dimmer switch and I really didn't' like the look of them. I spent about 10 minutes taking measurements of the switch and drawing them out in Aspire. I used pocket and profile cuts to machine out a cover for the switch using the same maple wood. I made the cover nice and tight so it could be held on by friction and easily removable should the need arise."
Ryan concluded his description of the project with how it was received, "The customer loves the Tequila cabinet. They want another one! I am also very happy with the cabinet. I would have liked to see a larger budget to work with, because I could have installed some seeded glass and maybe changed a few minor details, but the main thing is a happy customer"
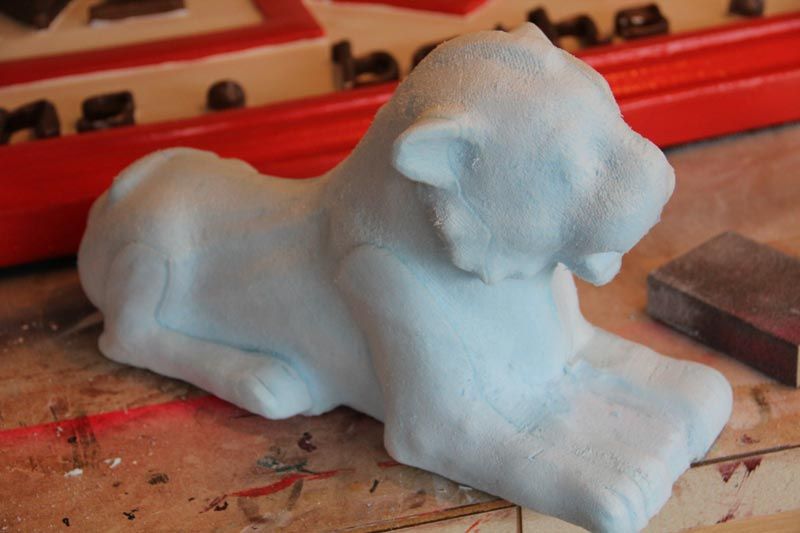
We asked Lindsay and Ryan to finish by telling us about upcoming projects they have in the works and to tell us a bit about their marketing, "One of the challenges we face with having a CNC setup is figuring out what direction we want to take our business in. We tend to jump around. While Lindsay primarily does sign work, and my business is a contracting business, we tend to take on anything that sounds exciting (which is pretty much any job that comes our way). Our latest job was to make a 3D replica of an ancient lion sculpture for a museum. Our neighbor happens to be in the business of creating 3D cad files of ancient artifacts and dig sites. He provided us with the Cad file so that we could carve it for him. We used 2" XPS foam, sliced the design into 4 pieces and carved it. Lindsay then epoxied it together and added further detail and painted the model to match the original.. The 3D Lion file was created using cutting edge technology that will likely revolutionize the whole way we create 3D files. Fortunately the person who created the technology happens to be my neighbor! I can't really spill too many secrets, so you will have to stay tuned. The Lion was originally made of clay around 1500 BC."
"We have also started facebook and twitter accounts so as to keep our friends, family and followers up to date on what we are working on at the moment. Twitter for signs is @NeathawkSigns, website is www.NeathawkSigns.com. Ryan's site is www.NeathawkGC.com and twitter is @RyanNeathawk. We were also featured recently in an article on an online local news site: http://www.iberkshires.com/story/41815/Williamstown-Woman-Carving-Out-Sign-Business.html - any kind of exposure like this is a great way to showcase what we do and improve the chances of people finding us when they search."
We would like to sincerely thank Ryan and Lindsay and congratulate them on their success so far and look forward to seeing everything they produce in the future.
Vectric Ltd
Precision House
2 Arden Road
Alcester
B49 6HN
Registered in England Number 05382596
VAT Registration GB115123072
Privacy Policy |
Cookie Policy |
Terms and Conditions


