For Tim, woodworking has been a lifelong hobby and passion and the decision to incorporate CNC technology within his well-equipped shop was seen by Tim as a natural progression.
Tim invested in his Shopbot CNC machine 8 years ago and soon required more sophisticated design software to tackle the projects he wanted to undertake. However, he became disillusioned with the lack of choice in the market, especially when it came to price as he explains;
“I could not justify spending more money for software than the entire machine cost to begin with”
Fortunately Tim did not have to wait too long as Vectric was soon to release its first product ‘VCarve Wizard’ (now VCarve Pro);
“Then Vectric appeared with their initial V-Carve Wizard software and everything turned around for me. Since then I have moved up through their products and currently use Aspire for everything.”
Since upgrading to Aspire Tim has been able to take more and more interesting projects, for work and for fun! This case study focuses on the latter and looks at how Tim used Aspire to machine 3D Shark models for his Grandkids.Inspired by another Vectric user who posted a 3D Christmas Camel project on the Vectric forum, Tim wanted to try something similar but new to him, as up until now all his work had been finished naturally. Although he could have designed and modeled the shark from scratch, he decided to check to see whether he had an interesting model to use in his 3D Clipart collection from VectorArt3D and found their 3D Great White Shark, knowing immediately that both grandkids would love to have one!
Tim’s aim was to create a big, impressive model that would pose problems if created out of wood, especially hanging from a wall, so he decided to try machining them in high density foam. I wanted it big and impressive, which in wood would have created something too heavy to hang on the wall as he explains:
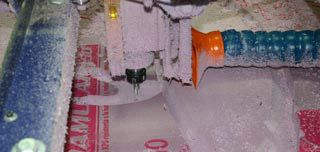
“I needed to make two but decided to do one first and see how it went. Hoping to get both out of one sheet of 4' X 8' X 2" foam insulation sold at the local home improvement store”Diseño de piezas y creación de trayectorias en Aspire:
Para este proyecto, Tim utilizó la función de segmentación de modelos 3D de Aspire para cortar el tiburón de 1,2 m de largo en cuatro secciones Z de 5 cm de grosor. La imagen de la derecha muestra el diseño inicial y la vista previa de la trayectoria para el primer tiburón.
Para asegurar que las piezas se mantuvieran en su lugar durante el mecanizado, Tim decidió incluir orificios de sujeción en el diseño para fijar el material a la mesa de la CNC. Estos orificios se mecanizarían primero, por lo que se creó una trayectoria de taladrado para un tornillo de cabeza arandela.
El siguiente paso fue crear la trayectoria de desbaste, que eliminó rápidamente grandes cantidades de material sobrante. Tras el desbaste, el acabado se realizó de forma rápida y uniforme. Tim decidió utilizar una broca de punta esférica más larga de lo habitual para obtener una mayor holgura en el eje Z.
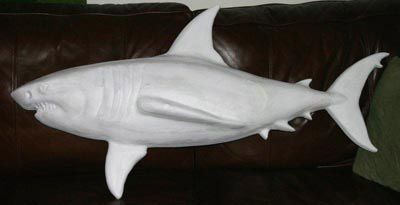
Acabado y pinturaWith the machining completed, as well as a lot of vacuuming, it was time to assemble. Wanting to use supplies that he already had, Tim glued the layers together using Titebond 3 glue, however Tim has started using a different method after the first shark as he explains;
“The glue worked fine and the shark is still in one piece, but has since read that the glue may not set up on the interior surfaces. Therefore, for the subsequent sharks, I have used a 3M spray adhesive and that is working great”
Here is a picture of the assembled shark after gluing the 4 layers together. Tim now needed to fill in and finish the rough edges and holes. Tim explains the method produced a great finish with cnc cut foam“I found sanding easiest with sponge sanding pads. The 60 and 80 grits worked the best, and with the soft sponge base, they were not as aggressive as the grit number would indicate. I used the 60 for some final shaping and smoothing followed by a heavy coat of Zinsser's water based primer. After letting the primer dry, I sanded all surfaces using the 80 grit sanding sponge.”
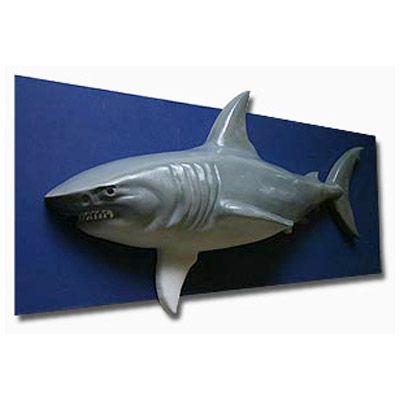
To fill in the small holes Tim mixed some light joint compound with a little water to achieve a pancake batter consistency and used a foam paintbrush to cover the entire surface (after the initial coat of primer).Tras lijar la superficie con una esponja de grano 80 para obtener un acabado liso y satisfactorio, Tim aplicó una última capa de imprimación al agua. Una vez seca, lijó toda la superficie con una esponja de grano 120 y finalmente la pintó con pintura gris humo brillante para el acabado superior e inferior. Después de un par de capas de gris y blanco, Tim usó un pincel pequeño para pintar los ojos y los dientes con pintura acrílica económica, disponible en casi cualquier lugar.
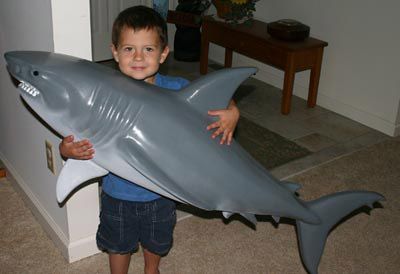
Tim nos contó que a sus nietos les encantaron los tiburones:
“El primer tiburón fue para mis dos nietas. Estaban emocionadas, pero ni de lejos tanto como mi nieto de dos años y medio. Costó un rato conseguir que lo sujetara para la foto, y no le hacía mucha ilusión que le sacaran la foto, pero esto es lo que hace que merezca la pena el tiempo y el esfuerzo.”
Para más información sobre el proyecto, lee el hilo completo en el Foro Vectric >

Vectric Ltd
Precision House
2 Arden Road
Alcester
B49 6HN
Registrado en Inglaterra Número 05382596
Número de IVA GB115123072
Política de privacidad |
Política de cookies |
Términos y condiciones


