As a newer member of the Vectric team and a new user of CNC machines I am interested in creating small practical projects to be useful about the house. My experience with software use and support has far exceeded my time of practical use of the actual CNC machine and it’s about time to actually build one of the projects I’ve designed.
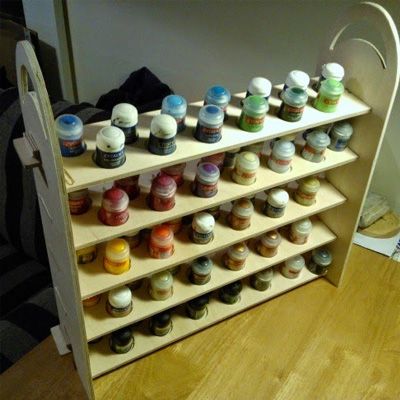
The first project I have designed is a simple paint rack, for small pots of paints.
The project specs were simple enough, it need to hold at least 50 paint pots, fit within a 24” space and not be any longer than 8 inches so as not to take up to much shelf space.
It also had to have easy access to the paint pots, and preferably allow me to see them all at once so that I don’t lose anything behind other paints.
As with every project I make I jumped right in and began designing in software before doing sketch plans. This is always a bad idea, as it is a lot smarter to begin a technical drawing with a firm plan in mind. Pre-production is always worth its time in gold, but it is a habit I have yet to break.
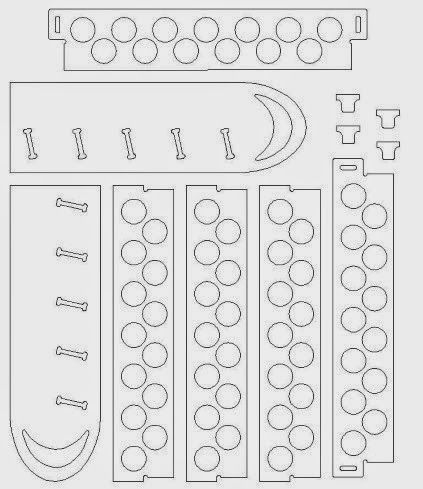
My initial drawings were simple enough, 2 mirrored sides with slots for hand holds, 5 joint slots per side and 5 shelves with a similar sized slot to give me a little shelf set.
On the shelves I actually drew 2 circles offset from each other and then used an array tool to evenly space them along the length of the shelf. I could then select the whole shelf with circles included and array them to give me my 5 shelves.
This now gave me my basic shape, and I originally intended to try to glue the whole thing together.
I often find that glue gives me mixed results however and I would like to be able to make the shelf hold together without glue this time. At first I thought it would work will to just leave it up to friction to hold it together, but knowing my luck it would fit loosely and come apart if I did so.
Looking at some other projects I got the idea to add a little tab to the slots of the top and bottom shelf that would allow me to insert a locking piece. A nice and easy solution that should make assembly a breeze! I drew on the extra shapes for the tabs and used the combine vector tool to merge them with the existing top and bottom shelf, added a slot an inch long and the thickness of the material wide in each and drew 4 matching locking parts.
Lastly, I knew I had a number of internal angles that a cutting bit would not get into so I used a fillet tool to go around the inside corners and add a radius of 0.126” (since I was using a 0.125” radius bit)
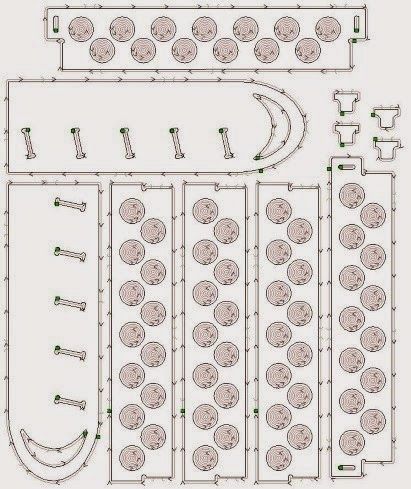
The parts looked ready, so I nested them to ensure there was plenty of clearance for the cutting bit and applied my toolpathing, pockets 1/3 the thickness of the material for the circles on the shelves to stand my pots in, and Profiling a fraction deeper than the thickness of the material for everything else. While Profiling I made sure to add a number of tabs to make sure no parts would come free while machining, which I made ½ the thickness of my material.
With the toolpaths done, I got the gcode exported out and set up the machine to do the cutting.
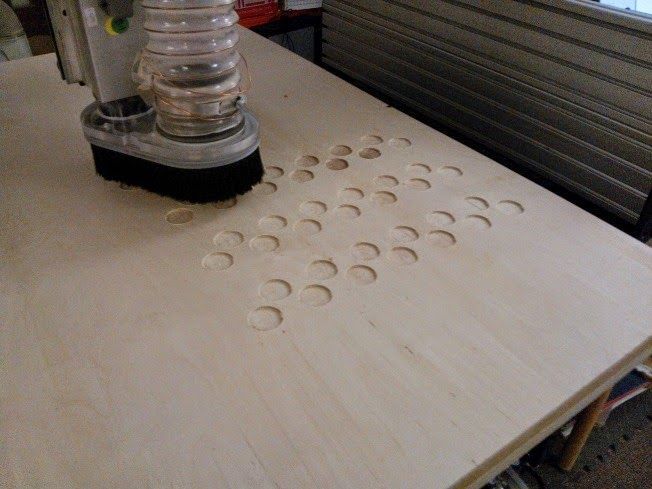
The initial cut was perfect, even with the cheap ply-wood the top edges were cut smoothly, and things looked like they were going well.
The first problem reared its head at the end of the job, as I found that the wood was not an even thickness throughout and my measurement of 0.255” thick was out by 0.01” or so, leaving a noticeable skin in the deepest layer.
I made a new toolpath that would cut 0.257” deep in one pass and let that run as well.
The skin was mostly removed, but it was not totally gone. By this point though I felt it was nothing that a little sanding would not fix and so removed the stock from the machine and cut though the tabs with a saw.
What followed was a quick sanding on the circular sanding belt and I began trying to fit the parts together, seeing the finished product soon to be in sight!
Of course since all of my slots and tabs were machined 0.255” think and I had not thought to make the slots a little wider to account for the variable material thickness I had to then go over every slot with a file to enlarge it a fraction so I could get my parts together. Much sanding and use of a mallet later my paint stand, stands completed!
And Full of Paint!
Lessons learned:
Plan a little more, draw the design first and consider the full design rather than having to redraw your design for extra tabs and the like later.
Take multiple measurements of your stock to make sure you are getting the real thickness, particularly if using cheaper materials.
Make use of the Spoil board, better to re-skim the board after a dozen jobs then try to be exact with your cut depths to preserve it, and end up needing to manually finish edges that the CNC machine could have gotten perfect first time.
Vectric Ltd
Precision House
2 Arden Road
Alcester
B49 6HN
Registered in England Number 05382596
VAT Registration GB115123072
Privacy Policy |
Cookie Policy |
Terms and Conditions


