Nouvelle recrue chez Vectric et novice en machines CNC, je souhaite réaliser de petits projets pratiques pour la maison. Mon expérience avec les logiciels et le support technique dépasse largement mon temps d'utilisation de la machine CNC elle-même, et il est grand temps de concrétiser l'un des projets que j'ai conçus.
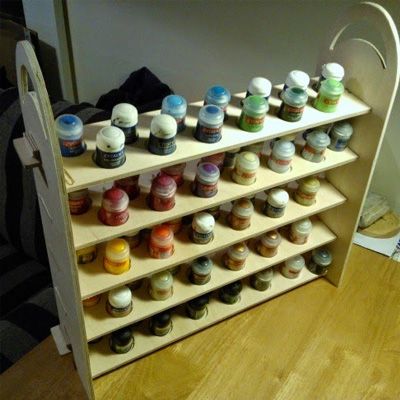
The first project I have designed is a simple paint rack, for small pots of paints.
The project specs were simple enough, it need to hold at least 50 paint pots, fit within a 24” space and not be any longer than 8 inches so as not to take up to much shelf space.
It also had to have easy access to the paint pots, and preferably allow me to see them all at once so that I don’t lose anything behind other paints.
As with every project I make I jumped right in and began designing in software before doing sketch plans. This is always a bad idea, as it is a lot smarter to begin a technical drawing with a firm plan in mind. Pre-production is always worth its time in gold, but it is a habit I have yet to break.
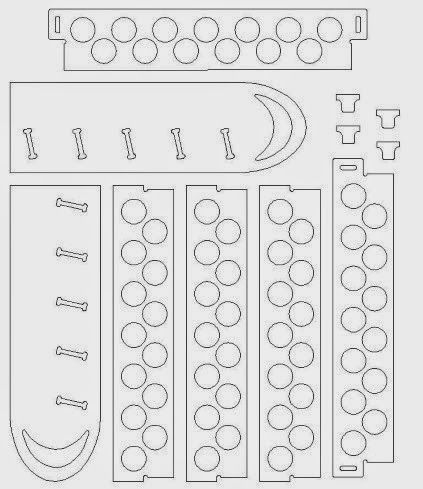
My initial drawings were simple enough, 2 mirrored sides with slots for hand holds, 5 joint slots per side and 5 shelves with a similar sized slot to give me a little shelf set.Sur les étagères, j'ai dessiné deux cercles décalés l'un par rapport à l'autre, puis j'ai utilisé l'outil de réseau pour les espacer uniformément sur toute la longueur. J'ai ensuite sélectionné l'étagère entière, cercles compris, et j'ai utilisé cette méthode pour créer mes cinq étagères.
J'avais ainsi la forme de base, et je comptais initialement coller le tout.
Cependant, la colle donne souvent des résultats mitigés, et j'aimerais cette fois-ci que l'étagère tienne sans colle. Au départ, je pensais que le simple frottement suffirait, mais connaissant ma chance, elle ne tiendrait pas bien et se détacherait.Looking at some other projects I got the idea to add a little tab to the slots of the top and bottom shelf that would allow me to insert a locking piece. A nice and easy solution that should make assembly a breeze! I drew on the extra shapes for the tabs and used the combine vector tool to merge them with the existing top and bottom shelf, added a slot an inch long and the thickness of the material wide in each and drew 4 matching locking parts.
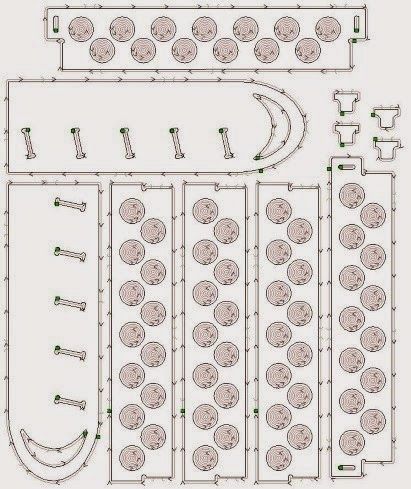
Lastly, I knew I had a number of internal angles that a cutting bit would not get into so I used a fillet tool to go around the inside corners and add a radius of 0.126” (since I was using a 0.125” radius bit)The parts looked ready, so I nested them to ensure there was plenty of clearance for the cutting bit and applied my toolpathing, pockets 1/3 the thickness of the material for the circles on the shelves to stand my pots in, and Profiling a fraction deeper than the thickness of the material for everything else. While Profiling I made sure to add a number of tabs to make sure no parts would come free while machining, which I made ½ the thickness of my material.
With the toolpaths done, I got the gcode exported out and set up the machine to do the cutting.
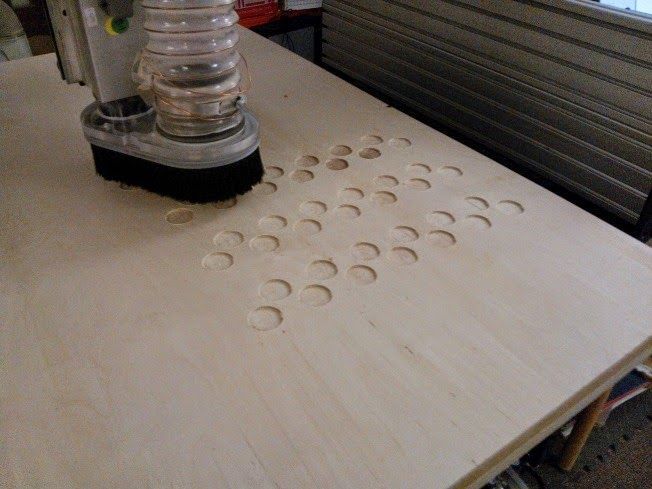
The initial cut was perfect, even with the cheap ply-wood the top edges were cut smoothly, and things looked like they were going well.
The first problem reared its head at the end of the job, as I found that the wood was not an even thickness throughout and my measurement of 0.255” thick was out by 0.01” or so, leaving a noticeable skin in the deepest layer.J'ai créé une nouvelle trajectoire d'outil qui usinerait à 6,5 mm de profondeur en une seule passe et je l'ai lancée.
La peau était presque entièrement enlevée, mais il en restait quelques-unes. À ce stade, je me suis dit qu'un léger ponçage suffirait, alors j'ai retiré la pièce de la machine et j'ai découpé les languettes à la scie.
J'ai ensuite poncé rapidement avec la ponceuse circulaire et j'ai commencé à assembler les pièces, impatient de voir le produit fini !
Bien sûr, comme toutes mes rainures et languettes avaient une épaisseur de 6,5 mm et que je n'avais pas pensé à les élargir un peu pour compenser l'épaisseur variable du matériau, j'ai dû limer chaque rainure pour l'agrandir légèrement et pouvoir assembler les pièces. Après beaucoup de ponçage et quelques coups de maillet, mon support de peinture est enfin terminé !
Et rempli de peinture !
Leçons apprises :
Planifiez un peu plus, dessinez d'abord le design et considérez le design complet plutôt que de devoir redessiner votre design pour des onglets supplémentaires et autres plus tard.Prenez plusieurs mesures de votre pièce pour vous assurer d'obtenir l'épaisseur réelle, surtout si vous utilisez des matériaux bon marché.
Utilisez la planche de rebuts : il est préférable de la rectifier après une douzaine d'opérations plutôt que d'essayer d'être précis sur la profondeur de coupe pour la préserver, et de devoir ensuite finir manuellement des bords que la machine CNC aurait pu usiner parfaitement du premier coup.
Vectric Ltd
Precision House
2 Arden Road
Alcester
B49 6HN
Immatriculée en Angleterre sous le numéro 05382596
Immatriculation à la TVA GB115123072
Politique de confidentialité |
Politique relative aux cookies |
Termes et conditions


