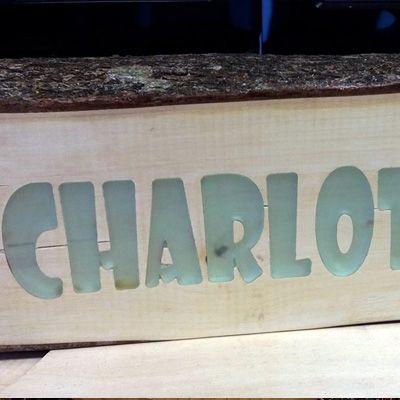
Après une longue interruption, j'ai repris les essais sur les différentes machines CNC du bureau afin de découvrir les bonnes pratiques et les erreurs à éviter lors de l'utilisation de ces machines.
For this project I wanted to make myself a Desk sign, but wanted it to be a little different from the other signs here in the office.
For this design I wanted it also to be a nice a simple project to get myself back into the swing of things.
For this reason I kept the CNC work as simple as I could so if I made mistakes it would not be the end of the world where I ruin a 6 hour project cut.
Keeping this in mind I started out by finding a suitable piece of wood, and as luck would have it we just so happened to have some spare fire wood laying about.
I picked out a small piece and set it in the Window to dry out… My first mistake! It dried to quickly and started to split. Thankfully not to much and I was able to cut off the worst of it in my second step, cutting it to a rough shape using the circular table saw.
With the wood cut down to size I screwed a piece of scrap wood to the back of it, flipped it over and then screwed the rough wood to the CNC machine bed.Cela m'a permis de bien le fixer sans laisser de marques sur les bords supérieurs ou latéraux.
Une fois le bois en place, j'ai pris les mesures et je suis allé dans VCarve Pro pour créer mes vecteurs et définir les trajectoires d'outil.
J'ai créé le texte avec une belle police en gras, puis j'ai tout converti en nœuds.
Cela m'a permis de créer un vecteur décalé à partir du vecteur d'origine. Pour ce faire, j'ai désactivé l'option « Angles vifs », puis j'ai défini le décalage sur le rayon de ma fraise (0,0625"). J'ai ensuite décalé vers l'intérieur, sélectionné le nouveau vecteur, puis décalé vers l'extérieur.
En supprimant le vecteur d'origine, j'obtiens le texte original, mais avec un arrondi efficace de tous les angles inaccessibles à la fraise, ce qui donne un bel effet arrondi.
Une trajectoire d'outil de poche, utilisant une fraise de 0,125" et une profondeur de 3 mm, a été appliquée à ces vecteurs et enregistrée, prête pour la découpe. Les vecteurs ont également été exportés, sous forme de fichier DXF imbriqué, prêts à être chargés dans la découpeuse laser.The Laser made short work of the letters in 3mm Perspex and I got the CNC machine centered on the block of wood with my 0.125” endmill loaded.
The cutting worked well and I soon had the completed text cut out of the wood…. however I learned then that an upcut Endmill performs very differently to a Downcut Endmill and found that around all of the edges the wood had frayed where it got torn.
A bit of clean up with a chisel saw to the worst of it and I Shellaced the final piece and left it to dry.
The Perspex letters were then pushed in to place, with a nice tight fit, and no glue required here!
Lessons Learned:
Know your wood types and the bits that work best for them. I found I wasted a good 20 minutes of cleanup just because I used an Upcut bit instead of a down cut bit.

Vectric Ltd
Precision House
2 Arden Road
Alcester
B49 6HN
Immatriculée en Angleterre sous le numéro 05382596
Immatriculation à la TVA GB115123072
Politique de confidentialité |
Politique relative aux cookies |
Termes et conditions



