
Here at Vectric HQ, we are always impressed by the projects made by our users. Doug Pinney’s tree picture frame project was one of his many projects that stood out to us on the Vectric Forum due to the impressive finish and details of the frame. For this month’s case study, we caught up with Doug and asked him about his background and how he got in to CNC…
I retired in 2009 from my contracting business. I was a design/build general contractor, designing and building commercial buildings. I still design buildings for a couple of contractors.
May of 2009, I finished my last project and flue to Alaska for three weeks. On the return trip my wife asked what I was going to do when we get home. I had no work lined up and she suggested that I retire. I agreed to that because my body was already telling me it had, had enough.
She then asked what I would do and suggested that I finish my woodshop, so I jumped all over that idea.
After about four years of woodworking, building furniture and other things, I started to look for a new challenge in woodworking. I started looking into CNC and talking to machine manufacturers.
I started with a Legacy Arty 58, then moved to a Legacy Maverick 3x5, I now have a Legacy Maverick 4x8 and a Legacy 2020 Maverick 4x8 with Auto Tool Change and Vacuum System coming.I started with Aspire V4.0, what a great program.
It’s been more than 7 years since Doug started with version 4 of Aspire, with all of this CNC experience under his belt it’s not difficult to see where Doug got his skills to create such amazing projects.
We wanted to hear more about why he decided to create the Tree Picture Frame…
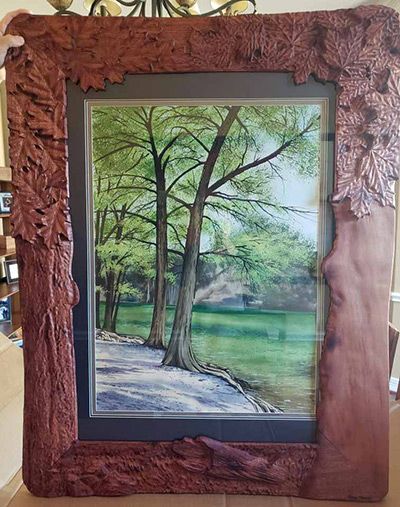
My daughter called me from Houston, TX, and asked if I would make a picture frame for a painting that Anna my granddaughter had purchased. She sent me a picture of the painting; it was of trees. Ann’s birthday was coming up in December. Once I saw the painting, I knew I had to create something special. My daughter also knew that it would not just be an ordinary picture frame. The painting is 26” x 36” and required a bold frame.
After coming up with the idea and getting the materials together Doug went to work planning and designing the wooden picture frame…I choose Mahogany for the wood, I happened to have enough 8/4 Mahogany in the shop that worked perfect.
I am capable of designing things in my head, which I did for several days before I sat down with Aspire.
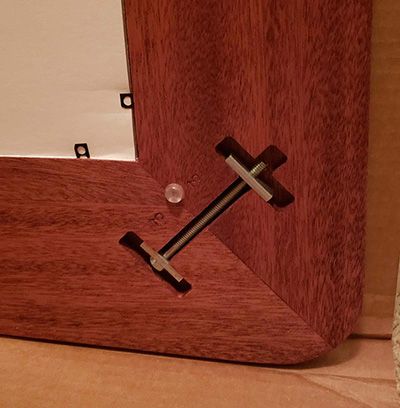
The big challenge was that I needed the ship the picture frame 1,000 miles. The frame was too big to ship assembled. I needed to figure out how I could ship the frame knocked down so Ann’s dad could assemble it easily on-site and keep the miter joints lined up and square.
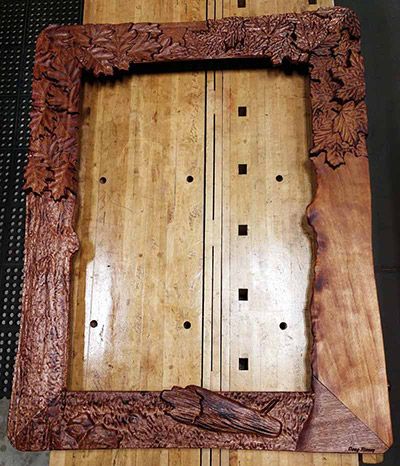
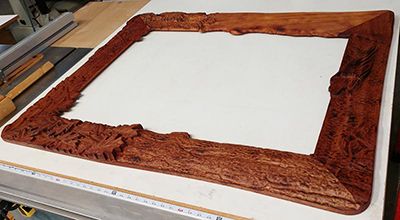
I came up with a design using Miter bolts (used to assemble countertops) to pull the corners together. Now I needed to keep the Miter joints square and aligned using dowels and splines. They were not practical so I decided on two small domino’s at each Miter joint which would lock the joint in place vertically and horizontally.I used Aspire V10’s 3D modeling tools to design the trees with the clipart provided within Aspire from Design&Make. The oak tree trunk I created with a two-rail sweep for the shape and I overlaid the bark texture. The maple tree trunk is a standard clipart image that I modified. The leaves I borrowed from other clipart. The grass is a standard texture. The grass needed something added to it, so I placed a dead tree trunk and some rocks.
The two-sided feature in Aspire was a great help in the design for the Miter bolt pockets, domino location and the painting location.
I machined the frame assembled (as one peace). Machined the back first using a 1” load strap around the perimeter and the domino’s to hold the frame assembly in place. Then inserted the Miter bolts after cutting the Miter bolt pockets and removed the load strap to machine the 3D front side of the frame.
Doug explained about the finishing and building of the project with some reflection…Le seul ponçage que j'ai effectué concernait les bords intérieurs et extérieurs du profil, et il a été entièrement réalisé à la main.
Pour la finition, j'ai utilisé un produit que je fabrique moi-même. Je l'appelle « 1-2-3 ». Il est composé d'une part d'huile de lin cuite, de deux parts de polyuréthane (à base d'huile) et de trois parts de white spirit. J'ai appliqué cinq couches. Le « 1-2-3 » fait ressortir le grain du bois. Il est facile à appliquer au pinceau et à essuyer avec un chiffon d'atelier.
Je suis très content du résultat ; je ne changerais rien si je devais refaire ce projet.
Nous avons ensuite demandé à Doug s'il avait des conseils à donner aux autres artisans.…
N'ayez pas peur d'essayer de nouvelles choses. J'adore les projets difficiles qui représentent un défi ; plus le défi est grand, mieux c'est.
Le travail acharné de Doug a clairement porté ses fruits, comme en témoignent ce projet et, espérons-le, bien d'autres à venir. Avant de le laisser partir, nous lui avons demandé quels étaient ses projets d'avenir.…
Je suis en train de concevoir la plaque commémorative de notre 57e anniversaire.Nous tenions à remercier chaleureusement Doug d'avoir pris le temps de nous parler de son projet, ce qui nous permettra d'inspirer notre communauté à tenter de nouvelles expériences. Si vous souhaitez nous soumettre une histoire, n'hésitez pas à nous contacter par courriel à l'adresse online@vectric.com. Nous serions ravis d'avoir de vos nouvelles.
Vectric Ltd
Precision House
2 Arden Road
Alcester
B49 6HN
Immatriculée en Angleterre sous le numéro 05382596
Immatriculation à la TVA GB115123072
Politique de confidentialité |
Politique relative aux cookies |
Termes et conditions


